
"2024 Approved Expert Guide to Progressive Volume Reduction with Logic Pro"
Expert Guide to Progressive Volume Reduction with Logic Pro
Apple’s Logic Pro fade out is quite a renowned audio editing feature set. Whether you should make the audio area seem to be inverted is one of the most often asked topics about how to fade on Logic Pro X. This screen reader-friendly lesson will take you through the three major methods you may add that classic fade out to a song you are working on if you are a blind Logic Pro user. These ways provide you complete control to use Logic Pro fade in. Learn more here.
The Logic Pro fade-out method, generally, in music production is used to gradually lower the level in a particular audio track, area, or song. It is one of the fundamental abilities any producer has to possess. In Logic Pro X, there are various methods to fade out a track. While you are free to utilize any of the many fade-out tools at your disposal, it is recommended to choose one based on your project, audio region, and MIDI region. Having trouble fading out in Logic Pro X? Go on reading!
- Method 1: Employ an Automation Tool
- Method 2: Employ the Fade-Out Tool
- Method 3: Utilize a File Editor
Part 1. Ways to Fade Audio with Logic Pro X
The tool may be used in your productions to help you conclude songs gradually and create more seamless transitions between different parts of your project. In Logic, there are several ways to create fades, but the two most popular methods are automation and the fade tool. The appropriate course of action will vary depending on several variables that we shall discuss later in this piece.

Method 1: Employ an Automation Tool
This technique is ideal for doing minor changes on a single audio sample. It will only function with an audio area, much as the fade tool. Make sure you adhere to the following procedures since this technique is excellent for streamlining your workflow: This is the method to use if you need to remove a song or area without bouncing.
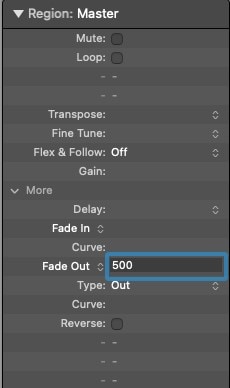
Step1 Locate the section Region Inspector on the left top side of your screen after choosing your preferred track. To enlarge it, if you haven’t already, click the arrow.
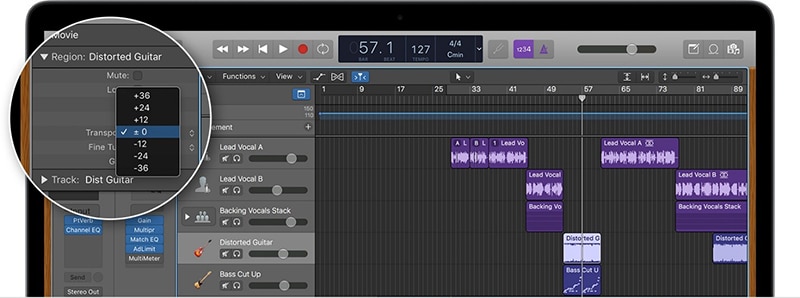
Step2 Enter the required value for your fade in the Fade Out section by clicking More and then finding it. If you’re uncertain, experiment with various figures until you find the ideal one.
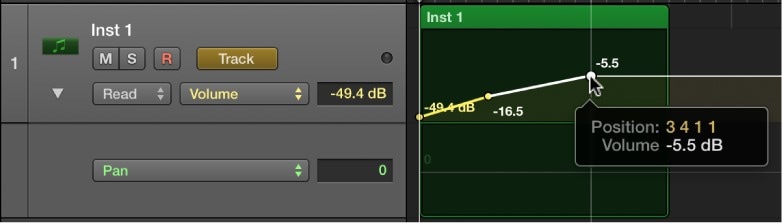
Step3 Create an automation curve on the produced fade using the Curve section if you’d like. For greater control, you may add a curve to your fading automation. To achieve this, choose the Automation Curve Tool by clicking on the Tool Selector at the top of the Arrangement View. Then, left-click and drag your automation point up or down between the points.

Method 2: Employ the Fade-Out Tool
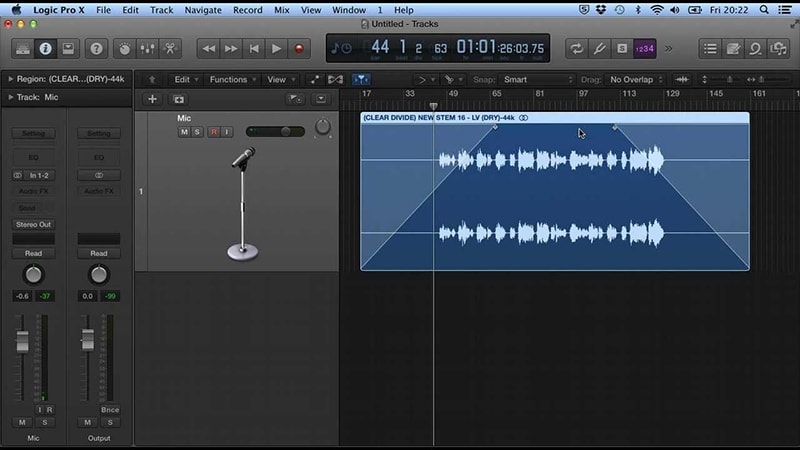
The fading-out process has additional option in Logic Pro. An audio track will fade out if the “Fade Out” slider is used. The audio will progressively fade away as a result. Then, to make an audio zone sound exactly like a “Crossfade-out” region, use the “Fade Out” slider. The fade tool offers an even simpler method for creating a fade out. However, keep in mind that this technique is limited to audio files and tracks. You’ll be able to see the cross-fade in action after you’ve applied it.
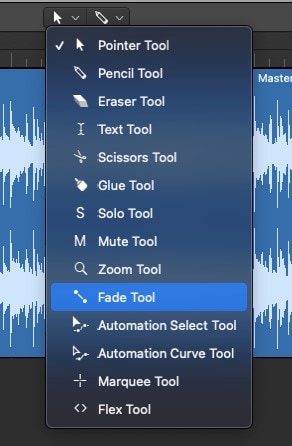
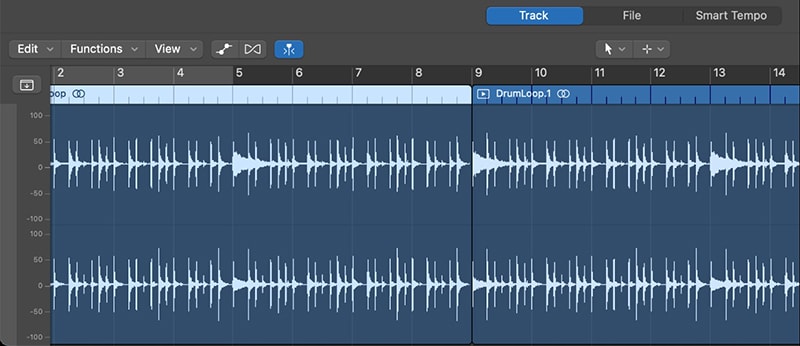
Step1 Navigate to the Tool Selector located at the Region View’s top. Select the Fade Tool by expanding it.
Step2 Select the fade tool, then left-click on the beginning point of your fading while still in the appropriate audio zone. Till the conclusion of your fade, drag the mouse.
Step3 The “Fade Out” option may also be used to manage how quickly an area fades out. You must first choose an area and then press the “Fade Out” slider to do this. A playhead may regulate a cross-fade depending on the genre of music. The choice is unaffected by this. However, you should utilize the “Fade In” slider if you’re employing an audio effect in a video.
 NeoDownloader - Fast and fully automatic image/video/music downloader.
Method 3: Utilize a File Editor
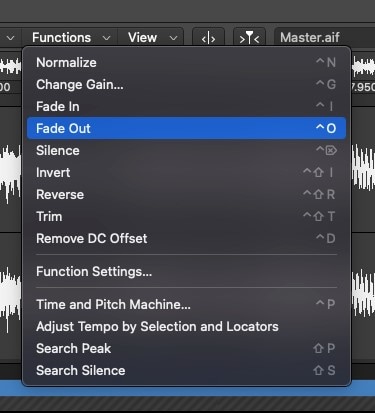
Using the File Editor to modify is another method for fading in Logic Pro X. This technique records audio data directly. If you’re manipulating a single audio sample or area without bouncing, this is helpful. Simply choose the “Fade Out” option from the track menu to alter an audio area. To adjust the fade-out area throughout this procedure, you will need to move the playhead back and forth.
Step1 Either hit the E key or click the icon of a button with a pair of scissors in the top left corner of your screen. Drag the start of your fade from where you want it to start on your waveform to where you want it to stop. Choose File from the menu.
Step2 To generate a seamless fade while dealing with audio, you must utilize the fade tool. You may use this to open and shut various audio zones. Use of the fade tool will make producing a smooth fade simpler. You may easily switch between various portions of the song by using the “Fade Out” button.
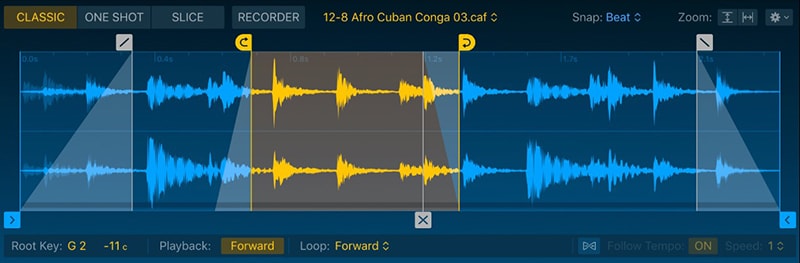
Step3 Additionally, you will always have the option to change the level, which is a terrific method to avoid having too much background noise in your music as shown here:
Part 2. Logic Pro X Alternative to Fade Audio
Logic Pro has long been the preferred choice for audio editors who can afford a Mac, but what if your whole workflow is dependent on Microsoft Windows? Logic Pro X isn’t now and won’t likely be anytime soon accessible for Windows. As a result, you must consider Logic Pro alternatives for Windows, and Filmora is among the top Logic Pro X replacements. It has one of the nicest user interfaces out there.
Regardless of the screen you are using, the scalable interface keeps your process moving. As a result, you may immediately download and install the software. You will be glad to see that multi-track recording capability is included if we go more into the list of features. On the other hand, you may get started with certain playback instruments or music production on your computer in a matter of minutes. The selection of effects that you may see in the software is much better. Having said that, improved noise reduction options would be excellent.
How to Fade Audio with Filmora
Free Download For Win 7 or later(64-bit)
Free Download For macOS 10.14 or later
Step1 Install Filmora and Import the Audio
You must first download and install this application on your computer before you can use it to crossfade audios. By accessing the official links, start by obtaining the most current version of this software. It’s now time to install it on your computer when you’ve completed that. Launch Filmora easily from your desktop or the search bar and launch it as follows to begin:

Then, you must import your files, which is easy with Filmora since you just need to do it once from your device as seen below. To import your music and video files, use the Import button from the software’s main screen as shown below:
Step2 Launch the Audio Editor in Filmora
You must drag the media files into the program’s timeline after importing them into Filmora. You may modify your media files using every tool in the timeline. To utilize Filmora’s audio editor, just right-click on the specific audio file and choose “Edit Audio” from the list:

Step3 Use the Audio Fade-in/Fade-out
The first step in this process is to learn how to use Filmora to start fading in and out your audio recordings. The best aspect of Filmora is how simple it is to employ these techniques from the timeline.
To achieve this, focus on the audio file that you want to change in the timeline; after you’ve picked it, the two icons will show up above the audio file. As demonstrated, drag the first one to the desired duration for the audio fade-in option. In Filmora, click the other symbol and drag it to the necessary length to finish the fade-out.

Step4 Export Your Fade Out Video
In the final touch, if you are content with the way your voice has evolved, now may be the ideal time to maintain it or even record it. There is support for all widely used video and audio formats, including MP3. Click “Export” and choose the appropriate file format from the Local menu as shown below to do this. The parameters as indicated below allow you to alter the ultimate location of the altered audio file:
Conclusion
Apple’s Logic Pro X is not compatible with Windows-based computers. Therefore, if you want the Logic Pro experience on Windows and Mac as well, you have Filmora as an alternate choice. Everything in the suite, including various effects and composition tools, is included. In conclusion, Filmora is highly feature-rich and enables you to carry out a range of activities, such as crossfading, composition, recording, editing, mixing, and posting to social media sites. Therefore, Filmora is your best option if you want to completely experience a DAW on Windows and Mac.
 ## Part 1\. Ways to Fade Audio with Logic Pro X
The tool may be used in your productions to help you conclude songs gradually and create more seamless transitions between different parts of your project. In Logic, there are several ways to create fades, but the two most popular methods are automation and the fade tool. The appropriate course of action will vary depending on several variables that we shall discuss later in this piece.
Method 1: Employ an Automation Tool
This technique is ideal for doing minor changes on a single audio sample. It will only function with an audio area, much as the fade tool. Make sure you adhere to the following procedures since this technique is excellent for streamlining your workflow: This is the method to use if you need to remove a song or area without bouncing.
Step1 Locate the section Region Inspector on the left top side of your screen after choosing your preferred track. To enlarge it, if you haven’t already, click the arrow.
 CollageIt Pro
Step2 Enter the required value for your fade in the Fade Out section by clicking More and then finding it. If you’re uncertain, experiment with various figures until you find the ideal one.
Step3 Create an automation curve on the produced fade using the Curve section if you’d like. For greater control, you may add a curve to your fading automation. To achieve this, choose the Automation Curve Tool by clicking on the Tool Selector at the top of the Arrangement View. Then, left-click and drag your automation point up or down between the points.
Method 2: Employ the Fade-Out Tool
The fading-out process has additional option in Logic Pro. An audio track will fade out if the “Fade Out” slider is used. The audio will progressively fade away as a result. Then, to make an audio zone sound exactly like a “Crossfade-out” region, use the “Fade Out” slider. The fade tool offers an even simpler method for creating a fade out. However, keep in mind that this technique is limited to audio files and tracks. You’ll be able to see the cross-fade in action after you’ve applied it.
Step1 Navigate to the Tool Selector located at the Region View’s top. Select the Fade Tool by expanding it.
 Easy and Safe Partition Software & Hard Disk Manager
Step2 Select the fade tool, then left-click on the beginning point of your fading while still in the appropriate audio zone. Till the conclusion of your fade, drag the mouse.

Step3 The “Fade Out” option may also be used to manage how quickly an area fades out. You must first choose an area and then press the “Fade Out” slider to do this. A playhead may regulate a cross-fade depending on the genre of music. The choice is unaffected by this. However, you should utilize the “Fade In” slider if you’re employing an audio effect in a video.
Method 3: Utilize a File Editor
Using the File Editor to modify is another method for fading in Logic Pro X. This technique records audio data directly. If you’re manipulating a single audio sample or area without bouncing, this is helpful. Simply choose the “Fade Out” option from the track menu to alter an audio area. To adjust the fade-out area throughout this procedure, you will need to move the playhead back and forth.
Step1 Either hit the E key or click the icon of a button with a pair of scissors in the top left corner of your screen. Drag the start of your fade from where you want it to start on your waveform to where you want it to stop. Choose File from the menu.
Step2 To generate a seamless fade while dealing with audio, you must utilize the fade tool. You may use this to open and shut various audio zones. Use of the fade tool will make producing a smooth fade simpler. You may easily switch between various portions of the song by using the “Fade Out” button.
Step3 Additionally, you will always have the option to change the level, which is a terrific method to avoid having too much background noise in your music as shown here:
Part 2. Logic Pro X Alternative to Fade Audio
Logic Pro has long been the preferred choice for audio editors who can afford a Mac, but what if your whole workflow is dependent on Microsoft Windows? Logic Pro X isn’t now and won’t likely be anytime soon accessible for Windows. As a result, you must consider Logic Pro alternatives for Windows, and Filmora is among the top Logic Pro X replacements. It has one of the nicest user interfaces out there.
Regardless of the screen you are using, the scalable interface keeps your process moving. As a result, you may immediately download and install the software. You will be glad to see that multi-track recording capability is included if we go more into the list of features. On the other hand, you may get started with certain playback instruments or music production on your computer in a matter of minutes. The selection of effects that you may see in the software is much better. Having said that, improved noise reduction options would be excellent.
How to Fade Audio with Filmora
Free Download For Win 7 or later(64-bit)
Free Download For macOS 10.14 or later
Step1 Install Filmora and Import the Audio
You must first download and install this application on your computer before you can use it to crossfade audios. By accessing the official links, start by obtaining the most current version of this software. It’s now time to install it on your computer when you’ve completed that. Launch Filmora easily from your desktop or the search bar and launch it as follows to begin:
Then, you must import your files, which is easy with Filmora since you just need to do it once from your device as seen below. To import your music and video files, use the Import button from the software’s main screen as shown below:
Step2 Launch the Audio Editor in Filmora
You must drag the media files into the program’s timeline after importing them into Filmora. You may modify your media files using every tool in the timeline. To utilize Filmora’s audio editor, just right-click on the specific audio file and choose “Edit Audio” from the list:
 SwifDoo PDF Perpetual (1 PC) Free upgrade. No monthly fees ever.
Step3 Use the Audio Fade-in/Fade-out
The first step in this process is to learn how to use Filmora to start fading in and out your audio recordings. The best aspect of Filmora is how simple it is to employ these techniques from the timeline.
To achieve this, focus on the audio file that you want to change in the timeline; after you’ve picked it, the two icons will show up above the audio file. As demonstrated, drag the first one to the desired duration for the audio fade-in option. In Filmora, click the other symbol and drag it to the necessary length to finish the fade-out.
 Power Tools add-on for Google Sheets, Lifetime subscription
Step4 Export Your Fade Out Video
In the final touch, if you are content with the way your voice has evolved, now may be the ideal time to maintain it or even record it. There is support for all widely used video and audio formats, including MP3. Click “Export” and choose the appropriate file format from the Local menu as shown below to do this. The parameters as indicated below allow you to alter the ultimate location of the altered audio file:
Conclusion
Apple’s Logic Pro X is not compatible with Windows-based computers. Therefore, if you want the Logic Pro experience on Windows and Mac as well, you have Filmora as an alternate choice. Everything in the suite, including various effects and composition tools, is included. In conclusion, Filmora is highly feature-rich and enables you to carry out a range of activities, such as crossfading, composition, recording, editing, mixing, and posting to social media sites. Therefore, Filmora is your best option if you want to completely experience a DAW on Windows and Mac.
- Title: 2024 Approved Expert Guide to Progressive Volume Reduction with Logic Pro
- Author: Jeffrey
- Created at : 2024-08-21 07:49:16
- Updated at : 2024-08-22 07:49:16
- Link: https://some-knowledge.techidaily.com/2024-approved-expert-guide-to-progressive-volume-reduction-with-logic-pro/
- License: This work is licensed under CC BY-NC-SA 4.0.