
"2024 Approved Expert Techniques in Creating Timelapses on Black Hero5"
Expert Techniques in Creating Timelapses on Black Hero5
How to Shoot a Time-lapse Video with GoPro Hero5 Black


Max Wales
Mar 27, 2024• Proven solutions
These days more and more travel photographers are resorting to time lapse videos instead of the regular ones. No matter if you want to shoot nature, urban life, beaches, clouds or sunrise, compacting a couple of hours of footage into a few minutes can be rather powerful visual narrative.
A time lapse video is basically a sequence of photos which have been shot at an interval and then player with a much faster speed. The time interval in which the photos have been shot could vary from a few seconds to a few minutes depending on the duration of the video you want to create. This is substantially different from a regular video where the photos are recorded in quick succession by the camera and then stringed together in real time. Time lapses can be a very handy tool for recording scenes which occur over a considerable period of time (for eg. Sunset, sunrise, eclipses, budding of flowers, clouds etc).
Are you an amateur travel photographer who has recently bought a GoPro cam and wondering which the best setting for time lapse photography is? Are you still not certain about which editing software to use for editing your GoPro time lapses? In this post we will discuss how to shoot a time lapse video with GoPro Hero 5 and how to edit the video with Filmora.
- Part 1:Shooting a time lapse video with GoPro Hero5
- Part 2: Making time lapse videos with Wondershare Filmora
Part 1: Shooting a time lapse video with GoPro Hero5
1. The best time lapse settings in GoPro:
Selecting the right setting is the most difficult part about shooting a GoPro time lapse. Here is what you need to do:
- At first, you need to set the right interval of shooting
- Next, you need to choose the optimal resolution
- Then, you have to select the exact playback rate
- Lastly, you need to decide on the length of your video.
Below parameters are the best time-lapse intervals for the GoPro Hero5 Black:
- 0.5s for up-close shooting birds, insects and other small moving things;
- 1.0s for filming in urban areas like flowing traffic, people, buses etc;
- 2.0s for shooting clouds as well as touristy areas;
- 5.0s for filming sunset, sunrise and normal moving clouds;
- 10s for shooting moving clouds and construction videos
- 30s for taking shots of shadows, drying puddles, thunderstorms etc.;
- 60s for blooming flowers, growing plants or any other long term process.
Choose 12 MP as the resolution and use 30 frames per second for your videos, which is the ideal settings for getting the most fluid-looking and realistic time-lapses. Now you need to decide on how long you want to shoot. While shooting at an interval of 60 seconds, you would have to place your camera on the location for quite some time, so as to get a time-lapse of considerable duration. If you shoot for 10 minutes with 1s interval, then you will be getting about 20 seconds of time lapse footage which is surely enough for creating a quick montage.
2. Tips before your shoot
First, you need to look for the right location. Make the most out of the rule of thirds and always ensure that you have a focal point of your time lapse footage. While shooting a crowded street try to position your camera at a vantage point from where you can capture the movement of the people and even that of the clouds.
Make use of good tripod, a fast and spacious SD card, a suction mount and always keep an extra battery. Gorilla Pod with its 3 in 1 mount is probably the best tripod for action cams. A longer cord can be of great help in situations where you have a power source. This would allow you to shoot hours and hours of footage on your GoPro.
3. Steps for making your time lapse video
- Switch on your GoPro Hero5
- Tap the shooting mode icon at the bottom of the left
- Tap the time lapse icon located on the right of the screen and choose time lapse video
- Select your settings by going to Res, FOV and Interval
- Tap on the screen to make the settings disappear
- Press the record button to shoot
- Now download your recorded video by connecting your camera or by using an SD card reader.
Learn complete review of GoPro Hero5 Black
Making time lapse videos with Wondershare Filmora
Wondershare Filmora is a powerful and easy to use software with which you can edit your time lapse videos. The Filmora action cam version is going to make your job a lot more easy. It comes with 2 new tools-
The Action Cam Tool- this has the capacity of correcting lens distortion and can also perform other important tasks like video stabilization, color correction, speed control, audio de-noise and much more.
The Instant cutter tool on the other hand can be used for trimming and merging videos quickly and easily without damaging its quality. It supports many video formats like encoded MP4, MTS and mov video which have been shot on phones, HD cameras and Action cams.
 /a>
/a> Download Mac Version ](https://tools.techidaily.com/wondershare/filmora/download/ )
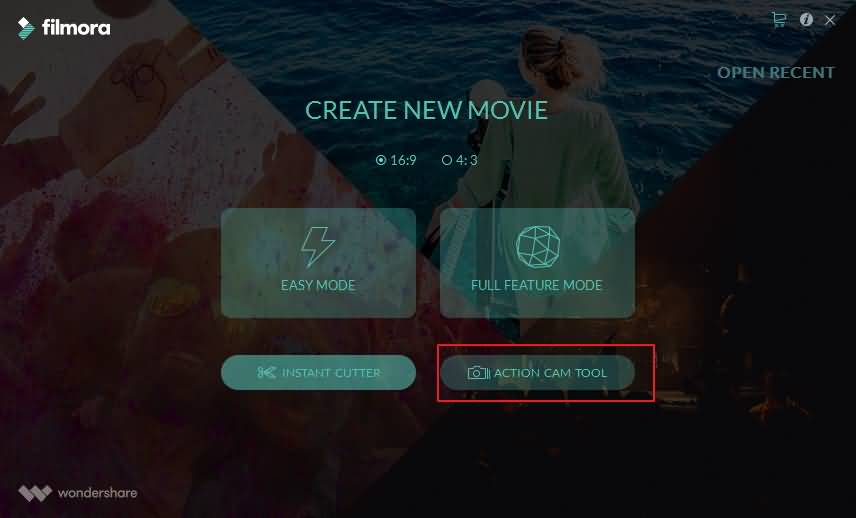
- First, launch the Filmora app and then choose the ‘action cam tool’
- Next, you need to click the ‘Import’ button or the ‘ Import an Action cam video’ button, so as to import your recorded video to Wondershare Filmora.
- Now go to the Speed tab and bring the Playhead to the exact position where the speed effect is to be applied.
- Click the Add Marker button. Click the speed marker and drag it onto either side of your timeline so as to choose a number of clips on your timeline.
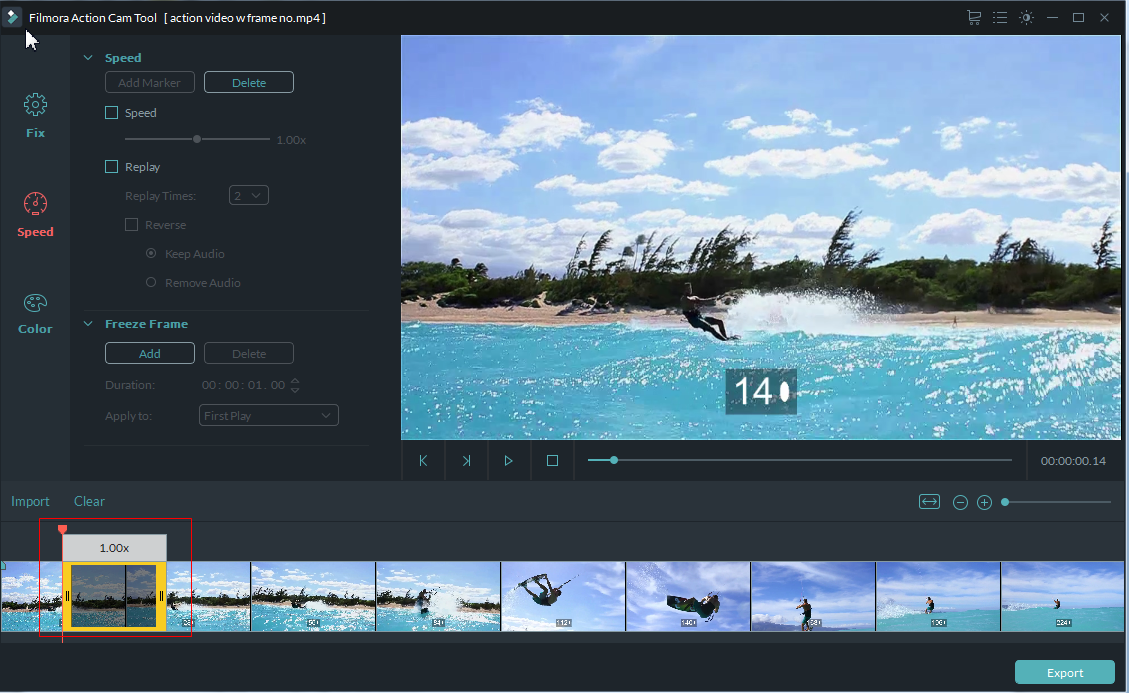
- The speed settings can be adjusted by clicking on the checkbox marked Speed. The speed slider can be moved forward to make it faster up to 20x for the time lapse effect.
- Export your time lapse video to Full Features Mode to edit further, such as adding various filters, overlay and effects. Currently, there are more than 300 Effects, and there is an ACTION CAM WINTER SET available now. Check More
Learn more detailed information about how to make a time lapse video in Filmora Full Feature Mode
Max Wales
Max Wales is a writer and a lover of all things video.
Follow @Max Wales
Max Wales
Mar 27, 2024• Proven solutions
These days more and more travel photographers are resorting to time lapse videos instead of the regular ones. No matter if you want to shoot nature, urban life, beaches, clouds or sunrise, compacting a couple of hours of footage into a few minutes can be rather powerful visual narrative.
A time lapse video is basically a sequence of photos which have been shot at an interval and then player with a much faster speed. The time interval in which the photos have been shot could vary from a few seconds to a few minutes depending on the duration of the video you want to create. This is substantially different from a regular video where the photos are recorded in quick succession by the camera and then stringed together in real time. Time lapses can be a very handy tool for recording scenes which occur over a considerable period of time (for eg. Sunset, sunrise, eclipses, budding of flowers, clouds etc).
Are you an amateur travel photographer who has recently bought a GoPro cam and wondering which the best setting for time lapse photography is? Are you still not certain about which editing software to use for editing your GoPro time lapses? In this post we will discuss how to shoot a time lapse video with GoPro Hero 5 and how to edit the video with Filmora.
- Part 1:Shooting a time lapse video with GoPro Hero5
- Part 2: Making time lapse videos with Wondershare Filmora
Part 1: Shooting a time lapse video with GoPro Hero5
1. The best time lapse settings in GoPro:
Selecting the right setting is the most difficult part about shooting a GoPro time lapse. Here is what you need to do:
- At first, you need to set the right interval of shooting
- Next, you need to choose the optimal resolution
- Then, you have to select the exact playback rate
- Lastly, you need to decide on the length of your video.
Below parameters are the best time-lapse intervals for the GoPro Hero5 Black:
- 0.5s for up-close shooting birds, insects and other small moving things;
- 1.0s for filming in urban areas like flowing traffic, people, buses etc;
- 2.0s for shooting clouds as well as touristy areas;
- 5.0s for filming sunset, sunrise and normal moving clouds;
- 10s for shooting moving clouds and construction videos
- 30s for taking shots of shadows, drying puddles, thunderstorms etc.;
- 60s for blooming flowers, growing plants or any other long term process.
Choose 12 MP as the resolution and use 30 frames per second for your videos, which is the ideal settings for getting the most fluid-looking and realistic time-lapses. Now you need to decide on how long you want to shoot. While shooting at an interval of 60 seconds, you would have to place your camera on the location for quite some time, so as to get a time-lapse of considerable duration. If you shoot for 10 minutes with 1s interval, then you will be getting about 20 seconds of time lapse footage which is surely enough for creating a quick montage.
2. Tips before your shoot
First, you need to look for the right location. Make the most out of the rule of thirds and always ensure that you have a focal point of your time lapse footage. While shooting a crowded street try to position your camera at a vantage point from where you can capture the movement of the people and even that of the clouds.
Make use of good tripod, a fast and spacious SD card, a suction mount and always keep an extra battery. Gorilla Pod with its 3 in 1 mount is probably the best tripod for action cams. A longer cord can be of great help in situations where you have a power source. This would allow you to shoot hours and hours of footage on your GoPro.
3. Steps for making your time lapse video
- Switch on your GoPro Hero5
- Tap the shooting mode icon at the bottom of the left
- Tap the time lapse icon located on the right of the screen and choose time lapse video
- Select your settings by going to Res, FOV and Interval
- Tap on the screen to make the settings disappear
- Press the record button to shoot
- Now download your recorded video by connecting your camera or by using an SD card reader.
Learn complete review of GoPro Hero5 Black
Making time lapse videos with Wondershare Filmora
Wondershare Filmora is a powerful and easy to use software with which you can edit your time lapse videos. The Filmora action cam version is going to make your job a lot more easy. It comes with 2 new tools-
The Action Cam Tool- this has the capacity of correcting lens distortion and can also perform other important tasks like video stabilization, color correction, speed control, audio de-noise and much more.
The Instant cutter tool on the other hand can be used for trimming and merging videos quickly and easily without damaging its quality. It supports many video formats like encoded MP4, MTS and mov video which have been shot on phones, HD cameras and Action cams.

Download Mac Version ](https://tools.techidaily.com/wondershare/filmora/download/ )
- First, launch the Filmora app and then choose the ‘action cam tool’
- Next, you need to click the ‘Import’ button or the ‘ Import an Action cam video’ button, so as to import your recorded video to Wondershare Filmora.
- Now go to the Speed tab and bring the Playhead to the exact position where the speed effect is to be applied.
- Click the Add Marker button. Click the speed marker and drag it onto either side of your timeline so as to choose a number of clips on your timeline.

WPS Office Premium ( File Recovery, Photo Scanning, Convert PDF)–Yearly
- The speed settings can be adjusted by clicking on the checkbox marked Speed. The speed slider can be moved forward to make it faster up to 20x for the time lapse effect.
- Export your time lapse video to Full Features Mode to edit further, such as adding various filters, overlay and effects. Currently, there are more than 300 Effects, and there is an ACTION CAM WINTER SET available now. Check More
Learn more detailed information about how to make a time lapse video in Filmora Full Feature Mode
Max Wales
Max Wales is a writer and a lover of all things video.
Follow @Max Wales
Max Wales
Mar 27, 2024• Proven solutions
These days more and more travel photographers are resorting to time lapse videos instead of the regular ones. No matter if you want to shoot nature, urban life, beaches, clouds or sunrise, compacting a couple of hours of footage into a few minutes can be rather powerful visual narrative.
A time lapse video is basically a sequence of photos which have been shot at an interval and then player with a much faster speed. The time interval in which the photos have been shot could vary from a few seconds to a few minutes depending on the duration of the video you want to create. This is substantially different from a regular video where the photos are recorded in quick succession by the camera and then stringed together in real time. Time lapses can be a very handy tool for recording scenes which occur over a considerable period of time (for eg. Sunset, sunrise, eclipses, budding of flowers, clouds etc).
Are you an amateur travel photographer who has recently bought a GoPro cam and wondering which the best setting for time lapse photography is? Are you still not certain about which editing software to use for editing your GoPro time lapses? In this post we will discuss how to shoot a time lapse video with GoPro Hero 5 and how to edit the video with Filmora.
- Part 1:Shooting a time lapse video with GoPro Hero5
- Part 2: Making time lapse videos with Wondershare Filmora
Part 1: Shooting a time lapse video with GoPro Hero5
1. The best time lapse settings in GoPro:
Selecting the right setting is the most difficult part about shooting a GoPro time lapse. Here is what you need to do:
- At first, you need to set the right interval of shooting
- Next, you need to choose the optimal resolution
- Then, you have to select the exact playback rate
- Lastly, you need to decide on the length of your video.
Below parameters are the best time-lapse intervals for the GoPro Hero5 Black:
- 0.5s for up-close shooting birds, insects and other small moving things;
- 1.0s for filming in urban areas like flowing traffic, people, buses etc;
- 2.0s for shooting clouds as well as touristy areas;
- 5.0s for filming sunset, sunrise and normal moving clouds;
- 10s for shooting moving clouds and construction videos
- 30s for taking shots of shadows, drying puddles, thunderstorms etc.;
- 60s for blooming flowers, growing plants or any other long term process.
Choose 12 MP as the resolution and use 30 frames per second for your videos, which is the ideal settings for getting the most fluid-looking and realistic time-lapses. Now you need to decide on how long you want to shoot. While shooting at an interval of 60 seconds, you would have to place your camera on the location for quite some time, so as to get a time-lapse of considerable duration. If you shoot for 10 minutes with 1s interval, then you will be getting about 20 seconds of time lapse footage which is surely enough for creating a quick montage.
2. Tips before your shoot
First, you need to look for the right location. Make the most out of the rule of thirds and always ensure that you have a focal point of your time lapse footage. While shooting a crowded street try to position your camera at a vantage point from where you can capture the movement of the people and even that of the clouds.
Make use of good tripod, a fast and spacious SD card, a suction mount and always keep an extra battery. Gorilla Pod with its 3 in 1 mount is probably the best tripod for action cams. A longer cord can be of great help in situations where you have a power source. This would allow you to shoot hours and hours of footage on your GoPro.
3. Steps for making your time lapse video
- Switch on your GoPro Hero5
- Tap the shooting mode icon at the bottom of the left
- Tap the time lapse icon located on the right of the screen and choose time lapse video
- Select your settings by going to Res, FOV and Interval
- Tap on the screen to make the settings disappear
- Press the record button to shoot
- Now download your recorded video by connecting your camera or by using an SD card reader.
Learn complete review of GoPro Hero5 Black
Making time lapse videos with Wondershare Filmora
Wondershare Filmora is a powerful and easy to use software with which you can edit your time lapse videos. The Filmora action cam version is going to make your job a lot more easy. It comes with 2 new tools-
The Action Cam Tool- this has the capacity of correcting lens distortion and can also perform other important tasks like video stabilization, color correction, speed control, audio de-noise and much more.
The Instant cutter tool on the other hand can be used for trimming and merging videos quickly and easily without damaging its quality. It supports many video formats like encoded MP4, MTS and mov video which have been shot on phones, HD cameras and Action cams.
Download Mac Version ](https://tools.techidaily.com/wondershare/filmora/download/ )
- First, launch the Filmora app and then choose the ‘action cam tool’
- Next, you need to click the ‘Import’ button or the ‘ Import an Action cam video’ button, so as to import your recorded video to Wondershare Filmora.

- Now go to the Speed tab and bring the Playhead to the exact position where the speed effect is to be applied.
- Click the Add Marker button. Click the speed marker and drag it onto either side of your timeline so as to choose a number of clips on your timeline.
- The speed settings can be adjusted by clicking on the checkbox marked Speed. The speed slider can be moved forward to make it faster up to 20x for the time lapse effect.
- Export your time lapse video to Full Features Mode to edit further, such as adding various filters, overlay and effects. Currently, there are more than 300 Effects, and there is an ACTION CAM WINTER SET available now. Check More
Learn more detailed information about how to make a time lapse video in Filmora Full Feature Mode
 dotConnect for Oracle is an ADO.NET data provider for Oracle with Entity Framework Support.
Max Wales
Max Wales is a writer and a lover of all things video.
Follow @Max Wales
Max Wales
Mar 27, 2024• Proven solutions
These days more and more travel photographers are resorting to time lapse videos instead of the regular ones. No matter if you want to shoot nature, urban life, beaches, clouds or sunrise, compacting a couple of hours of footage into a few minutes can be rather powerful visual narrative.
A time lapse video is basically a sequence of photos which have been shot at an interval and then player with a much faster speed. The time interval in which the photos have been shot could vary from a few seconds to a few minutes depending on the duration of the video you want to create. This is substantially different from a regular video where the photos are recorded in quick succession by the camera and then stringed together in real time. Time lapses can be a very handy tool for recording scenes which occur over a considerable period of time (for eg. Sunset, sunrise, eclipses, budding of flowers, clouds etc).
Are you an amateur travel photographer who has recently bought a GoPro cam and wondering which the best setting for time lapse photography is? Are you still not certain about which editing software to use for editing your GoPro time lapses? In this post we will discuss how to shoot a time lapse video with GoPro Hero 5 and how to edit the video with Filmora.
- Part 1:Shooting a time lapse video with GoPro Hero5
- Part 2: Making time lapse videos with Wondershare Filmora
Part 1: Shooting a time lapse video with GoPro Hero5
1. The best time lapse settings in GoPro:
Selecting the right setting is the most difficult part about shooting a GoPro time lapse. Here is what you need to do:
- At first, you need to set the right interval of shooting
- Next, you need to choose the optimal resolution
- Then, you have to select the exact playback rate
- Lastly, you need to decide on the length of your video.
Below parameters are the best time-lapse intervals for the GoPro Hero5 Black:
- 0.5s for up-close shooting birds, insects and other small moving things;
- 1.0s for filming in urban areas like flowing traffic, people, buses etc;
- 2.0s for shooting clouds as well as touristy areas;
- 5.0s for filming sunset, sunrise and normal moving clouds;
- 10s for shooting moving clouds and construction videos
- 30s for taking shots of shadows, drying puddles, thunderstorms etc.;
- 60s for blooming flowers, growing plants or any other long term process.
Choose 12 MP as the resolution and use 30 frames per second for your videos, which is the ideal settings for getting the most fluid-looking and realistic time-lapses. Now you need to decide on how long you want to shoot. While shooting at an interval of 60 seconds, you would have to place your camera on the location for quite some time, so as to get a time-lapse of considerable duration. If you shoot for 10 minutes with 1s interval, then you will be getting about 20 seconds of time lapse footage which is surely enough for creating a quick montage.
2. Tips before your shoot
First, you need to look for the right location. Make the most out of the rule of thirds and always ensure that you have a focal point of your time lapse footage. While shooting a crowded street try to position your camera at a vantage point from where you can capture the movement of the people and even that of the clouds.
Make use of good tripod, a fast and spacious SD card, a suction mount and always keep an extra battery. Gorilla Pod with its 3 in 1 mount is probably the best tripod for action cams. A longer cord can be of great help in situations where you have a power source. This would allow you to shoot hours and hours of footage on your GoPro.
3. Steps for making your time lapse video
- Switch on your GoPro Hero5
- Tap the shooting mode icon at the bottom of the left
- Tap the time lapse icon located on the right of the screen and choose time lapse video
- Select your settings by going to Res, FOV and Interval
- Tap on the screen to make the settings disappear
- Press the record button to shoot
- Now download your recorded video by connecting your camera or by using an SD card reader.
Learn complete review of GoPro Hero5 Black
Making time lapse videos with Wondershare Filmora
Wondershare Filmora is a powerful and easy to use software with which you can edit your time lapse videos. The Filmora action cam version is going to make your job a lot more easy. It comes with 2 new tools-
The Action Cam Tool- this has the capacity of correcting lens distortion and can also perform other important tasks like video stabilization, color correction, speed control, audio de-noise and much more.
The Instant cutter tool on the other hand can be used for trimming and merging videos quickly and easily without damaging its quality. It supports many video formats like encoded MP4, MTS and mov video which have been shot on phones, HD cameras and Action cams.

Download Mac Version ](https://tools.techidaily.com/wondershare/filmora/download/ )
- First, launch the Filmora app and then choose the ‘action cam tool’
- Next, you need to click the ‘Import’ button or the ‘ Import an Action cam video’ button, so as to import your recorded video to Wondershare Filmora.
- Now go to the Speed tab and bring the Playhead to the exact position where the speed effect is to be applied.
- Click the Add Marker button. Click the speed marker and drag it onto either side of your timeline so as to choose a number of clips on your timeline.
- The speed settings can be adjusted by clicking on the checkbox marked Speed. The speed slider can be moved forward to make it faster up to 20x for the time lapse effect.
- Export your time lapse video to Full Features Mode to edit further, such as adding various filters, overlay and effects. Currently, there are more than 300 Effects, and there is an ACTION CAM WINTER SET available now. Check More
Learn more detailed information about how to make a time lapse video in Filmora Full Feature Mode
Max Wales
Max Wales is a writer and a lover of all things video.
Follow @Max Wales
- Title: 2024 Approved Expert Techniques in Creating Timelapses on Black Hero5
- Author: Jeffrey
- Created at : 2024-08-21 13:26:05
- Updated at : 2024-08-22 13:26:05
- Link: https://some-knowledge.techidaily.com/2024-approved-expert-techniques-in-creating-timelapses-on-black-hero5/
- License: This work is licensed under CC BY-NC-SA 4.0.