
"2024 Approved From Novice to Expert A Guide for Effective Single-Stream Livestreams"
From Novice to Expert: A Guide for Effective Single-Stream Livestreams
Live streaming has become the recent trend among content creators as study shows that people engage more in live streams than written posts and regular video uploads. However, pulling off a successful live stream is quite challenging. You will have to get your script correct at the go, there are audio problems, and network issues are not ruled out. Where it all gets messed up is that you can’t edit if you make mistakes or an issue can slightly disrupt your stream. So, you have to be extra careful to do it successfully.
Fortunately, with the OneStream live streaming tool, you may not need to worry much because you can successfully and efficiently live stream a pre-recorded video. So, after recording your video and editing it to your taste, you can use OneStream to stream it as a live video to any social platform.

Part 1. What is OneStream Live?
OneStream Live is a cloud-based live streaming tool that allows you to stream your pre-recorded videos as live videos over any external website. You can simultaneously live stream to over 40 social networks, including Facebook, YouTube, Twitch, Instagram, etc. You can also go live (not pre-recorded video) using OneStream.
You also don’t have to worry about the requirements of the social platform you are streaming to. OneStream will take care of everything.
Price: Although there is a free trial, you must subscribe to a plan to enjoy most of the exciting features of OneStream because the free version comes with minimal features.
- Free Plan - $0/month (5min max and one social account option). You can use this to explore the tool a little bit before making a financial commitment.
- Basic Plan - $10/month. 15 mins max & 3 social accounts
- Standard Plan - $45/month. 60 mins max & 25 social accounts
- Professional Plan - $99/month. 8hrs max & 50 social accounts
Part 2. Key features of OneStream Live
Multi-streaming to different social platforms: You can use it to live to stream your recorded videos or real-time stream to over 40 social media at the same time. It also supports multi-stream real-time live in combination with popular live streaming tools like Zoom, OBS, Wirecast, etc.
Embed Player: with OneStream, you can live stream on your external website. You have to embed your live stream on your website.
Live Spaces: if you don’t have a webpage, you don’t need to worry because OneStream has covered you. The live space feature allows you to create your webpage with a few clicks.
Schedule Streaming: This tool allows you to schedule what time your pre-recorded video will live stream to your audience. So, if you are not going to be available at the time your want to live stream, you can schedule your video to live stream by itself when that time comes. Live streams can be scheduled up to 60 days in advance.
Live Stream Playlist: so basically, this feature allows you to Queue up your scheduled pre-recorded videos in the desired order you want them you go live.
Caption: You can add a caption to your pre-recorded live stream through SRT files.
Brand Your Streams: You can add customized logos, watermarks, and thumbnails to personalize your streams. This feature will come in handy if you have a brand you want to build.
Your Stream Analytics: With OneStream, you can see how your audience interacts with your streams. It is crucial to know how well your streams are doing. You can view all your social platform analytics on your OneStream dashboard.
180- and 360-Degrees Video Support: OneStream streaming tool allows you to go live with 360- and 180-degrees videos.

Part 3. How to live stream with Online OneStream
Live streaming with OneStream is pretty straightforward. I will walk you through a series of steps you can follow to live stream using OneStream successfully.
Step1 First, head to OneStream live website and create an account. Just input a username, password, and email address. After that, you need to choose a plan. OneStream offers 4 plans, as I have mentioned above. Just go through the plan features and choose the one that best suits you.
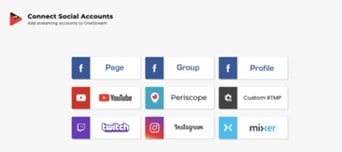
Step2 After you have successfully picked a plan, on the dashboard, you will see 40 top social platforms, and you will be requested to add your social accounts. If you can’t see the social platform you want to live stream to, you can use custom RTMP to stream it. Except for Instagram, you can connect all of your social accounts directly.
To connect your Instagram account, you must utilize a third-party software called Instafeed. Instead, it will construct your Instagram account’s Sync URL. Once the URL is generated, please copy and paste it into the OneStream Sync URL section. It will successfully connect your Instagram account to OneStream.
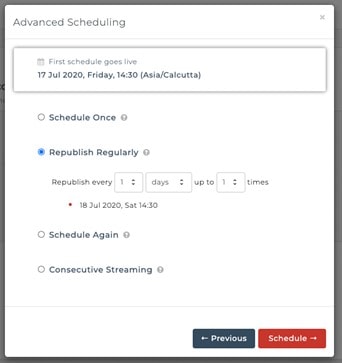
Step3 To schedule your live stream on the dashboard, click the “three-line” button. You will see the schedule button there in the interface. Click it, and a window will appear. You can set the time zone, time, and date you want your stream to go live.
Step4 To go live, click on the “new stream” button at the top of your dashboard. You can choose to go live with a recorded video on your device or cloud storage next. Oro select videos from previous video uploads. Click on “Third-party RTMP source” if you want to use OBS, Zoom, etc., to stream via OneStream.

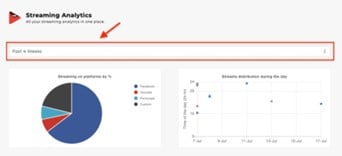
Step5 To see how your live streams are doing, click the “three-line” button on your dashboard and the “Streaming Analytics” tab. A window will open, showing you the analytics of your live streams.
 Allavsoft Batch Download Online Videos, Music Offline to MP4, MP3, MOV, etc format
Part 4. Advantages and Disadvantages of Using OneStream to Live Stream
Pros
- Easy to use Interface: You can effortlessly walk through the OneStream live streaming process without having professional knowledge of live streaming.
- Multi-Streaming to Lots of Social Platforms: With OneStream, you can simultaneously go live on over 40 social platforms.
- Live Stream Playlist: You can create a playlist for your pre-recorded videos in the order you want them to go live.
- Cloud Storage Integration: OneStream allows you to import pre-recorded videos for streaming from your Google Drive, Dropbox, OneDrive, Box, S3, and cloud and stream them directly. With this feature, you can save up your internet bandwidth. There is also no limit to the videos you can upload from cloud storage services.
- No Installation: OneStream allows you to import pre-recorded videos for streaming from your Google Drive, Dropbox, OneDrive, Box, S3, and cloud and stream them directly. With this feature, you can save up your internet bandwidth. There is also no limit to the videos you can upload from cloud storage services.
- Free Trial: There is a 0$ plan that allows you to test the waters and see if you can swim well in them. You will be able to experience first-hand how OneStream works before making any financial commitment.
- Robust Customer Support: OneStream customer support is top-notch. The oneStream support team is always available to attend to any issue you encounter while using the tool. They usually answer queries in under 30 minutes.
Cons
- Real-time streaming still needs improvement: With more focus on streaming pre-recorded video, it is understandable that OneStream may lack a little in its real-time streaming. Fortunately, there have been improvements, and the company promises more future improvements.
- No Refund on subscription: You can’t get your subscription money back if you decide not to use OneStream again.
- Free trial has limited features: OneStream free plan has very limited features. It is quite understandable since the plan is for you to test the tool.

Part 5. What about OneStream Mobile App
The OneStream mobile app version also has professional streaming features just like the Cloud-based version. Let’s have a look at some of its features.
Features:
- Use the mobile camera to go live on multiple platforms
- Simulcasting and Multicasting
- Live video looping
- Schedule streaming
- Cloud storage integration
- 360 degrees video support
Part 6. How to Stream with OneStream app on mobile?
Streaming on mobile using OneStream is quite easy, and the steps are not much different from streaming with a desktop.
Step1 Prepare the necessary equipment
You may need an external mic because your mobile phone’s in-built microphone might not give you your desired audio quality. And extra lighting is indispensable. You can get small light equipment to clip to your mobile device. Make sure you put your mobile phone on a stable surface to avoid shaky videos. You can get a small tripod to serve this purpose.
Step2 Just go live with OneStream
Once everything is set, you can open your OneStream app and follow the steps I showed you above in Part 3 (How to live stream with online OneStream).
Bonus Tips: How to record you stream videos easily?
If you want to record your live streams or how your audience interacts with your streams, using Filmora is the best way.
Filmora is a video editor and screen recorder with fantastic editing and recording features. It can help you create professional videos and screen records. Being beginners friendly, Filmora can record your screen with high video and audio quality. It also boasts editing features like filters, overlays, animated elements, 4k editing supports, noise removal, video stabilization, and audio equalizer, among others. With these features, you can record your streams with high quality successfully.
A step-by-step guide to successful recording with Filmora
Step1 Download and install the Filmora software on your computer. After that, open it and click on create a new project.
Step2 After installing, you can directly click on the “PC Screen” in the panel.


Step3 A window will come up where you can customize the settings of your recordings then. Choose the area of your screen you want to record, the video quality, your audio source, and also if you want to record your webcam alongside your screen, etc.
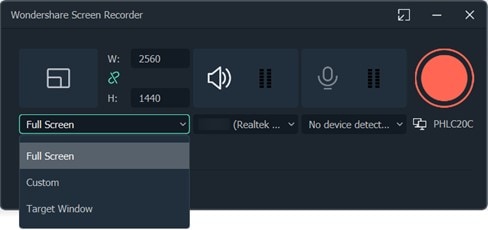
Step4 After you finish customizing the settings you can click the red button on the window’s page. Your screen will start recording after the countdown. The video file will save to the Filmora screen capture folder. You can also edit the video with the software editing tools.
Conclusion
OneStream has made multi-streaming easy with its multi-streaming feature. You can live stream or schedule recorded video streams to more than 40 social media platforms at the same time. Coupled with other streaming platforms, OneStream is undoubtedly your one-stop solution for all streaming requirements and is worth a try.
Free Download For Win 7 or later(64-bit)
Free Download For macOS 10.14 or later
Part 5. What about OneStream Mobile App
The OneStream mobile app version also has professional streaming features just like the Cloud-based version. Let’s have a look at some of its features.
Features:
- Use the mobile camera to go live on multiple platforms
- Simulcasting and Multicasting
- Live video looping
- Schedule streaming
- Cloud storage integration
- 360 degrees video support

Part 6. How to Stream with OneStream app on mobile?
Streaming on mobile using OneStream is quite easy, and the steps are not much different from streaming with a desktop.
Step1 Prepare the necessary equipment
You may need an external mic because your mobile phone’s in-built microphone might not give you your desired audio quality. And extra lighting is indispensable. You can get small light equipment to clip to your mobile device. Make sure you put your mobile phone on a stable surface to avoid shaky videos. You can get a small tripod to serve this purpose.
Step2 Just go live with OneStream
Once everything is set, you can open your OneStream app and follow the steps I showed you above in Part 3 (How to live stream with online OneStream).
Bonus Tips: How to record you stream videos easily?
If you want to record your live streams or how your audience interacts with your streams, using Filmora is the best way.
Filmora is a video editor and screen recorder with fantastic editing and recording features. It can help you create professional videos and screen records. Being beginners friendly, Filmora can record your screen with high video and audio quality. It also boasts editing features like filters, overlays, animated elements, 4k editing supports, noise removal, video stabilization, and audio equalizer, among others. With these features, you can record your streams with high quality successfully.
A step-by-step guide to successful recording with Filmora
Step1 Download and install the Filmora software on your computer. After that, open it and click on create a new project.
Step2 After installing, you can directly click on the “PC Screen” in the panel.
Step3 A window will come up where you can customize the settings of your recordings then. Choose the area of your screen you want to record, the video quality, your audio source, and also if you want to record your webcam alongside your screen, etc.
Step4 After you finish customizing the settings you can click the red button on the window’s page. Your screen will start recording after the countdown. The video file will save to the Filmora screen capture folder. You can also edit the video with the software editing tools.
Conclusion
OneStream has made multi-streaming easy with its multi-streaming feature. You can live stream or schedule recorded video streams to more than 40 social media platforms at the same time. Coupled with other streaming platforms, OneStream is undoubtedly your one-stop solution for all streaming requirements and is worth a try.
Free Download For Win 7 or later(64-bit)
Free Download For macOS 10.14 or later
- Title: 2024 Approved From Novice to Expert A Guide for Effective Single-Stream Livestreams
- Author: Jeffrey
- Created at : 2024-08-21 12:53:30
- Updated at : 2024-08-22 12:53:30
- Link: https://some-knowledge.techidaily.com/2024-approved-from-novice-to-expert-a-guide-for-effective-single-stream-livestreams/
- License: This work is licensed under CC BY-NC-SA 4.0.