
"2024 Approved From Sketches to Screens Animation via Windows Movie Maker"
From Sketches to Screens: Animation via Windows Movie Maker
Wondering how to make animation in Windows Movie Maker? As storytelling is the foundation of all content, your primary objective is to communicate a message that inspires your audience is less likely to take action if you have a compelling narrative but communicate it badly. The Windows Movie Maker animation may be useful in this situation. Any animated video you produce will have one or more main points that you want to get over to your viewers.
Animated video is a rich, captivating medium that will make your main arguments stand out. You can use Windows Movie Maker effects as it has far lower resource needs than you may anticipate while yet providing all the advantages of a visual medium. The difficulty is in turning that central idea into a direct, concise tale that will hold the attention of your audience. Feel free to try out various combinations while using the Windows Movie Maker animation tool since you can always quickly delete an effect after applying it. Learn more about the best animation video maker software for Windows in this guide.

Part 1. Steps to Create Animation with Windows Movie Maker
You don’t need any technological expertise to produce picture slideshows or home movies with Movie Maker. By using transitions, pan and zoom, and other visual effects, you may give them a more professional appearance and feel. You’ve decided to create an animated video for your company, so let’s get started. Is it still difficult to understand? Be at ease. It’s simpler than you would imagine to make an animated video. In this video, we’ll go through how to include animations into a Movie Maker project. The Windows Movie Maker instructions for making your own animated movie are listed below.
Step1Launch and Add Files in Windows Movie Maker
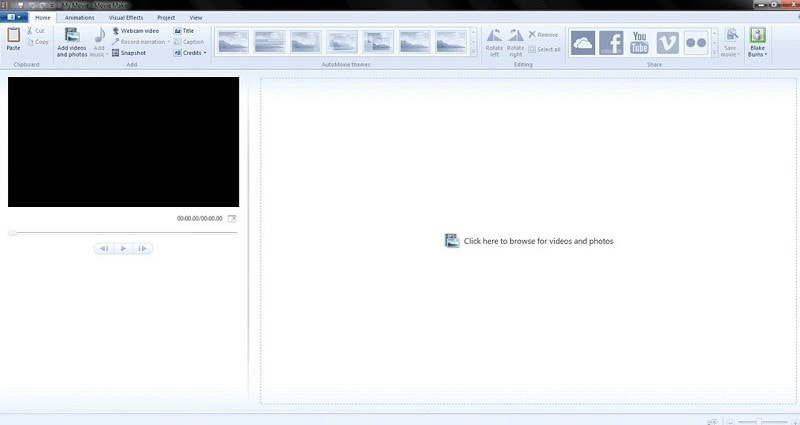
On your PC, launch Windows Movie Maker. Windows Movie Maker, however, has to be installed on your computer. Select “import photos” in the top right corner. By selecting the “Add movies and photographs” option under the “Home” tab in the navigation bar, you may create films by combining images, sounds, and videos. You may then choose the suitable media to import into the program from a popup that will display.
 SwifDoo PDF Perpetual (2-PC) Free upgrade. No monthly fees ever.
![]()
Note: You have the option to upload one file at a time or many files simultaneously.
Step2Go to Edit Menu
If you wish to clip off a section, go to “Edit” under “Video Tools” and choose the “Split” option. Depending on where you place the cursor during the section, the software will divide it into two halves. If you want to remove certain snippets, just touch the clip to reveal the context menu and choose “Remove” or “Delete” from the keyboard.
Step3Open the Animation Tab
You may add two distinct types of animations—Transitions and Pan and Zoom—to video clips or photographs using the Animations window on the ribbon. The dropdown menu next to “Speed” in the “Edit” tab may be expanded to change the speed of a video clip. The ‘Duration’ dropdown menu allows you to choose how long a certain image will be shown in a movie.

Step4Add Transitions
Between two multimedia portions, a transition effect may be added. In the “Animations” section, there are many different transitions available, including dissolves, patterns, and forms. The transition will be included at the start of the chosen medium. You may alter the effect’s duration by writing or choosing a new time frame from the dropdown menu next to “Duration.”
 Screensaver Factory, Create stunning professional screensavers within minutes. Create screensavers for yourself, for marketing or unlimited royalty-free commercial distribution. Make screensavers from images, video and swf flash, add background music and smooth sprite and transition effects. Screensaver Factory is very easy to use, and it enables you to make self-installing screensaver files and CDs for easy setup and distribution. Screensaver Factory is the most advanced software of its kind.
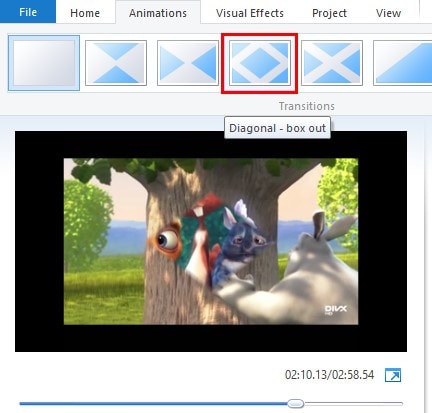
Step5Save the Video
When a transition is applied, a washed-out diagonal zone on the clip in the timeline indicates where the transition starts and finishes. Additionally, you have a choice in the sequence in which the effects are used. This may change how the movie is finally shown depending on the Effects, you choose. Once you’re done, click Apply.
Part 2. Movie Maker Alternative to Add Animations
You could encounter certain difficulties as a brand while creating an animated film using Windows Movie Maker for the first time. Despite all the modifications, making animations might still seem like a difficult effort. Most organizations find it difficult to readily include animations into their video marketing plan due to the intricacy of animated videos, among other factors. Filmora ought to be your only option if you want to produce something extensive, thorough, in-depth, and detailed.
Naturally, animation production techniques have changed throughout time. But you can do anything you want using Filmora’s animated video maker. A excellent animated video has a clear, story-focused plot and imparts useful knowledge to its audience. Use Filmora to unleash your creativity! You may easily bring any idea to life with its help, no matter how complicated or fantastical it may be. Let us attempt to assist you with Filmora, the greatest animation creation tool with simple customization.
Free Download For Win 7 or later(64-bit)
Free Download For macOS 10.14 or later
Step1Launch the Filmora Editor
To proceed without difficulties, the software program must first be launched. In the launch window, choose the Video Editor button to accomplish this. Click the Import media option to add your photographs to the editor once you’re there. Next, drag the chosen picture into the timeline to replace the default image on the template with your own. After that, the following editor panel will show up:
Step2Adding text to the Project
Filmora swiftly imports your files, then collects them together under the Import section. The imported files are clearly visible, and you can begin editing the text animation by adding the required ones from there to the timeline below. Simply drag the files to the timeline as shown below to begin. A number of possibilities are also shown; you must choose the one where you want your text to appear.
Step3Animate the Text
Filmora helps you create your text animation using the controller window as seen below by supporting you with font, style, color, alignment, and everything else. Animated video tab here is a lively, interesting medium that will make your main ideas stand out and is inexpensive and simple to maintain. You may make your text move by selecting the Advanced option from the editor menu.
Step4Export the Project
The software’s Preview window also allows you to preview the animation you’ve selected before adding it to the timeline with a few simple drag-and-drop actions. After finishing the production and editing of the instructional video, you may save it for distribution on social media. You may choose to save the document as an MP4, WMV, AVI, MOV, or even a GIF file.

Part 3. Related FAQs about Windows Movie Maker
- Where is the Visual Effects tab in Movie Maker?
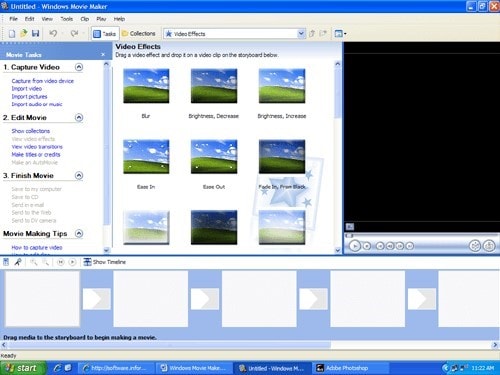
The Visual Effects may be found on the tab with the same name; to use one, choose a clip, then choose an effect from the gallery. Both still images and moving pictures may use the visual effects.
- Can I make my own animation movie?
Since the 2000s, when they were primarily used to show back sequential pictures, animations have advanced to become a common video format. Technically speaking, it is possible to create a unique animated short. To get your point over to the audience, all you have to do is choose an appropriate animation program, like Filmora.
- Can you animate on Windows Movie Maker?
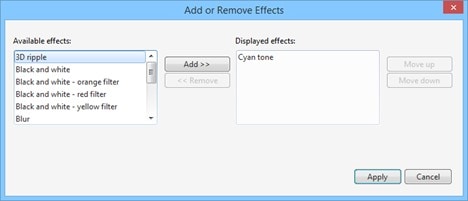
Simple movies may be easily made using Windows Live Movie Maker. With Windows Video Maker’s Animation settings, you can add visual effects and transitions between segments to liven up your movie. Following addition, a list of the additional effects’ thumbnails will show, allowing you to choose which one to change.
Step2Go to Edit Menu
If you wish to clip off a section, go to “Edit” under “Video Tools” and choose the “Split” option. Depending on where you place the cursor during the section, the software will divide it into two halves. If you want to remove certain snippets, just touch the clip to reveal the context menu and choose “Remove” or “Delete” from the keyboard.
 Greeting Card Builder
Step3Open the Animation Tab
You may add two distinct types of animations—Transitions and Pan and Zoom—to video clips or photographs using the Animations window on the ribbon. The dropdown menu next to “Speed” in the “Edit” tab may be expanded to change the speed of a video clip. The ‘Duration’ dropdown menu allows you to choose how long a certain image will be shown in a movie.

Step4Add Transitions
Between two multimedia portions, a transition effect may be added. In the “Animations” section, there are many different transitions available, including dissolves, patterns, and forms. The transition will be included at the start of the chosen medium. You may alter the effect’s duration by writing or choosing a new time frame from the dropdown menu next to “Duration.”
Step5Save the Video
When a transition is applied, a washed-out diagonal zone on the clip in the timeline indicates where the transition starts and finishes. Additionally, you have a choice in the sequence in which the effects are used. This may change how the movie is finally shown depending on the Effects, you choose. Once you’re done, click Apply.
Part 2. Movie Maker Alternative to Add Animations
You could encounter certain difficulties as a brand while creating an animated film using Windows Movie Maker for the first time. Despite all the modifications, making animations might still seem like a difficult effort. Most organizations find it difficult to readily include animations into their video marketing plan due to the intricacy of animated videos, among other factors. Filmora ought to be your only option if you want to produce something extensive, thorough, in-depth, and detailed.
Naturally, animation production techniques have changed throughout time. But you can do anything you want using Filmora’s animated video maker. A excellent animated video has a clear, story-focused plot and imparts useful knowledge to its audience. Use Filmora to unleash your creativity! You may easily bring any idea to life with its help, no matter how complicated or fantastical it may be. Let us attempt to assist you with Filmora, the greatest animation creation tool with simple customization.
Free Download For Win 7 or later(64-bit)
Free Download For macOS 10.14 or later
Step1Launch the Filmora Editor
To proceed without difficulties, the software program must first be launched. In the launch window, choose the Video Editor button to accomplish this. Click the Import media option to add your photographs to the editor once you’re there. Next, drag the chosen picture into the timeline to replace the default image on the template with your own. After that, the following editor panel will show up:
Step2Adding text to the Project
Filmora swiftly imports your files, then collects them together under the Import section. The imported files are clearly visible, and you can begin editing the text animation by adding the required ones from there to the timeline below. Simply drag the files to the timeline as shown below to begin. A number of possibilities are also shown; you must choose the one where you want your text to appear.
Step3Animate the Text
Filmora helps you create your text animation using the controller window as seen below by supporting you with font, style, color, alignment, and everything else. Animated video tab here is a lively, interesting medium that will make your main ideas stand out and is inexpensive and simple to maintain. You may make your text move by selecting the Advanced option from the editor menu.
Step4Export the Project
The software’s Preview window also allows you to preview the animation you’ve selected before adding it to the timeline with a few simple drag-and-drop actions. After finishing the production and editing of the instructional video, you may save it for distribution on social media. You may choose to save the document as an MP4, WMV, AVI, MOV, or even a GIF file.
Part 3. Related FAQs about Windows Movie Maker
- Where is the Visual Effects tab in Movie Maker?
The Visual Effects may be found on the tab with the same name; to use one, choose a clip, then choose an effect from the gallery. Both still images and moving pictures may use the visual effects.
- Can I make my own animation movie?
Since the 2000s, when they were primarily used to show back sequential pictures, animations have advanced to become a common video format. Technically speaking, it is possible to create a unique animated short. To get your point over to the audience, all you have to do is choose an appropriate animation program, like Filmora.
- Can you animate on Windows Movie Maker?
Simple movies may be easily made using Windows Live Movie Maker. With Windows Video Maker’s Animation settings, you can add visual effects and transitions between segments to liven up your movie. Following addition, a list of the additional effects’ thumbnails will show, allowing you to choose which one to change.
- Title: 2024 Approved From Sketches to Screens Animation via Windows Movie Maker
- Author: Jeffrey
- Created at : 2024-08-21 11:19:04
- Updated at : 2024-08-22 11:19:04
- Link: https://some-knowledge.techidaily.com/2024-approved-from-sketches-to-screens-animation-via-windows-movie-maker/
- License: This work is licensed under CC BY-NC-SA 4.0.