"2024 Approved Harnessing Google Photos for Organized Memories"
Harnessing Google Photos for Organized Memories
Since its inception some years ago, Google Images has established itself as a go-to service for many consumers who want to keep their photos and videos online. The Google Photos service allows you to store personal images in a virtual vault and makes that data accessible from any device you own.
Also included are various tools for organizing, viewing, altering, and finding your digital memories via the use of the service. Because it is the default picture app for Google’s Android operating system, it is available on most Android phones linked to your Google Account.
This comprehensive Google Video Editor tutorial has been compiled to assist you with your Google Photos navigation. Make sure you know everything about Google Video Editor before using it the next time! Let’s get this ball rolling!
In this article
02 How to Get Started with Google Photos?
03 Google Photos Video Editing Features
04 How to Create Videos With Google Photos?
05 How to Share Edited Videos from Google Photos?
Part 1: What is Google Photos?
Google Photos is a platform for uploading, sharing, and storing digital photos. A year after its debut, it’s already a global phenomenon. And Google Photographs uses the term “the cloud” to refer to the online storage of your photos and videos.
If you had to do this in the past, you would have had to connect your phone or camera to a computer to upload your photographs and movies. You may have then backed up your PC to an external hard drive. But now, with Google Photos, the process is effortless and does not require a USB connection.
In addition to the benefits listed above, keeping your photographs and movies in the cloud has the following aspects:
- It has many options for organizing, using, sharing, and managing your photographs and videos.
- It’s compatible with both iOS and Android devices.
- Anyone can use Google Photos, regardless of their level of computer literacy. It’s easy to figure out where you are and how to go about.
- The days of running out of space on your phone are long gone. You’ll be able to free up some space on your phone once you’ve uploaded your pictures and movies.
- As long as you have an internet connection, you may view your photographs and videos from any device (phone, tablet, computer).
- To share an album of images or videos with a friend or family member is easy.
- Whenever you’re connected to Wi-Fi, you may schedule automatic backups to take place.
- Storage space is provided at no cost to you. If you want your images to be preserved at their original resolution, you can pay, but you’ll probably be happy with the free version’s typical excellent quality. Compression is applied to images and movies with a resolution of more than 16MP. More on storage will be covered later.

Part 2: How to Get Started with Google Photos?
After you’ve installed the app on your smartphone, it’s time to get started with exploring the interface and the various editing options it contains.
Step 1: Launch the app and Sign In To Your Google Account. There is a good chance that you already have a Google account (such as Gmail). If you haven’t already, it’s fast and simple to join up.
Step 2: Once you’ve logged in, all you have to do is follow the on-screen instructions to begin uploading your photographs and videos.
Note: If you have many photographs and videos, this may take some time. If you don’t want to waste your mobile data, make sure you’re connected to the internet through Wi-Fi.
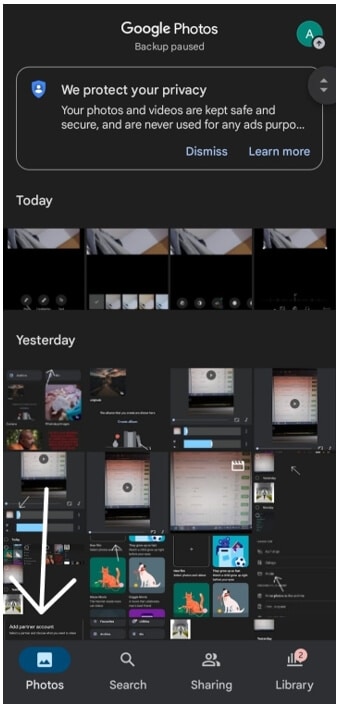
Photos, Search, Sharing, and Library are the three primary tabs at the bottom of the Google Photos program. If you’re using an iPhone/iPad or an Android device, you’ll notice the app has a slightly different design. Let’s look into this in more depth:
1. The Photos Tab
Photos is the first tab on the left-hand side of the screen. Memories from the past and the most current images may be found here.
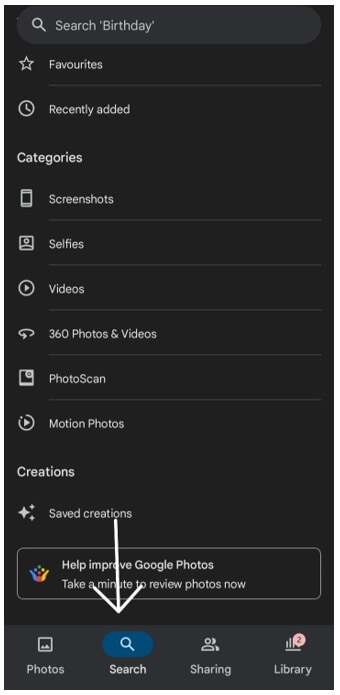
2. The Search Tab
The Search tab appears next. You may use this search to find images of people, places, items on a map, or in a category. You may also see your own animations, collages, and movies in the gallery.
3. The Sharing Tab
When you tap on the Sharing option, you have plenty of options. You can begin with the options of Create Shared Album and Share with Partner. You can choose to Share Some or All of Your Photos Automatically. Be it conversations or pictures. You have a good number of options here.

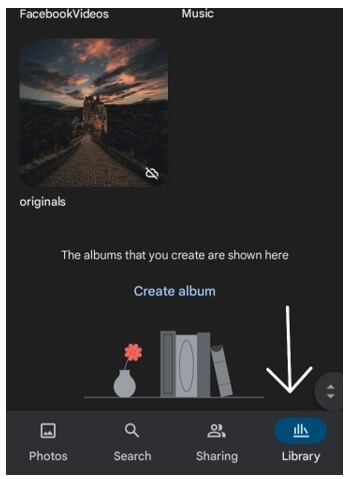
4. The Library Tab
The Library tab is the third one on the left-hand side. Your Albums, Favorites and Archive are all here, as well as your Trash.
The Utilities menu includes tools for animating, collaging, and creating movies. By tapping on a picture, you may see the photo in its entirety. You may also access the editing and sharing options for a picture in this manner.
Part 3: Google Photos Video Editing Features
We’re introducing some of the editing tools already accessible on Pixel to Google Photos Video Editor users as part of their subscription starting today.
These machine learning effects modify your photos: with Portrait Blur, you can blur the backdrop post-snap, and with Portrait Light, you can increase the lighting on faces in portraits.
Both capabilities would work for recent and past photographs, even if the original image was not captured in portrait mode.
Blur and Color Pop is still available for photographs with depth information (such as those taken in portrait mode), and anybody with Google Photos may use them for free.
According to today’s upgrade, Google Photo Video Editor users may now apply similar effects to even more images of people, even those that lack depth information, such as vintage film scans or professional shots.
Members of Google Photos Video Editor will also access new machine learning-powered effects. Consider them super filters that can make sophisticated adjustments with a single press.
You may use the Dynamic suggestion to boost Brightness and Contrast throughout the picture where it’s required, resulting in a more dramatic, balanced picture.
With Sky recommendations, you can make your golden hour photographs stand out by enhancing and altering the color and contrast in the sky using one of many Themes inspired by magnificent sunrises and sunsets.
Besides, other editing features such as Adjust, Trim, Cut, Slider, Filters, Color Focus, Skin Tone, Focus, HDR, Portrait Light, etc. are some of the basic editing features you get in Google Video Editor Online.
Let’s take a deep look into how you can apply these effects to your video:
1. Crop and Rotate video in Google Photos
Tap on the Crop option and select the different Aspect Ratios to start with. Click on the Transform or Auto option to choose your style of cropping the video.

Simply use the Dial option or select Auto to automatically straighten the video.
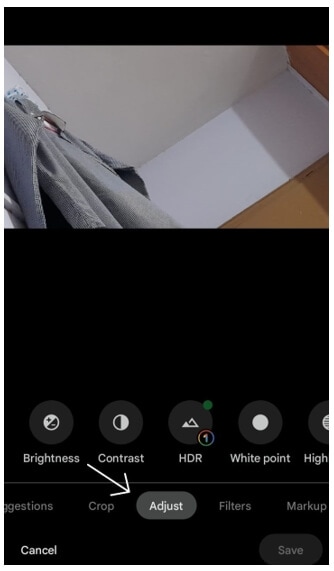
2. Adjust colour in Google Photos app
Select the video of your choice and press on the Edit option and then Adjust. Select the sort of effect you wish to apply to your video, and then adjust the dial to make the necessary adjustments. Effects like:
- Brightness
- Contrast
- White point
- Highlights
- Shadows
- Black point
- Saturation
- And many more a part of this feature.
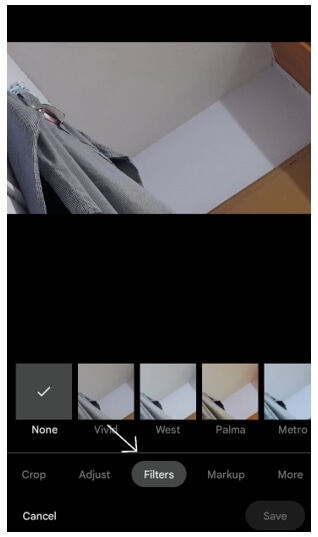
3. Add a Filter in Google Photos app
Open the Edit option and tap on Filters to select the kind of Filter you want to add to you video.
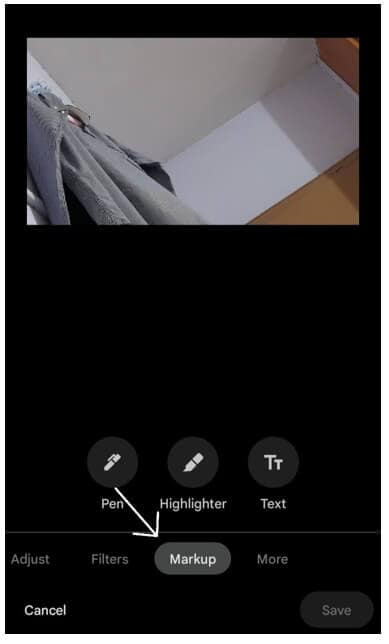
4. Highlight or Draw on Google Photos app
Head over to the Markup section in the Edit option and tap on Highlighter or on Pen to draw or highlight according to your liking.
Part 4: How to Create Videos With Google Photos?
To follow along with this tutorial, you’ll need a Google-enabled Android phone or tablet to use Google Photos. Using Google Photos on a mobile device requires some fiddling if it doesn’t support the service. Google images may be used to create movies on Android smartphones by following these instructions.
Step 1: To use the app, you first need to sign up for an account. To begin, you’ll need to Sign In using your Gmail Account if you’ve previously enrolled.
Step 2: Select Library from the drop-down menu in the lower right corner of your mobile device’s display. Scroll down to Utilities and click on it. Animation, Collage, and Movie are all included in the Create New section. As this instruction is about making a movie, the Movie button will be selected.

Step 3: Choosing a movie theme on the “Create Movie” tab or creating a new standard movie is the only option.


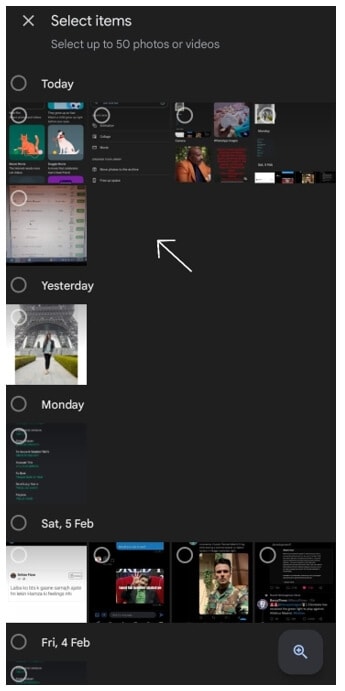
Step 4: When making a video, now you may choose from up to 50 images and clips. Once you’ve chosen your material, just hit the “create” button, and Google will arrange your images and videos in chronological order for you.

Step 5: Changing the sequence of the photos may be done by tapping and dragging on the film strip icon. The slider allows you to change the length of a picture in the movie. Theme songs and music from your computer’s hard drive may be accessed by selecting the music button in the center-right corner.
Step 6: In addition, you may alter the appearance of the video by applying styles and effects. Select a title for your film after seeing the finished video. When you’re finished, click Save, and the completed image will display in your Google Photos album. To save a video to your device’s storage, locate the video and choose Download Video from the video’s options menu to begin the download process.
Besides the features mentioned above, you can also use it to stabilize shaky video. Check: How to Stabilize Videos for Free with Google Photos app .
## Part 5: How to Share Edited Videos from Google Photos?After editing your videos, now would be the time for you to share them with your amigos. Here’s how:
Step 1: Open the Google Photos app on your mobile device and click on the Photos tab. Log in to your Google Account if you haven’t already.
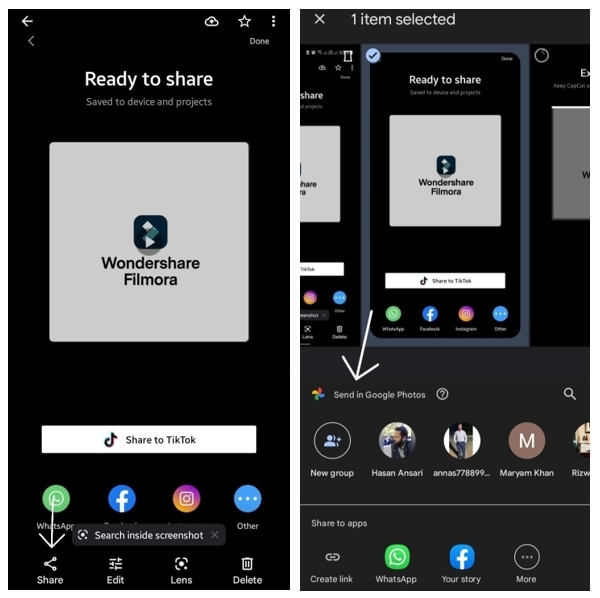
Step 2: Choose a photograph, an album, or a video. To share, use the Share button. Select the individuals you want to share your photos with under Send in Google Photos.

Note: To share with a single individual, touch their name on the screen.
- To look for a specific person, choose Search from the drop-down menu. Type their _name, phone numbe_r, and email
- Select multiple persons if you want to share with more than one person.
- (Optional) Add a message to go along with the material you’ve contributed.
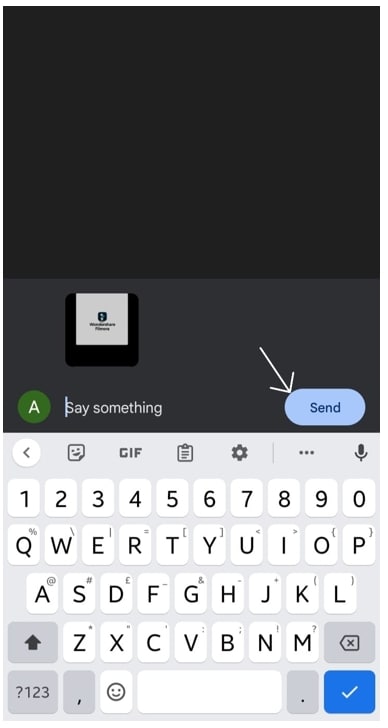
Step 3: To send a picture or a video, use the Send button.
Conclusion
You may use Google Video Editor to make movies from your photos and relive your most memorable experiences. This is a standard method for saving space in the cloud. You should use Google Photos if you would like to post unique videos on your social networking platforms.
If you want to make your memories even more exciting, you can create collages and animations. Because Google Photos is straightforward, effective, and easy to use, you won’t find a better alternative than it!
02 How to Get Started with Google Photos?
03 Google Photos Video Editing Features
04 How to Create Videos With Google Photos?
05 How to Share Edited Videos from Google Photos?
 CollageIt Pro
Part 1: What is Google Photos?
Google Photos is a platform for uploading, sharing, and storing digital photos. A year after its debut, it’s already a global phenomenon. And Google Photographs uses the term “the cloud” to refer to the online storage of your photos and videos.
If you had to do this in the past, you would have had to connect your phone or camera to a computer to upload your photographs and movies. You may have then backed up your PC to an external hard drive. But now, with Google Photos, the process is effortless and does not require a USB connection.
In addition to the benefits listed above, keeping your photographs and movies in the cloud has the following aspects:
- It has many options for organizing, using, sharing, and managing your photographs and videos.
- It’s compatible with both iOS and Android devices.
- Anyone can use Google Photos, regardless of their level of computer literacy. It’s easy to figure out where you are and how to go about.
- The days of running out of space on your phone are long gone. You’ll be able to free up some space on your phone once you’ve uploaded your pictures and movies.
- As long as you have an internet connection, you may view your photographs and videos from any device (phone, tablet, computer).
- To share an album of images or videos with a friend or family member is easy.
- Whenever you’re connected to Wi-Fi, you may schedule automatic backups to take place.
- Storage space is provided at no cost to you. If you want your images to be preserved at their original resolution, you can pay, but you’ll probably be happy with the free version’s typical excellent quality. Compression is applied to images and movies with a resolution of more than 16MP. More on storage will be covered later.
Part 2: How to Get Started with Google Photos?
After you’ve installed the app on your smartphone, it’s time to get started with exploring the interface and the various editing options it contains.
Step 1: Launch the app and Sign In To Your Google Account. There is a good chance that you already have a Google account (such as Gmail). If you haven’t already, it’s fast and simple to join up.
Step 2: Once you’ve logged in, all you have to do is follow the on-screen instructions to begin uploading your photographs and videos.
Note: If you have many photographs and videos, this may take some time. If you don’t want to waste your mobile data, make sure you’re connected to the internet through Wi-Fi.
Photos, Search, Sharing, and Library are the three primary tabs at the bottom of the Google Photos program. If you’re using an iPhone/iPad or an Android device, you’ll notice the app has a slightly different design. Let’s look into this in more depth:
1. The Photos Tab
Photos is the first tab on the left-hand side of the screen. Memories from the past and the most current images may be found here.
2. The Search Tab
The Search tab appears next. You may use this search to find images of people, places, items on a map, or in a category. You may also see your own animations, collages, and movies in the gallery.
3. The Sharing Tab
When you tap on the Sharing option, you have plenty of options. You can begin with the options of Create Shared Album and Share with Partner. You can choose to Share Some or All of Your Photos Automatically. Be it conversations or pictures. You have a good number of options here.
4. The Library Tab
The Library tab is the third one on the left-hand side. Your Albums, Favorites and Archive are all here, as well as your Trash.
The Utilities menu includes tools for animating, collaging, and creating movies. By tapping on a picture, you may see the photo in its entirety. You may also access the editing and sharing options for a picture in this manner.
 PDF application, powered by AI-based OCR, for unified workflows with both digital and scanned documents.
 Part 3: Google Photos Video Editing Features
We’re introducing some of the editing tools already accessible on Pixel to Google Photos Video Editor users as part of their subscription starting today.
These machine learning effects modify your photos: with Portrait Blur, you can blur the backdrop post-snap, and with Portrait Light, you can increase the lighting on faces in portraits.
Both capabilities would work for recent and past photographs, even if the original image was not captured in portrait mode.
Blur and Color Pop is still available for photographs with depth information (such as those taken in portrait mode), and anybody with Google Photos may use them for free.
According to today’s upgrade, Google Photo Video Editor users may now apply similar effects to even more images of people, even those that lack depth information, such as vintage film scans or professional shots.
Members of Google Photos Video Editor will also access new machine learning-powered effects. Consider them super filters that can make sophisticated adjustments with a single press.
You may use the Dynamic suggestion to boost Brightness and Contrast throughout the picture where it’s required, resulting in a more dramatic, balanced picture.
With Sky recommendations, you can make your golden hour photographs stand out by enhancing and altering the color and contrast in the sky using one of many Themes inspired by magnificent sunrises and sunsets.
Besides, other editing features such as Adjust, Trim, Cut, Slider, Filters, Color Focus, Skin Tone, Focus, HDR, Portrait Light, etc. are some of the basic editing features you get in Google Video Editor Online.
Let’s take a deep look into how you can apply these effects to your video:
1. Crop and Rotate video in Google Photos
Tap on the Crop option and select the different Aspect Ratios to start with. Click on the Transform or Auto option to choose your style of cropping the video.

Simply use the Dial option or select Auto to automatically straighten the video.
2. Adjust colour in Google Photos app
Select the video of your choice and press on the Edit option and then Adjust. Select the sort of effect you wish to apply to your video, and then adjust the dial to make the necessary adjustments. Effects like:
- Brightness
- Contrast
- White point
- Highlights
- Shadows
- Black point
- Saturation
- And many more a part of this feature.
3. Add a Filter in Google Photos app
Open the Edit option and tap on Filters to select the kind of Filter you want to add to you video.
4. Highlight or Draw on Google Photos app
Head over to the Markup section in the Edit option and tap on Highlighter or on Pen to draw or highlight according to your liking.
 Glarysoft File Recovery Pro - Helps to recover your lost file/data, even permanently deleted data.
Part 4: How to Create Videos With Google Photos?
To follow along with this tutorial, you’ll need a Google-enabled Android phone or tablet to use Google Photos. Using Google Photos on a mobile device requires some fiddling if it doesn’t support the service. Google images may be used to create movies on Android smartphones by following these instructions.
Step 1: To use the app, you first need to sign up for an account. To begin, you’ll need to Sign In using your Gmail Account if you’ve previously enrolled.
Step 2: Select Library from the drop-down menu in the lower right corner of your mobile device’s display. Scroll down to Utilities and click on it. Animation, Collage, and Movie are all included in the Create New section. As this instruction is about making a movie, the Movie button will be selected.
Step 3: Choosing a movie theme on the “Create Movie” tab or creating a new standard movie is the only option.
Step 4: When making a video, now you may choose from up to 50 images and clips. Once you’ve chosen your material, just hit the “create” button, and Google will arrange your images and videos in chronological order for you.
Step 5: Changing the sequence of the photos may be done by tapping and dragging on the film strip icon. The slider allows you to change the length of a picture in the movie. Theme songs and music from your computer’s hard drive may be accessed by selecting the music button in the center-right corner.
Step 6: In addition, you may alter the appearance of the video by applying styles and effects. Select a title for your film after seeing the finished video. When you’re finished, click Save, and the completed image will display in your Google Photos album. To save a video to your device’s storage, locate the video and choose Download Video from the video’s options menu to begin the download process.

Besides the features mentioned above, you can also use it to stabilize shaky video. Check: How to Stabilize Videos for Free with Google Photos app .
 SwifDoo PDF Perpetual (2-PC) Free upgrade. No monthly fees ever.
Part 5: How to Share Edited Videos from Google Photos?
After editing your videos, now would be the time for you to share them with your amigos. Here’s how:
Step 1: Open the Google Photos app on your mobile device and click on the Photos tab. Log in to your Google Account if you haven’t already.
Step 2: Choose a photograph, an album, or a video. To share, use the Share button. Select the individuals you want to share your photos with under Send in Google Photos.

Note: To share with a single individual, touch their name on the screen.
- To look for a specific person, choose Search from the drop-down menu. Type their _name, phone numbe_r, and email
- Select multiple persons if you want to share with more than one person.
- (Optional) Add a message to go along with the material you’ve contributed.
Step 3: To send a picture or a video, use the Send button.

Conclusion
You may use Google Video Editor to make movies from your photos and relive your most memorable experiences. This is a standard method for saving space in the cloud. You should use Google Photos if you would like to post unique videos on your social networking platforms.
If you want to make your memories even more exciting, you can create collages and animations. Because Google Photos is straightforward, effective, and easy to use, you won’t find a better alternative than it!
02 How to Get Started with Google Photos?
03 Google Photos Video Editing Features
04 How to Create Videos With Google Photos?
05 How to Share Edited Videos from Google Photos?
Part 1: What is Google Photos?
Google Photos is a platform for uploading, sharing, and storing digital photos. A year after its debut, it’s already a global phenomenon. And Google Photographs uses the term “the cloud” to refer to the online storage of your photos and videos.
If you had to do this in the past, you would have had to connect your phone or camera to a computer to upload your photographs and movies. You may have then backed up your PC to an external hard drive. But now, with Google Photos, the process is effortless and does not require a USB connection.
In addition to the benefits listed above, keeping your photographs and movies in the cloud has the following aspects:
- It has many options for organizing, using, sharing, and managing your photographs and videos.
- It’s compatible with both iOS and Android devices.
- Anyone can use Google Photos, regardless of their level of computer literacy. It’s easy to figure out where you are and how to go about.
- The days of running out of space on your phone are long gone. You’ll be able to free up some space on your phone once you’ve uploaded your pictures and movies.
- As long as you have an internet connection, you may view your photographs and videos from any device (phone, tablet, computer).
- To share an album of images or videos with a friend or family member is easy.
- Whenever you’re connected to Wi-Fi, you may schedule automatic backups to take place.
- Storage space is provided at no cost to you. If you want your images to be preserved at their original resolution, you can pay, but you’ll probably be happy with the free version’s typical excellent quality. Compression is applied to images and movies with a resolution of more than 16MP. More on storage will be covered later.
Part 2: How to Get Started with Google Photos?
After you’ve installed the app on your smartphone, it’s time to get started with exploring the interface and the various editing options it contains.
Step 1: Launch the app and Sign In To Your Google Account. There is a good chance that you already have a Google account (such as Gmail). If you haven’t already, it’s fast and simple to join up.
Step 2: Once you’ve logged in, all you have to do is follow the on-screen instructions to begin uploading your photographs and videos.
Note: If you have many photographs and videos, this may take some time. If you don’t want to waste your mobile data, make sure you’re connected to the internet through Wi-Fi.
Photos, Search, Sharing, and Library are the three primary tabs at the bottom of the Google Photos program. If you’re using an iPhone/iPad or an Android device, you’ll notice the app has a slightly different design. Let’s look into this in more depth:
1. The Photos Tab
Photos is the first tab on the left-hand side of the screen. Memories from the past and the most current images may be found here.
2. The Search Tab
The Search tab appears next. You may use this search to find images of people, places, items on a map, or in a category. You may also see your own animations, collages, and movies in the gallery.
3. The Sharing Tab
When you tap on the Sharing option, you have plenty of options. You can begin with the options of Create Shared Album and Share with Partner. You can choose to Share Some or All of Your Photos Automatically. Be it conversations or pictures. You have a good number of options here.

4. The Library Tab
The Library tab is the third one on the left-hand side. Your Albums, Favorites and Archive are all here, as well as your Trash.
The Utilities menu includes tools for animating, collaging, and creating movies. By tapping on a picture, you may see the photo in its entirety. You may also access the editing and sharing options for a picture in this manner.

WPS Office Premium ( File Recovery, Photo Scanning, Convert PDF)–Yearly
Part 3: Google Photos Video Editing Features
We’re introducing some of the editing tools already accessible on Pixel to Google Photos Video Editor users as part of their subscription starting today.
These machine learning effects modify your photos: with Portrait Blur, you can blur the backdrop post-snap, and with Portrait Light, you can increase the lighting on faces in portraits.
Both capabilities would work for recent and past photographs, even if the original image was not captured in portrait mode.
Blur and Color Pop is still available for photographs with depth information (such as those taken in portrait mode), and anybody with Google Photos may use them for free.
According to today’s upgrade, Google Photo Video Editor users may now apply similar effects to even more images of people, even those that lack depth information, such as vintage film scans or professional shots.
Members of Google Photos Video Editor will also access new machine learning-powered effects. Consider them super filters that can make sophisticated adjustments with a single press.
You may use the Dynamic suggestion to boost Brightness and Contrast throughout the picture where it’s required, resulting in a more dramatic, balanced picture.
With Sky recommendations, you can make your golden hour photographs stand out by enhancing and altering the color and contrast in the sky using one of many Themes inspired by magnificent sunrises and sunsets.
Besides, other editing features such as Adjust, Trim, Cut, Slider, Filters, Color Focus, Skin Tone, Focus, HDR, Portrait Light, etc. are some of the basic editing features you get in Google Video Editor Online.
Let’s take a deep look into how you can apply these effects to your video:
1. Crop and Rotate video in Google Photos
Tap on the Crop option and select the different Aspect Ratios to start with. Click on the Transform or Auto option to choose your style of cropping the video.
Simply use the Dial option or select Auto to automatically straighten the video.
2. Adjust colour in Google Photos app
Select the video of your choice and press on the Edit option and then Adjust. Select the sort of effect you wish to apply to your video, and then adjust the dial to make the necessary adjustments. Effects like:
- Brightness
- Contrast
- White point
- Highlights
- Shadows
- Black point
- Saturation
- And many more a part of this feature.
3. Add a Filter in Google Photos app
Open the Edit option and tap on Filters to select the kind of Filter you want to add to you video.
4. Highlight or Draw on Google Photos app
Head over to the Markup section in the Edit option and tap on Highlighter or on Pen to draw or highlight according to your liking.
Part 4: How to Create Videos With Google Photos?
To follow along with this tutorial, you’ll need a Google-enabled Android phone or tablet to use Google Photos. Using Google Photos on a mobile device requires some fiddling if it doesn’t support the service. Google images may be used to create movies on Android smartphones by following these instructions.
Step 1: To use the app, you first need to sign up for an account. To begin, you’ll need to Sign In using your Gmail Account if you’ve previously enrolled.
Step 2: Select Library from the drop-down menu in the lower right corner of your mobile device’s display. Scroll down to Utilities and click on it. Animation, Collage, and Movie are all included in the Create New section. As this instruction is about making a movie, the Movie button will be selected.
Step 3: Choosing a movie theme on the “Create Movie” tab or creating a new standard movie is the only option.
Step 4: When making a video, now you may choose from up to 50 images and clips. Once you’ve chosen your material, just hit the “create” button, and Google will arrange your images and videos in chronological order for you.
Step 5: Changing the sequence of the photos may be done by tapping and dragging on the film strip icon. The slider allows you to change the length of a picture in the movie. Theme songs and music from your computer’s hard drive may be accessed by selecting the music button in the center-right corner.
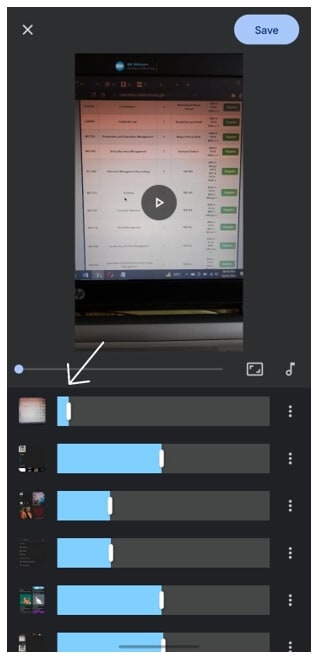
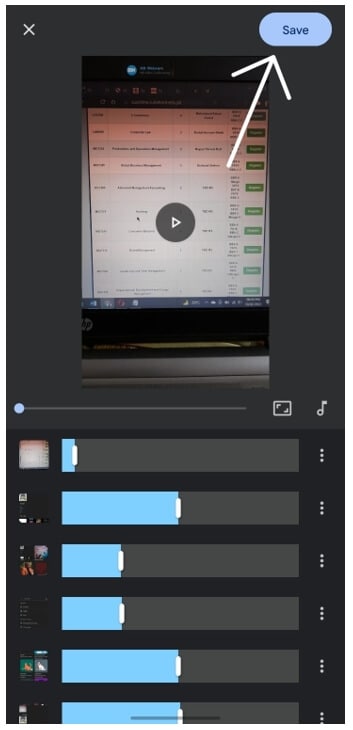
Step 6: In addition, you may alter the appearance of the video by applying styles and effects. Select a title for your film after seeing the finished video. When you’re finished, click Save, and the completed image will display in your Google Photos album. To save a video to your device’s storage, locate the video and choose Download Video from the video’s options menu to begin the download process.
Besides the features mentioned above, you can also use it to stabilize shaky video. Check: How to Stabilize Videos for Free with Google Photos app .
Part 5: How to Share Edited Videos from Google Photos?
After editing your videos, now would be the time for you to share them with your amigos. Here’s how:
Step 1: Open the Google Photos app on your mobile device and click on the Photos tab. Log in to your Google Account if you haven’t already.
Step 2: Choose a photograph, an album, or a video. To share, use the Share button. Select the individuals you want to share your photos with under Send in Google Photos.
Note: To share with a single individual, touch their name on the screen.
- To look for a specific person, choose Search from the drop-down menu. Type their _name, phone numbe_r, and email
- Select multiple persons if you want to share with more than one person.
- (Optional) Add a message to go along with the material you’ve contributed.
Step 3: To send a picture or a video, use the Send button.
Conclusion
You may use Google Video Editor to make movies from your photos and relive your most memorable experiences. This is a standard method for saving space in the cloud. You should use Google Photos if you would like to post unique videos on your social networking platforms.
If you want to make your memories even more exciting, you can create collages and animations. Because Google Photos is straightforward, effective, and easy to use, you won’t find a better alternative than it!
02 How to Get Started with Google Photos?
03 Google Photos Video Editing Features
04 How to Create Videos With Google Photos?
05 How to Share Edited Videos from Google Photos?
Part 1: What is Google Photos?
Google Photos is a platform for uploading, sharing, and storing digital photos. A year after its debut, it’s already a global phenomenon. And Google Photographs uses the term “the cloud” to refer to the online storage of your photos and videos.
If you had to do this in the past, you would have had to connect your phone or camera to a computer to upload your photographs and movies. You may have then backed up your PC to an external hard drive. But now, with Google Photos, the process is effortless and does not require a USB connection.
In addition to the benefits listed above, keeping your photographs and movies in the cloud has the following aspects:
- It has many options for organizing, using, sharing, and managing your photographs and videos.
- It’s compatible with both iOS and Android devices.
- Anyone can use Google Photos, regardless of their level of computer literacy. It’s easy to figure out where you are and how to go about.
- The days of running out of space on your phone are long gone. You’ll be able to free up some space on your phone once you’ve uploaded your pictures and movies.
- As long as you have an internet connection, you may view your photographs and videos from any device (phone, tablet, computer).
- To share an album of images or videos with a friend or family member is easy.
- Whenever you’re connected to Wi-Fi, you may schedule automatic backups to take place.
- Storage space is provided at no cost to you. If you want your images to be preserved at their original resolution, you can pay, but you’ll probably be happy with the free version’s typical excellent quality. Compression is applied to images and movies with a resolution of more than 16MP. More on storage will be covered later.
Part 2: How to Get Started with Google Photos?
After you’ve installed the app on your smartphone, it’s time to get started with exploring the interface and the various editing options it contains.
Step 1: Launch the app and Sign In To Your Google Account. There is a good chance that you already have a Google account (such as Gmail). If you haven’t already, it’s fast and simple to join up.
Step 2: Once you’ve logged in, all you have to do is follow the on-screen instructions to begin uploading your photographs and videos.
Note: If you have many photographs and videos, this may take some time. If you don’t want to waste your mobile data, make sure you’re connected to the internet through Wi-Fi.
Photos, Search, Sharing, and Library are the three primary tabs at the bottom of the Google Photos program. If you’re using an iPhone/iPad or an Android device, you’ll notice the app has a slightly different design. Let’s look into this in more depth:
1. The Photos Tab
Photos is the first tab on the left-hand side of the screen. Memories from the past and the most current images may be found here.

2. The Search Tab
The Search tab appears next. You may use this search to find images of people, places, items on a map, or in a category. You may also see your own animations, collages, and movies in the gallery.

3. The Sharing Tab
When you tap on the Sharing option, you have plenty of options. You can begin with the options of Create Shared Album and Share with Partner. You can choose to Share Some or All of Your Photos Automatically. Be it conversations or pictures. You have a good number of options here.

Key features:
• Import from any devices and cams, including GoPro and drones. All formats supported. Сurrently the only free video editor that allows users to export in a new H265/HEVC codec, something essential for those working with 4K and HD.
• Everything for hassle-free basic editing: cut, crop and merge files, add titles and favorite music
• Visual effects, advanced color correction and trendy Instagram-like filters
• All multimedia processing done from one app: video editing capabilities reinforced by a video converter, a screen capture, a video capture, a disc burner and a YouTube uploader
• Non-linear editing: edit several files with simultaneously
• Easy export to social networks: special profiles for YouTube, Facebook, Vimeo, Twitter and Instagram
• High quality export – no conversion quality loss, double export speed even of HD files due to hardware acceleration
• Stabilization tool will turn shaky or jittery footage into a more stable video automatically.
• Essential toolset for professional video editing: blending modes, Mask tool, advanced multiple-color Chroma Key
4. The Library Tab
The Library tab is the third one on the left-hand side. Your Albums, Favorites and Archive are all here, as well as your Trash.
The Utilities menu includes tools for animating, collaging, and creating movies. By tapping on a picture, you may see the photo in its entirety. You may also access the editing and sharing options for a picture in this manner.
Part 3: Google Photos Video Editing Features
We’re introducing some of the editing tools already accessible on Pixel to Google Photos Video Editor users as part of their subscription starting today.
These machine learning effects modify your photos: with Portrait Blur, you can blur the backdrop post-snap, and with Portrait Light, you can increase the lighting on faces in portraits.
Both capabilities would work for recent and past photographs, even if the original image was not captured in portrait mode.
Blur and Color Pop is still available for photographs with depth information (such as those taken in portrait mode), and anybody with Google Photos may use them for free.
According to today’s upgrade, Google Photo Video Editor users may now apply similar effects to even more images of people, even those that lack depth information, such as vintage film scans or professional shots.
Members of Google Photos Video Editor will also access new machine learning-powered effects. Consider them super filters that can make sophisticated adjustments with a single press.
You may use the Dynamic suggestion to boost Brightness and Contrast throughout the picture where it’s required, resulting in a more dramatic, balanced picture.
With Sky recommendations, you can make your golden hour photographs stand out by enhancing and altering the color and contrast in the sky using one of many Themes inspired by magnificent sunrises and sunsets.
Besides, other editing features such as Adjust, Trim, Cut, Slider, Filters, Color Focus, Skin Tone, Focus, HDR, Portrait Light, etc. are some of the basic editing features you get in Google Video Editor Online.
Let’s take a deep look into how you can apply these effects to your video:
1. Crop and Rotate video in Google Photos
Tap on the Crop option and select the different Aspect Ratios to start with. Click on the Transform or Auto option to choose your style of cropping the video.
Simply use the Dial option or select Auto to automatically straighten the video.
2. Adjust colour in Google Photos app
Select the video of your choice and press on the Edit option and then Adjust. Select the sort of effect you wish to apply to your video, and then adjust the dial to make the necessary adjustments. Effects like:
- Brightness
- Contrast
- White point
- Highlights
- Shadows
- Black point
- Saturation
- And many more a part of this feature.
3. Add a Filter in Google Photos app
Open the Edit option and tap on Filters to select the kind of Filter you want to add to you video.
4. Highlight or Draw on Google Photos app
Head over to the Markup section in the Edit option and tap on Highlighter or on Pen to draw or highlight according to your liking.
Part 4: How to Create Videos With Google Photos?
To follow along with this tutorial, you’ll need a Google-enabled Android phone or tablet to use Google Photos. Using Google Photos on a mobile device requires some fiddling if it doesn’t support the service. Google images may be used to create movies on Android smartphones by following these instructions.
Step 1: To use the app, you first need to sign up for an account. To begin, you’ll need to Sign In using your Gmail Account if you’ve previously enrolled.
Step 2: Select Library from the drop-down menu in the lower right corner of your mobile device’s display. Scroll down to Utilities and click on it. Animation, Collage, and Movie are all included in the Create New section. As this instruction is about making a movie, the Movie button will be selected.
Step 3: Choosing a movie theme on the “Create Movie” tab or creating a new standard movie is the only option.
Step 4: When making a video, now you may choose from up to 50 images and clips. Once you’ve chosen your material, just hit the “create” button, and Google will arrange your images and videos in chronological order for you.
Step 5: Changing the sequence of the photos may be done by tapping and dragging on the film strip icon. The slider allows you to change the length of a picture in the movie. Theme songs and music from your computer’s hard drive may be accessed by selecting the music button in the center-right corner.
 Jet Profiler for MySQL, Enterprise Version: Jet Profiler for MySQL is real-time query performance and diagnostics tool for the MySQL database server. Its detailed query information, graphical interface and ease of use makes this a great tool for finding performance bottlenecks in your MySQL databases.
Step 6: In addition, you may alter the appearance of the video by applying styles and effects. Select a title for your film after seeing the finished video. When you’re finished, click Save, and the completed image will display in your Google Photos album. To save a video to your device’s storage, locate the video and choose Download Video from the video’s options menu to begin the download process.
Besides the features mentioned above, you can also use it to stabilize shaky video. Check: How to Stabilize Videos for Free with Google Photos app .
Part 5: How to Share Edited Videos from Google Photos?
After editing your videos, now would be the time for you to share them with your amigos. Here’s how:
Step 1: Open the Google Photos app on your mobile device and click on the Photos tab. Log in to your Google Account if you haven’t already.
Step 2: Choose a photograph, an album, or a video. To share, use the Share button. Select the individuals you want to share your photos with under Send in Google Photos.

Note: To share with a single individual, touch their name on the screen.
- To look for a specific person, choose Search from the drop-down menu. Type their _name, phone numbe_r, and email
- Select multiple persons if you want to share with more than one person.
- (Optional) Add a message to go along with the material you’ve contributed.
Step 3: To send a picture or a video, use the Send button.
Conclusion
You may use Google Video Editor to make movies from your photos and relive your most memorable experiences. This is a standard method for saving space in the cloud. You should use Google Photos if you would like to post unique videos on your social networking platforms.
If you want to make your memories even more exciting, you can create collages and animations. Because Google Photos is straightforward, effective, and easy to use, you won’t find a better alternative than it!
- Title: 2024 Approved Harnessing Google Photos for Organized Memories
- Author: Jeffrey
- Created at : 2024-08-11 02:15:15
- Updated at : 2024-08-12 02:15:15
- Link: https://some-knowledge.techidaily.com/2024-approved-harnessing-google-photos-for-organized-memories/
- License: This work is licensed under CC BY-NC-SA 4.0.