
"2024 Approved How to Digitize Your Old Photos and Turn Them Into Videos"
How to Digitize Your Old Photos and Turn Them Into Videos
How to Digitize Your Old Photos and Turn Them into Impressive Videos

Ollie Mattison
Mar 27, 2024• Proven solutions
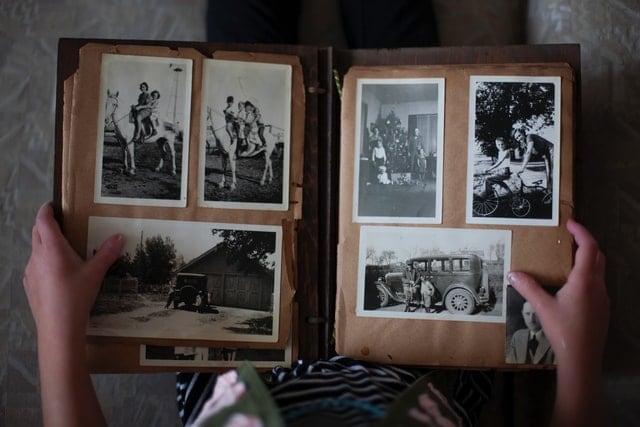
We all know that pictures have the magic to make some moments last forever. Though, if a picture has been taken a long time back, then it might lose its quality. A lot of people end up losing their precious photos due to all kinds of incidents.
Therefore, it is highly recommended to digitize photos to make them lasting. In this way, you can make your photos last forever and keep them handy. In this post, I’m going to discuss some smart ways to digitize photos without any hassle. In another case, you may want to know how to restore old photos in old devices.
- Part 1: How to Digitize Your Memorable Old Photos
- Part 2: How to Convert Old Photos into a Video with Ease?
- Part 3: More Editing Tips for Creating Memorable Videos
4 Smart Ways to Digitize Your Memorable Old Photos
With time, the way we capture moments has also been changed. These days, Polaroid cameras have been replaced by various smartphones and 4K DSLR cameras . Nevertheless, you can digitize your photos in either of the following ways so that you can convert them into softcopy and easily move them around.
1. Use your Smartphones or Digital Cameras
This is something that you might have thought of doing before as well. We all use smartphones to take pictures, but have you ever thought of using the device’s camera to scan your old photographs. The same can be done by using any digital camera too.
Just make sure that you have proper lighting and all the pictures are organized. Now, just use your smartphone camera to take their pictures. Later, you can connect your phone (or its SD card) to your computer and transfer these scanned copies to any secure location. If you want, you can also upload your photos to the cloud to keep them safe.
2. Use a Scanner
If you have access to a scanner, then it would make it pretty easy for you to digitize photos. Most of the digital scanners won’t even cost that much. Therefore, if you have a lot of pictures to scan, then you can just buy a scanner. You can also find a scanner available at a nearby digital store that you can use on a per-copy basis.
Once you have scanned your photos, you can transfer them to a pen drive or move them to any other device of your choice.
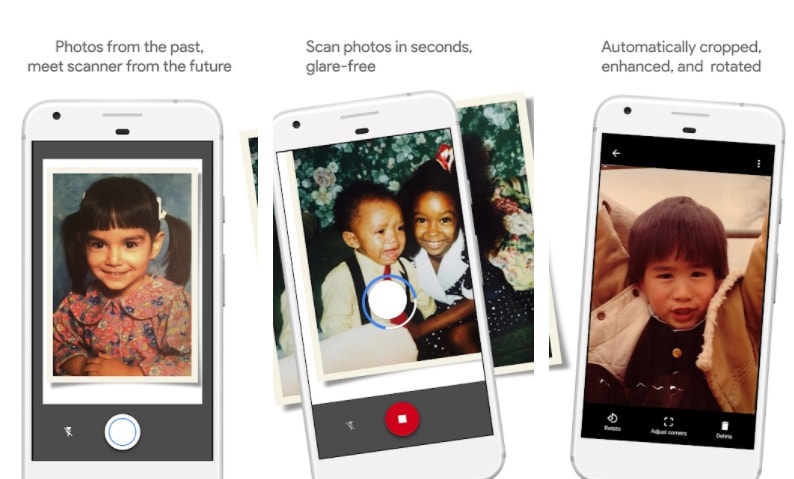
3. Use a Photo Scanner App
There are also tons of readily available apps that you can use on your Android or iOS devices to digitize photos. You can just go to the App Store or Play Store on your device to browse the available scanner apps (most of them are free).
Some popular photo scanners that you can consider using are Scanner Pro, PhotoScan, ShoeBox, or PicScanner. Out of them, PhotoScan by Google is one of the most reliable options that I would recommend. It will help you easily scan your photos, edit them accordingly, and minimize their glare. You can also directly load your scanned pictures to your Google Photos account from here.
4. Get in Touch with a Professional
In case you have a lot of pictures that you wish to scan and little time, then you can also get in touch with some professionals. There are tons of photo digitization services that you can explore in almost every major city to get dedicated assistance.
 WinUtilities Pro
How to Convert Old Photos into a Video Effortlessly?
By now, you would be able to digitize photos and have a soft copy of your old photographs. Apart from that, a lot of people would also like to make a video collage of their favorite pictures as well. If you have old pictures of a loved one and a special occasion is coming, then a video collage of their photos would be one of the best gifts.
To convert your old photos into stunning videos, you can take the assistance of Filmora. Developed by Wondershare, Filmora features a wide range of editing tools and is extremely easy to use.
- You can import tons of old photos to Filmora and further arrange their order in its timeline.
- In Filmora, you will find inbuilt features to edit and customize your videos without any technical hassle.
- There are hundreds of effects, filters, presets, stickers, layers, etc. that you can include in your videos with a few clicks.
- The application would also let you add an audio track in the background from its library or by importing any audio of your choice.
- Filmora is freely available and would let you export your videos to different formats and resolutions.


To learn how to come up with an impressive video collage using Filmora, just follow these steps:
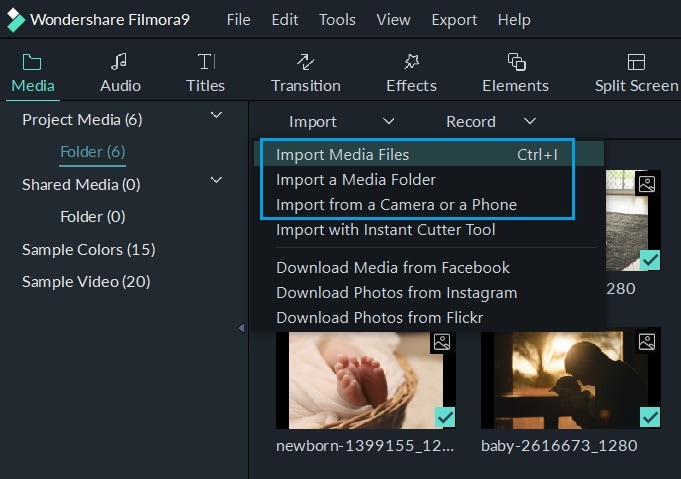
1. Import your digitized photos
To start with, you can just launch Filmora on your system and import your photos to the application. Simply click on the “Import” button from the toolbar to insert selective pictures or an entire folder. This will open a browser window, letting you locate and load the photos of your choice.

2. Create a timeline for your photos
Once you have imported your photos, you can include them in the timeline. To do this, you can click on the “+” button that is located on the top of the photo’s thumbnail. You can also just drag any photo and drop it on the preferred location in the timeline.
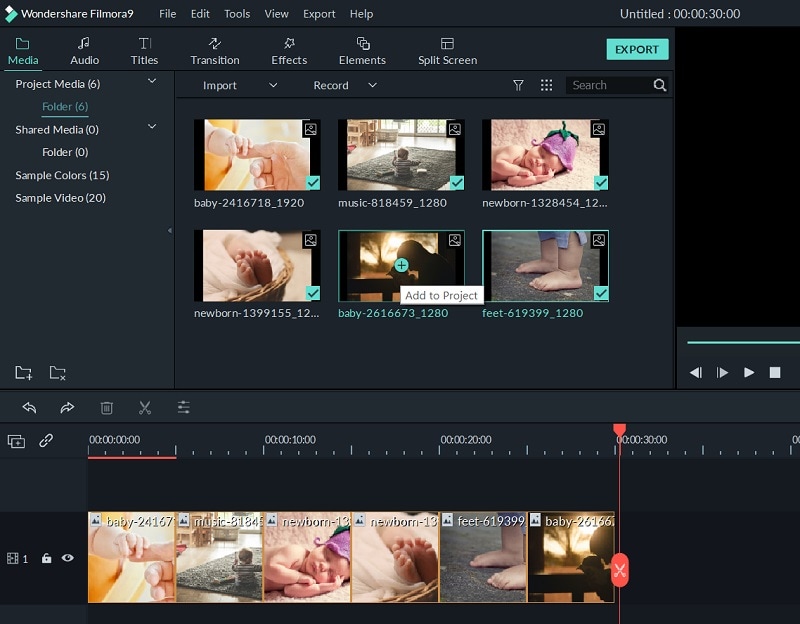
3. Edit the video
Just above the timeline, you can find all kinds of tools to edit your video. For instance, you can crop your photos, split the video, delete pictures, correct their coloring, and so on. To explore more options, you can click on the edit icon here.
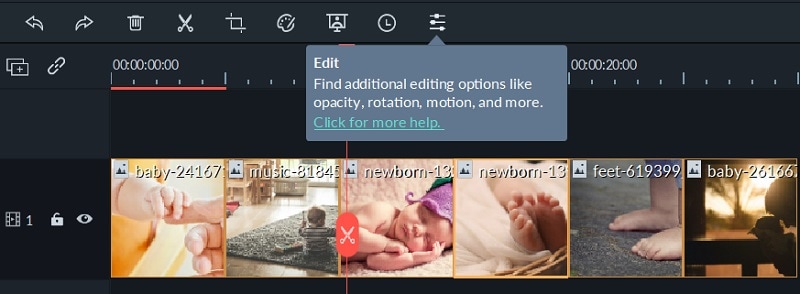
The edit option will present tons of additional features that you can implement on the video. Here, you can go to the “Motion” feature to get different transitions for your photos. This will let you select how any photo would appear in the video collage.
4. Add effects, transitions, audio, and more
As stated above, you can find a wide range of video editing options to explore in Fimora. On top of the interface, you can switch between audio, transition, effects, titles, and other options. You can just go to any feature here (like effects) to apply it to the video.


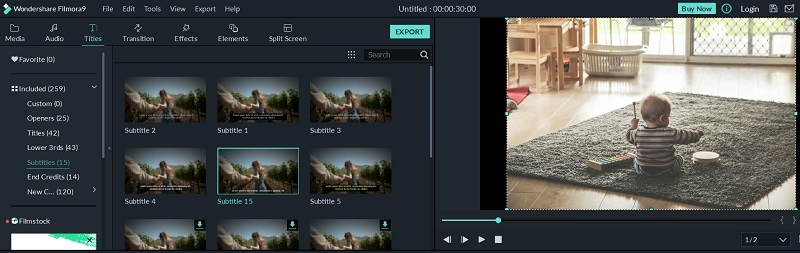
To add text to your videos, just go to the “Titles” option here. This will let you select a text effect, letting you add the content of your choice.
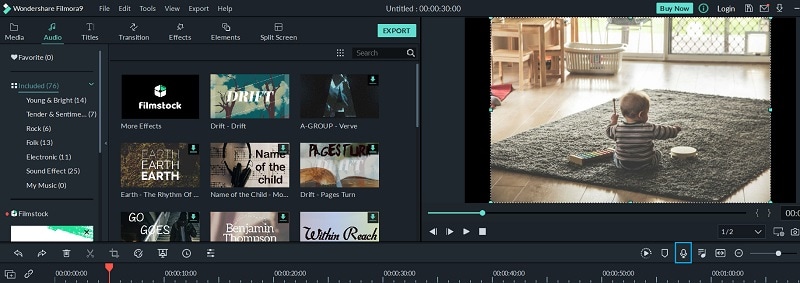
Besides that, you can also add a track to the video by visiting the “Audio” feature. Here, you will get access to tons to royalty-free audio tracks. Furthermore, you can also import any other audio track or click on the microphone icon (at the bottom of the preview panel) to record a voiceover for the video.
5. Export your video
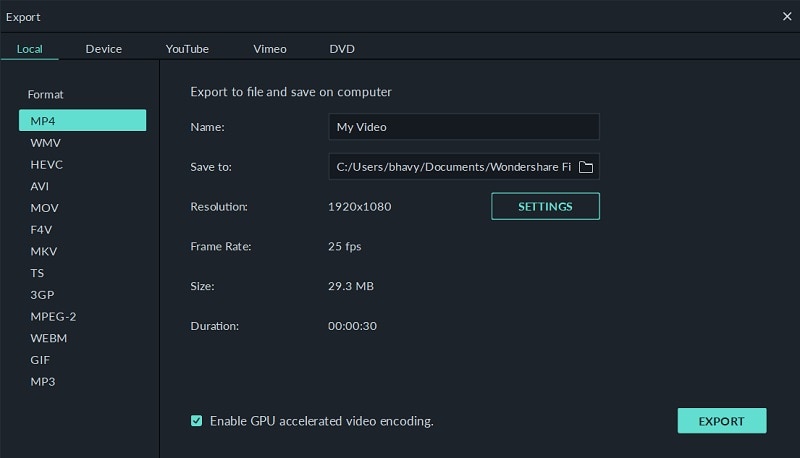
That’s it! After making all the changes, you can preview your video on the right side. If you are satisfied with the results, then click on the “Export” button from the top. This will open a dedicated window, letting you select a preferred format to export your file. You can also select a resolution for your video to adjust its size as well.
Find more fancy ways to make the best photo and video slideshow with Filmora!

More Editing Tips for Creating Memorable Videos
To get better results while making your video collage, you can consider following these suggestions.
1. Get high-quality pictures
When you digitize photos, keep their overall quality in mind. That’s why it is recommended to use a digital camera or a dedicated photo scanner app. In this way, you can maintain the high quality of your photos even when they are inserted into a video.
2. Maintain a timeline
When you add photos, try to come up with a feasible timeline instead of inserting them randomly. It is recommended to have a chronological timeline so that you can create a story for your audience.
3. Don’t apply too many effects and transitions
While it is good to have some transitions and effects in your video collage, try not to overdo it. If you have too many animations, then they might take away the essence of the video.
4. Insert suitable music
The background music in your video is as important as your photos, but a lot of people overlook it. You can easily find royalty-free music from several sources or can even insert any other file that you own. Some applications would also let you insert voiceovers to have that personal effect in your video.
Click here to know: where to get royalty-free music?
5. Use a reliable video editor
Most importantly, pick a user-friendly and effective video editor like Filmora. The application will let you come up with stunning videos using your photos without much effort.
There you go! I’m sure that after reading this guide, you would be able to digitize photos pretty easily. Not just that, you can also come up with memorable videos using your old photographs with a tool like Filmora. The resourceful application offers a wide range of video editing tools that will certainly come handy to you on numerous occasions.
Ollie Mattison
Ollie Mattison is a writer and a lover of all things video.
Follow @Ollie Mattison
Ollie Mattison
Mar 27, 2024• Proven solutions
We all know that pictures have the magic to make some moments last forever. Though, if a picture has been taken a long time back, then it might lose its quality. A lot of people end up losing their precious photos due to all kinds of incidents.
Therefore, it is highly recommended to digitize photos to make them lasting. In this way, you can make your photos last forever and keep them handy. In this post, I’m going to discuss some smart ways to digitize photos without any hassle. In another case, you may want to know how to restore old photos in old devices.

- Part 1: How to Digitize Your Memorable Old Photos
- Part 2: How to Convert Old Photos into a Video with Ease?
- Part 3: More Editing Tips for Creating Memorable Videos
4 Smart Ways to Digitize Your Memorable Old Photos
With time, the way we capture moments has also been changed. These days, Polaroid cameras have been replaced by various smartphones and 4K DSLR cameras . Nevertheless, you can digitize your photos in either of the following ways so that you can convert them into softcopy and easily move them around.
1. Use your Smartphones or Digital Cameras
This is something that you might have thought of doing before as well. We all use smartphones to take pictures, but have you ever thought of using the device’s camera to scan your old photographs. The same can be done by using any digital camera too.
Just make sure that you have proper lighting and all the pictures are organized. Now, just use your smartphone camera to take their pictures. Later, you can connect your phone (or its SD card) to your computer and transfer these scanned copies to any secure location. If you want, you can also upload your photos to the cloud to keep them safe.
2. Use a Scanner
If you have access to a scanner, then it would make it pretty easy for you to digitize photos. Most of the digital scanners won’t even cost that much. Therefore, if you have a lot of pictures to scan, then you can just buy a scanner. You can also find a scanner available at a nearby digital store that you can use on a per-copy basis.
Once you have scanned your photos, you can transfer them to a pen drive or move them to any other device of your choice.
3. Use a Photo Scanner App
There are also tons of readily available apps that you can use on your Android or iOS devices to digitize photos. You can just go to the App Store or Play Store on your device to browse the available scanner apps (most of them are free).
Some popular photo scanners that you can consider using are Scanner Pro, PhotoScan, ShoeBox, or PicScanner. Out of them, PhotoScan by Google is one of the most reliable options that I would recommend. It will help you easily scan your photos, edit them accordingly, and minimize their glare. You can also directly load your scanned pictures to your Google Photos account from here.
4. Get in Touch with a Professional
In case you have a lot of pictures that you wish to scan and little time, then you can also get in touch with some professionals. There are tons of photo digitization services that you can explore in almost every major city to get dedicated assistance.
How to Convert Old Photos into a Video Effortlessly?
By now, you would be able to digitize photos and have a soft copy of your old photographs. Apart from that, a lot of people would also like to make a video collage of their favorite pictures as well. If you have old pictures of a loved one and a special occasion is coming, then a video collage of their photos would be one of the best gifts.
To convert your old photos into stunning videos, you can take the assistance of Filmora. Developed by Wondershare, Filmora features a wide range of editing tools and is extremely easy to use.
- You can import tons of old photos to Filmora and further arrange their order in its timeline.
- In Filmora, you will find inbuilt features to edit and customize your videos without any technical hassle.
- There are hundreds of effects, filters, presets, stickers, layers, etc. that you can include in your videos with a few clicks.
- The application would also let you add an audio track in the background from its library or by importing any audio of your choice.
- Filmora is freely available and would let you export your videos to different formats and resolutions.
To learn how to come up with an impressive video collage using Filmora, just follow these steps:
1. Import your digitized photos
To start with, you can just launch Filmora on your system and import your photos to the application. Simply click on the “Import” button from the toolbar to insert selective pictures or an entire folder. This will open a browser window, letting you locate and load the photos of your choice.
2. Create a timeline for your photos
Once you have imported your photos, you can include them in the timeline. To do this, you can click on the “+” button that is located on the top of the photo’s thumbnail. You can also just drag any photo and drop it on the preferred location in the timeline.
3. Edit the video
Just above the timeline, you can find all kinds of tools to edit your video. For instance, you can crop your photos, split the video, delete pictures, correct their coloring, and so on. To explore more options, you can click on the edit icon here.
 DLNow Video Downloader
The edit option will present tons of additional features that you can implement on the video. Here, you can go to the “Motion” feature to get different transitions for your photos. This will let you select how any photo would appear in the video collage.
4. Add effects, transitions, audio, and more
As stated above, you can find a wide range of video editing options to explore in Fimora. On top of the interface, you can switch between audio, transition, effects, titles, and other options. You can just go to any feature here (like effects) to apply it to the video.
To add text to your videos, just go to the “Titles” option here. This will let you select a text effect, letting you add the content of your choice.
Besides that, you can also add a track to the video by visiting the “Audio” feature. Here, you will get access to tons to royalty-free audio tracks. Furthermore, you can also import any other audio track or click on the microphone icon (at the bottom of the preview panel) to record a voiceover for the video.

company, user or members of the same household. Action! - screen and game recorder</a>
5. Export your video
That’s it! After making all the changes, you can preview your video on the right side. If you are satisfied with the results, then click on the “Export” button from the top. This will open a dedicated window, letting you select a preferred format to export your file. You can also select a resolution for your video to adjust its size as well.
Find more fancy ways to make the best photo and video slideshow with Filmora!
More Editing Tips for Creating Memorable Videos
To get better results while making your video collage, you can consider following these suggestions.
1. Get high-quality pictures
When you digitize photos, keep their overall quality in mind. That’s why it is recommended to use a digital camera or a dedicated photo scanner app. In this way, you can maintain the high quality of your photos even when they are inserted into a video.
2. Maintain a timeline
When you add photos, try to come up with a feasible timeline instead of inserting them randomly. It is recommended to have a chronological timeline so that you can create a story for your audience.
3. Don’t apply too many effects and transitions
While it is good to have some transitions and effects in your video collage, try not to overdo it. If you have too many animations, then they might take away the essence of the video.
4. Insert suitable music
The background music in your video is as important as your photos, but a lot of people overlook it. You can easily find royalty-free music from several sources or can even insert any other file that you own. Some applications would also let you insert voiceovers to have that personal effect in your video.
Click here to know: where to get royalty-free music?
5. Use a reliable video editor
Most importantly, pick a user-friendly and effective video editor like Filmora. The application will let you come up with stunning videos using your photos without much effort.
There you go! I’m sure that after reading this guide, you would be able to digitize photos pretty easily. Not just that, you can also come up with memorable videos using your old photographs with a tool like Filmora. The resourceful application offers a wide range of video editing tools that will certainly come handy to you on numerous occasions.
Ollie Mattison
Ollie Mattison is a writer and a lover of all things video.
Follow @Ollie Mattison
Ollie Mattison
Mar 27, 2024• Proven solutions
We all know that pictures have the magic to make some moments last forever. Though, if a picture has been taken a long time back, then it might lose its quality. A lot of people end up losing their precious photos due to all kinds of incidents.
Therefore, it is highly recommended to digitize photos to make them lasting. In this way, you can make your photos last forever and keep them handy. In this post, I’m going to discuss some smart ways to digitize photos without any hassle. In another case, you may want to know how to restore old photos in old devices.
- Part 1: How to Digitize Your Memorable Old Photos
- Part 2: How to Convert Old Photos into a Video with Ease?
- Part 3: More Editing Tips for Creating Memorable Videos
 Jet Profiler for MySQL, Enterprise Version: Jet Profiler for MySQL is real-time query performance and diagnostics tool for the MySQL database server. Its detailed query information, graphical interface and ease of use makes this a great tool for finding performance bottlenecks in your MySQL databases.
 4 Smart Ways to Digitize Your Memorable Old Photos
With time, the way we capture moments has also been changed. These days, Polaroid cameras have been replaced by various smartphones and 4K DSLR cameras . Nevertheless, you can digitize your photos in either of the following ways so that you can convert them into softcopy and easily move them around.
1. Use your Smartphones or Digital Cameras
This is something that you might have thought of doing before as well. We all use smartphones to take pictures, but have you ever thought of using the device’s camera to scan your old photographs. The same can be done by using any digital camera too.
Just make sure that you have proper lighting and all the pictures are organized. Now, just use your smartphone camera to take their pictures. Later, you can connect your phone (or its SD card) to your computer and transfer these scanned copies to any secure location. If you want, you can also upload your photos to the cloud to keep them safe.
2. Use a Scanner
If you have access to a scanner, then it would make it pretty easy for you to digitize photos. Most of the digital scanners won’t even cost that much. Therefore, if you have a lot of pictures to scan, then you can just buy a scanner. You can also find a scanner available at a nearby digital store that you can use on a per-copy basis.
Once you have scanned your photos, you can transfer them to a pen drive or move them to any other device of your choice.
3. Use a Photo Scanner App
There are also tons of readily available apps that you can use on your Android or iOS devices to digitize photos. You can just go to the App Store or Play Store on your device to browse the available scanner apps (most of them are free).
Some popular photo scanners that you can consider using are Scanner Pro, PhotoScan, ShoeBox, or PicScanner. Out of them, PhotoScan by Google is one of the most reliable options that I would recommend. It will help you easily scan your photos, edit them accordingly, and minimize their glare. You can also directly load your scanned pictures to your Google Photos account from here.
4. Get in Touch with a Professional
In case you have a lot of pictures that you wish to scan and little time, then you can also get in touch with some professionals. There are tons of photo digitization services that you can explore in almost every major city to get dedicated assistance.
## How to Convert Old Photos into a Video Effortlessly?By now, you would be able to digitize photos and have a soft copy of your old photographs. Apart from that, a lot of people would also like to make a video collage of their favorite pictures as well. If you have old pictures of a loved one and a special occasion is coming, then a video collage of their photos would be one of the best gifts.
To convert your old photos into stunning videos, you can take the assistance of Filmora. Developed by Wondershare, Filmora features a wide range of editing tools and is extremely easy to use.
- You can import tons of old photos to Filmora and further arrange their order in its timeline.
- In Filmora, you will find inbuilt features to edit and customize your videos without any technical hassle.
- There are hundreds of effects, filters, presets, stickers, layers, etc. that you can include in your videos with a few clicks.
- The application would also let you add an audio track in the background from its library or by importing any audio of your choice.
- Filmora is freely available and would let you export your videos to different formats and resolutions.

To learn how to come up with an impressive video collage using Filmora, just follow these steps:
1. Import your digitized photos
To start with, you can just launch Filmora on your system and import your photos to the application. Simply click on the “Import” button from the toolbar to insert selective pictures or an entire folder. This will open a browser window, letting you locate and load the photos of your choice.

2. Create a timeline for your photos
Once you have imported your photos, you can include them in the timeline. To do this, you can click on the “+” button that is located on the top of the photo’s thumbnail. You can also just drag any photo and drop it on the preferred location in the timeline.
3. Edit the video
Just above the timeline, you can find all kinds of tools to edit your video. For instance, you can crop your photos, split the video, delete pictures, correct their coloring, and so on. To explore more options, you can click on the edit icon here.
The edit option will present tons of additional features that you can implement on the video. Here, you can go to the “Motion” feature to get different transitions for your photos. This will let you select how any photo would appear in the video collage.
4. Add effects, transitions, audio, and more
As stated above, you can find a wide range of video editing options to explore in Fimora. On top of the interface, you can switch between audio, transition, effects, titles, and other options. You can just go to any feature here (like effects) to apply it to the video.
To add text to your videos, just go to the “Titles” option here. This will let you select a text effect, letting you add the content of your choice.
Besides that, you can also add a track to the video by visiting the “Audio” feature. Here, you will get access to tons to royalty-free audio tracks. Furthermore, you can also import any other audio track or click on the microphone icon (at the bottom of the preview panel) to record a voiceover for the video.

5. Export your video
That’s it! After making all the changes, you can preview your video on the right side. If you are satisfied with the results, then click on the “Export” button from the top. This will open a dedicated window, letting you select a preferred format to export your file. You can also select a resolution for your video to adjust its size as well.
Find more fancy ways to make the best photo and video slideshow with Filmora!
More Editing Tips for Creating Memorable Videos
To get better results while making your video collage, you can consider following these suggestions.
1. Get high-quality pictures
When you digitize photos, keep their overall quality in mind. That’s why it is recommended to use a digital camera or a dedicated photo scanner app. In this way, you can maintain the high quality of your photos even when they are inserted into a video.
2. Maintain a timeline
When you add photos, try to come up with a feasible timeline instead of inserting them randomly. It is recommended to have a chronological timeline so that you can create a story for your audience.
3. Don’t apply too many effects and transitions
While it is good to have some transitions and effects in your video collage, try not to overdo it. If you have too many animations, then they might take away the essence of the video.
4. Insert suitable music
The background music in your video is as important as your photos, but a lot of people overlook it. You can easily find royalty-free music from several sources or can even insert any other file that you own. Some applications would also let you insert voiceovers to have that personal effect in your video.
Click here to know: where to get royalty-free music?
5. Use a reliable video editor
Most importantly, pick a user-friendly and effective video editor like Filmora. The application will let you come up with stunning videos using your photos without much effort.

There you go! I’m sure that after reading this guide, you would be able to digitize photos pretty easily. Not just that, you can also come up with memorable videos using your old photographs with a tool like Filmora. The resourceful application offers a wide range of video editing tools that will certainly come handy to you on numerous occasions.
Ollie Mattison
Ollie Mattison is a writer and a lover of all things video.
Follow @Ollie Mattison
Ollie Mattison
Mar 27, 2024• Proven solutions
We all know that pictures have the magic to make some moments last forever. Though, if a picture has been taken a long time back, then it might lose its quality. A lot of people end up losing their precious photos due to all kinds of incidents.
Therefore, it is highly recommended to digitize photos to make them lasting. In this way, you can make your photos last forever and keep them handy. In this post, I’m going to discuss some smart ways to digitize photos without any hassle. In another case, you may want to know how to restore old photos in old devices.
- Part 1: How to Digitize Your Memorable Old Photos
- Part 2: How to Convert Old Photos into a Video with Ease?
- Part 3: More Editing Tips for Creating Memorable Videos
4 Smart Ways to Digitize Your Memorable Old Photos
With time, the way we capture moments has also been changed. These days, Polaroid cameras have been replaced by various smartphones and 4K DSLR cameras . Nevertheless, you can digitize your photos in either of the following ways so that you can convert them into softcopy and easily move them around.
1. Use your Smartphones or Digital Cameras
This is something that you might have thought of doing before as well. We all use smartphones to take pictures, but have you ever thought of using the device’s camera to scan your old photographs. The same can be done by using any digital camera too.
Just make sure that you have proper lighting and all the pictures are organized. Now, just use your smartphone camera to take their pictures. Later, you can connect your phone (or its SD card) to your computer and transfer these scanned copies to any secure location. If you want, you can also upload your photos to the cloud to keep them safe.
2. Use a Scanner
If you have access to a scanner, then it would make it pretty easy for you to digitize photos. Most of the digital scanners won’t even cost that much. Therefore, if you have a lot of pictures to scan, then you can just buy a scanner. You can also find a scanner available at a nearby digital store that you can use on a per-copy basis.
Once you have scanned your photos, you can transfer them to a pen drive or move them to any other device of your choice.
3. Use a Photo Scanner App
There are also tons of readily available apps that you can use on your Android or iOS devices to digitize photos. You can just go to the App Store or Play Store on your device to browse the available scanner apps (most of them are free).
Some popular photo scanners that you can consider using are Scanner Pro, PhotoScan, ShoeBox, or PicScanner. Out of them, PhotoScan by Google is one of the most reliable options that I would recommend. It will help you easily scan your photos, edit them accordingly, and minimize their glare. You can also directly load your scanned pictures to your Google Photos account from here.
4. Get in Touch with a Professional
In case you have a lot of pictures that you wish to scan and little time, then you can also get in touch with some professionals. There are tons of photo digitization services that you can explore in almost every major city to get dedicated assistance.
How to Convert Old Photos into a Video Effortlessly?
By now, you would be able to digitize photos and have a soft copy of your old photographs. Apart from that, a lot of people would also like to make a video collage of their favorite pictures as well. If you have old pictures of a loved one and a special occasion is coming, then a video collage of their photos would be one of the best gifts.
To convert your old photos into stunning videos, you can take the assistance of Filmora. Developed by Wondershare, Filmora features a wide range of editing tools and is extremely easy to use.
- You can import tons of old photos to Filmora and further arrange their order in its timeline.
- In Filmora, you will find inbuilt features to edit and customize your videos without any technical hassle.
- There are hundreds of effects, filters, presets, stickers, layers, etc. that you can include in your videos with a few clicks.
- The application would also let you add an audio track in the background from its library or by importing any audio of your choice.
- Filmora is freely available and would let you export your videos to different formats and resolutions.
 /a>
/a>
To learn how to come up with an impressive video collage using Filmora, just follow these steps:
1. Import your digitized photos
To start with, you can just launch Filmora on your system and import your photos to the application. Simply click on the “Import” button from the toolbar to insert selective pictures or an entire folder. This will open a browser window, letting you locate and load the photos of your choice.
2. Create a timeline for your photos
Once you have imported your photos, you can include them in the timeline. To do this, you can click on the “+” button that is located on the top of the photo’s thumbnail. You can also just drag any photo and drop it on the preferred location in the timeline.

3. Edit the video
Just above the timeline, you can find all kinds of tools to edit your video. For instance, you can crop your photos, split the video, delete pictures, correct their coloring, and so on. To explore more options, you can click on the edit icon here.
 The Tube Sites Submitter is a fast and efficient tool for anyone who needs to upload videos quickly, easily and automatically to hundreds of tube sites in mere minutes .
The edit option will present tons of additional features that you can implement on the video. Here, you can go to the “Motion” feature to get different transitions for your photos. This will let you select how any photo would appear in the video collage.
4. Add effects, transitions, audio, and more
As stated above, you can find a wide range of video editing options to explore in Fimora. On top of the interface, you can switch between audio, transition, effects, titles, and other options. You can just go to any feature here (like effects) to apply it to the video.
To add text to your videos, just go to the “Titles” option here. This will let you select a text effect, letting you add the content of your choice.
Besides that, you can also add a track to the video by visiting the “Audio” feature. Here, you will get access to tons to royalty-free audio tracks. Furthermore, you can also import any other audio track or click on the microphone icon (at the bottom of the preview panel) to record a voiceover for the video.
5. Export your video
That’s it! After making all the changes, you can preview your video on the right side. If you are satisfied with the results, then click on the “Export” button from the top. This will open a dedicated window, letting you select a preferred format to export your file. You can also select a resolution for your video to adjust its size as well.
Find more fancy ways to make the best photo and video slideshow with Filmora!
More Editing Tips for Creating Memorable Videos
To get better results while making your video collage, you can consider following these suggestions.
1. Get high-quality pictures
When you digitize photos, keep their overall quality in mind. That’s why it is recommended to use a digital camera or a dedicated photo scanner app. In this way, you can maintain the high quality of your photos even when they are inserted into a video.
2. Maintain a timeline
When you add photos, try to come up with a feasible timeline instead of inserting them randomly. It is recommended to have a chronological timeline so that you can create a story for your audience.
3. Don’t apply too many effects and transitions
While it is good to have some transitions and effects in your video collage, try not to overdo it. If you have too many animations, then they might take away the essence of the video.
4. Insert suitable music
The background music in your video is as important as your photos, but a lot of people overlook it. You can easily find royalty-free music from several sources or can even insert any other file that you own. Some applications would also let you insert voiceovers to have that personal effect in your video.
Click here to know: where to get royalty-free music?
5. Use a reliable video editor
Most importantly, pick a user-friendly and effective video editor like Filmora. The application will let you come up with stunning videos using your photos without much effort.

There you go! I’m sure that after reading this guide, you would be able to digitize photos pretty easily. Not just that, you can also come up with memorable videos using your old photographs with a tool like Filmora. The resourceful application offers a wide range of video editing tools that will certainly come handy to you on numerous occasions.
Ollie Mattison
Ollie Mattison is a writer and a lover of all things video.
Follow @Ollie Mattison
- Title: 2024 Approved How to Digitize Your Old Photos and Turn Them Into Videos
- Author: Jeffrey
- Created at : 2024-08-21 13:24:49
- Updated at : 2024-08-22 13:24:49
- Link: https://some-knowledge.techidaily.com/2024-approved-how-to-digitize-your-old-photos-and-turn-them-into-videos/
- License: This work is licensed under CC BY-NC-SA 4.0.