
"In 2024, Fine-Tuning Your Audio Transitions In-Depth Insights for Using Audacity"
Fine-Tuning Your Audio Transitions: In-Depth Insights for Using Audacity
You may choose from a wide variety of audio editing tools. It’s really free to utilize one of the most well-liked ones. You want to make your voice better for your next audio production, right? You most likely searched the internet and came across some cool audio program named Audacity. Mix tracks or add effects to your recordings to edit your audio utilizing the cut, copy, and paste tools with limitless undo capability.
For audio analysis applications, Audacity additionally has an integrated amplitude-envelope editor, a customizable spectrogram mode, and a frequency-analysis window. The ideal way to get started in the realm of audio editing is using Audacity. It was created by volunteers using open-source software. With Audacity, you can do a lot of things, such trim files to make them shorter, take away background noise, cut out silence, change volume, and more. The drop-down menu located underneath the sound level meters on top allows you to rapidly choose between the numerous audio sources.

Part 1. What is Crossfade?
Crossfading process allows two sounds to segue smoothly into one another. Crossfading is an audio effect that is often used in audio engineering to merge two or more sounds in a song gradually rather than suddenly. This method is mostly used to prevent any abrupt silences between two songs, which might disturb listeners. As a result of the development of the computer-based digital audio editor, crossfading became more straightforward.
When you cross fade music, you cause one piece of audio to fade out—the sound gradually vanishes—at the precise same moment as another piece of audio fades in—the sound gradually manifests. This effect produces a seamless transition between the two songs without any abrupt pauses or quiet in between. The volume of audio in the source files is the sole restriction on the duration of the fade in a digital editor that supports crossfading between two or more files.
 Jet Profiler for MySQL, Enterprise Version: Jet Profiler for MySQL is real-time query performance and diagnostics tool for the MySQL database server. Its detailed query information, graphical interface and ease of use makes this a great tool for finding performance bottlenecks in your MySQL databases.
 Part 2. How To Use Crossfading in Audacity
Don’t be intimidated by the capabilities of this audio program. Before the first event completely vanishes into the second, the crossfade gradually transitions by overlaying the events at the transition point so that both are seen or heard at the same time. Using Audacity, it’s easy to reduce some of the background noise in your audio track. You must create a noise profile to do this. We’ve put up a helpful guide on how to use Audacity to enhance your audio productions.
Steps to Use Audacity Crossfade:
Step1 Select File, Import, and Audio from the menu. You may choose one or more audio files, and Audacity will automatically import them into the current project.

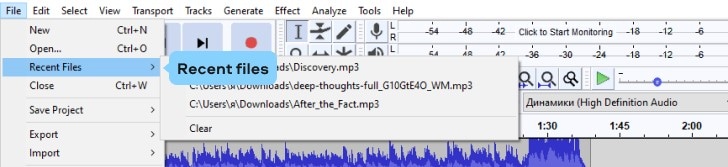
Step2 Select File, followed by Recent files. The first of the 12 most recent saved or imported files will be imported if you do this.
Step3 Use your Selection tool to align the clips so that a crossfade will be applied between two clips on different tracks. Go to Effect > Crossfade Songs, place the cursor where you want the fade to begin, then drag it across the tracks you wish to blend.
 WinUtilities Pro
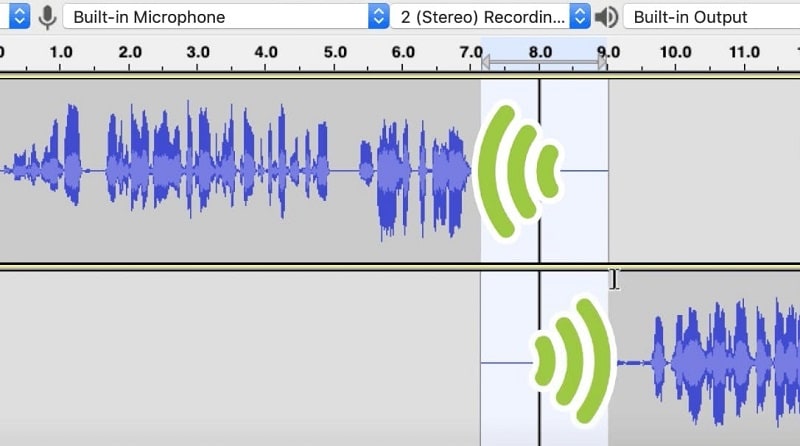
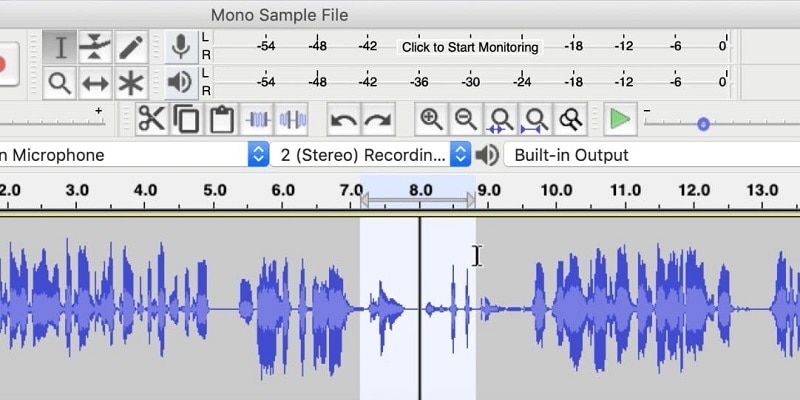
Step4 Using the Time Shift Tool, place your two clips adjacent to one another in order to apply a crossfade across them on the same track. Select the area to be crossfaded using the Selection tool, and then click Effect > Crossfade Clips to combine the sounds you’ve chosen.

Step5 This project should be exported as an MP3. Once you’ve finished editing, choose File > Export > Export as MP3 from the menu. From this point on, a pop-up window with a number of fields will appear, allowing you to choose how the file is saved.
 HD Video Converter Factory Pro
Part 3. Alternative Way to Fade Audio
One of the many outstanding audios editing programs for beginners with powerful but user-friendly audio and video editing tools is Filmora . When exporting your audios from Wondershare Filmora, there is no watermark and no restriction save the expectation of free trial users.
In contrast to the Audacity crossfade, we’re here referring to the platform for editing features, which has all audio and video-related functions built in. Wondershare Filmora is really unique. With Filmora’s robust audio editor integrated into the video editing platform, fading in and out is a breeze. While doing so is useful and worthwhile, attempt. Let’s examine the procedures involved in achieving it:
Free Download For Win 7 or later(64-bit)
Free Download For macOS 10.14 or later
How To Crossfade Audio with Filmora :
Step1 Install Filmora and Import the Audio
To use this program to crossfade audios, you must first download and install it on your computer. Start by downloading the most recent version of this program by visiting the official links. Once you’ve done that, it’s time to install it on your computer. You can quickly launch Filmora from your desktop or the search bar and open it as follows to get started:
Afterwards, you need to import your files and with the Filmora it’s handy as well as you need to import it with a single click from your device as follows: Choose the Import button from the software’s main interface as shown below to import your audio and video files:

Step2 Open Filmora’s Audio Editor
Following the import of your media files into Filmora, you must drag the files onto the program’s timeline. Your media files may be edited using all available methods in the timeline. Simply right-click on the particular audio file and choose “Edit Audio” from the list to use Filmora’s audio editor:
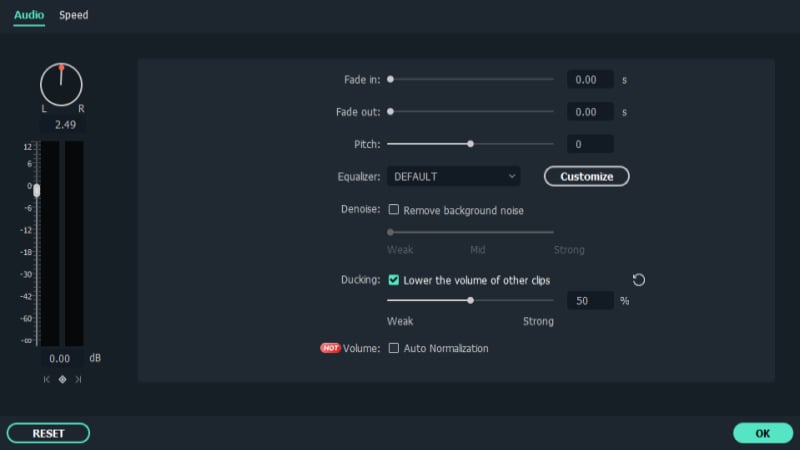
Step3 Use the Audio Fade-in/Fade-out
The primary step in this respect is how to begin fading-in/fading-out your audio files using Filmora, which is presented here. The nicest feature of the Filmora is how easy you can use these methods from the timeline.

To do so, center your attention on your audio file inside the timeline; after you’ve chosen it, the two icons will appear above the audio file. Drag the first one to the length you want to conduct the audio fade-in option, as shown. Hit the other icon and drag it to the required extent in Filmora to complete the fade-out.
Step4 Polish the Audio Further
Filmora features a built-in video editing toolbox in addition to an audio editor. Within the app, you may use editing methods ranging from simple to advanced. Simply click on the video file inside the timeline as shown below to choose the basic editor:

Step5 Export Your Sound and Video
On that note, if you are happy with how your voice has changed, right now could be the greatest moment to preserve it or perhaps record it. All popular video and audio formats, including MP3, are supported. To do this, click “Export” and select the file format from the Local menu as shown below. You can also customize the final destination of the edited audio file using the settings as shown below:
Part 4. Related FAQs
1. What is crossfade between tracks?
Crossfade occurs when one piece of audio fades out just as another piece of audio begins to fade in. To fix errors, people often just highlight them and snip them out. There is now a vacuum there. The portion before the cut and the portion following it result in two separate audio files. As you drag the later audio to the left to link it like a railway part to the end of the previous audio item, you can now unite these two pieces.
2. How to crossfade audio online?
You may utilize crossfade between your combined tracks and convert your audio file to the proper format with the Online Audio Combiner. You will need a free internet program that combines audio files. If you want a seamless change from one file to another, use the crossfade option. When combining sounds, it will fade in and out.


3. How do I smooth audio in Audacity?
Use the Normalize effect to equalize the left and right channels of stereo recordings, set the peak amplitude of a single track, and make several tracks have the same peak amplitude. By doing this, you can be confident that your podcast or audio recording will sound great via headphones.

Conclusion
In summary, Audacity is a free audio tool that’s really simple to use. By utilizing the graphic equalizer, you may enhance the sound quality of the voices in your audio. You may modify the frequencies’ loudness levels with the visual equalizer. We strongly advise that you adhere to the instructions in the article in order to get the best results since a decent setup will make post-production a lot simpler.
Free Download For macOS 10.14 or later
How To Crossfade Audio with Filmora :
Step1 Install Filmora and Import the Audio
To use this program to crossfade audios, you must first download and install it on your computer. Start by downloading the most recent version of this program by visiting the official links. Once you’ve done that, it’s time to install it on your computer. You can quickly launch Filmora from your desktop or the search bar and open it as follows to get started:
Afterwards, you need to import your files and with the Filmora it’s handy as well as you need to import it with a single click from your device as follows: Choose the Import button from the software’s main interface as shown below to import your audio and video files:
Step2 Open Filmora’s Audio Editor
Following the import of your media files into Filmora, you must drag the files onto the program’s timeline. Your media files may be edited using all available methods in the timeline. Simply right-click on the particular audio file and choose “Edit Audio” from the list to use Filmora’s audio editor:
Step3 Use the Audio Fade-in/Fade-out
The primary step in this respect is how to begin fading-in/fading-out your audio files using Filmora, which is presented here. The nicest feature of the Filmora is how easy you can use these methods from the timeline.
Parental Control Software
To do so, center your attention on your audio file inside the timeline; after you’ve chosen it, the two icons will appear above the audio file. Drag the first one to the length you want to conduct the audio fade-in option, as shown. Hit the other icon and drag it to the required extent in Filmora to complete the fade-out.
Step4 Polish the Audio Further
Filmora features a built-in video editing toolbox in addition to an audio editor. Within the app, you may use editing methods ranging from simple to advanced. Simply click on the video file inside the timeline as shown below to choose the basic editor:
 LYRX is an easy-to-use karaoke software with the professional features karaoke hosts need to perform with precision. LYRX is karaoke show hosting software that supports all standard karaoke file types as well as HD video formats, and it’s truly fun to use.
Step5 Export Your Sound and Video
On that note, if you are happy with how your voice has changed, right now could be the greatest moment to preserve it or perhaps record it. All popular video and audio formats, including MP3, are supported. To do this, click “Export” and select the file format from the Local menu as shown below. You can also customize the final destination of the edited audio file using the settings as shown below:
Part 4. Related FAQs
1. What is crossfade between tracks?
Crossfade occurs when one piece of audio fades out just as another piece of audio begins to fade in. To fix errors, people often just highlight them and snip them out. There is now a vacuum there. The portion before the cut and the portion following it result in two separate audio files. As you drag the later audio to the left to link it like a railway part to the end of the previous audio item, you can now unite these two pieces.
2. How to crossfade audio online?
You may utilize crossfade between your combined tracks and convert your audio file to the proper format with the Online Audio Combiner. You will need a free internet program that combines audio files. If you want a seamless change from one file to another, use the crossfade option. When combining sounds, it will fade in and out.
3. How do I smooth audio in Audacity?
Use the Normalize effect to equalize the left and right channels of stereo recordings, set the peak amplitude of a single track, and make several tracks have the same peak amplitude. By doing this, you can be confident that your podcast or audio recording will sound great via headphones.
Conclusion
In summary, Audacity is a free audio tool that’s really simple to use. By utilizing the graphic equalizer, you may enhance the sound quality of the voices in your audio. You may modify the frequencies’ loudness levels with the visual equalizer. We strongly advise that you adhere to the instructions in the article in order to get the best results since a decent setup will make post-production a lot simpler.
- Title: In 2024, Fine-Tuning Your Audio Transitions In-Depth Insights for Using Audacity
- Author: Jeffrey
- Created at : 2024-08-21 13:07:22
- Updated at : 2024-08-22 13:07:22
- Link: https://some-knowledge.techidaily.com/in-2024-fine-tuning-your-audio-transitions-in-depth-insights-for-using-audacity/
- License: This work is licensed under CC BY-NC-SA 4.0.