:max_bytes(150000):strip_icc()/youtubetvdown-b7ae7388da8543c58e8529b9c4a7f11d.jpg)
In 2024, Implementing Incremental Noise Reduction Using Audacity
Implementing Incremental Noise Reduction Using Audacity
Free, open-source freeware for Windows and Mac, Audacity, is a powerful toolkit to Fade Audacity. You could wish to employ the common music production method of fading songs in and out of your podcast using Audacity fade. To make an engaging and deeper podcast, it’s helpful to understand how to slightly fade out the music so that it plays in the background but still makes it easy to hear the spoken track. There are a few ways to do this.
You can easily apply professional fades to your audio files with Audacity fade out effect. The audio in the chosen portion will progressively get quieter when the fade out effect is applied, ending in stillness. The fade out tool is nearly totally automated, making it simple and understandable for both novices and experts. Along with the other several tools under Audacity’s Effects menu, the fade out tool may be found there.

WPS Office Premium ( File Recovery, Photo Scanning, Convert PDF)–Yearly
Part 1. Linear Fade in/out
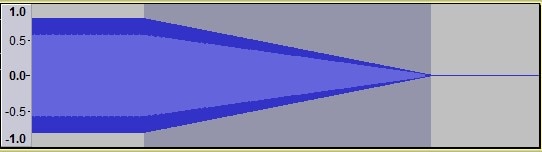
You may apply linear fades, a straightforward fade option, to any segment of your music. Alternatively, you might apply it to the full audio file. Linear fades come in two varieties. Fade-in and Fade-out are the two varieties. Any section of your audio that you apply a fade-in to will get muted and return to its original volume. Additionally, if you activate the fade-out feature in your audio, the audio will transition from its original volume to total quiet.
Steps to Use Linear Fade in/out:
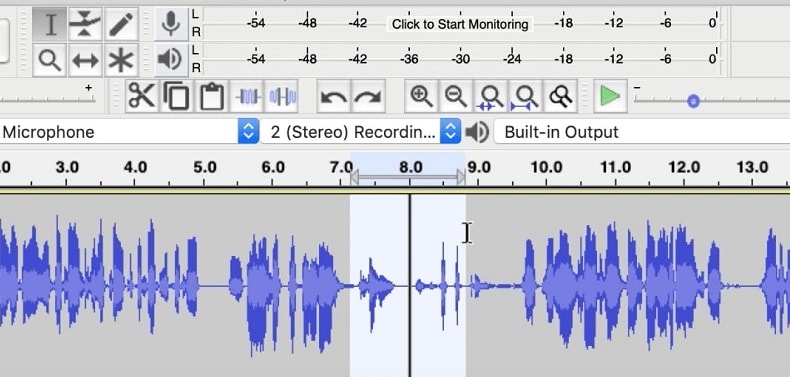
To divide a track into several parts so you may apply a fade to a specific audio segment, press Cmd + I (or Ctrl + I).
In this example, we divided the clip at the eight-second mark and used the Time Shift tool to shift the second chunk to the new location.
By selecting the audio segment, you wish to fade out and selecting Effect > Fade Out, you may add a fade-out to the initial clip.

 Glarysoft File Recovery Pro - Helps to recover your lost file/data, even permanently deleted data.
Part 2. Studio Fade Out
This effect is shown by Audacity as a curve that resembles the letter S. It results in a very gentle fading. After the first boom, there is utter quiet. It’s a sound that actually gives off the impression of fading away over time. Using the repeat last effect, you can quickly repeat this fading option. Additionally, Ctrl + R serves as the shortcut for the same.
How to Use Studio Fade Out:
Choose your audio segment, go to the Effect menu, slide to the bottom, and pick Studio Fade Out to apply the effect.

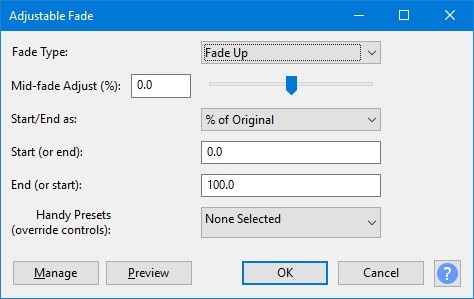
Part 3. Adjustable Fade
A dialog box will show up on the screen when you choose the customizable fade option. You may customize the form and pattern of the fading using that dialog box. You may use this ability to make partial fades if you’d like. You must maintain the tracks stacked one on top of the other with the lower track underneath the higher track and its end overlapping when employing this form of fade.
Steps to Use Adjustable Fade:
- Select Effect from the menu.
- Select the variable fading option.
 CollageIt Pro
Part 4. Crossfades Audacity
There are two choices available when using this effect. You have two options: either manually make a crossfade of your own, or utilize one of the pre-existing crossfades in Audacity. In Audacity, there are two crossfades that are accessible. Crossfade clips and Crossfade tracks are what they are. Crossfade clips make it easier to switch between two distinct clips. Additionally, crossfade tracks aid in crossfading between two audio tracks and are more exact.
Steps to Use Crossfades:
Using the Time Shift Tool, place your two clips adjacent to one another in order to apply a crossfade across them on the same track.
Select the area to be crossfaded using the Selection tool, and then click Effect > Crossfade Clips to combine the sounds you’ve chosen.
Use your Selection tool to organize the clips such that a crossfade will be applied between two clips on different tracks. Go to Effect > Crossfade Songs, place the cursor where you want the fade to begin, then drag it across the tracks you wish to blend.
Part 5. Alternative Way to Fade Audio
Even though it’s still thought of as difficult, time-consuming work, audio editing is really pretty easy with the correct program or tool. The quality of audio tracks in a video is often disregarded by amateur video producers. In addition to having advanced features like 4K editing support, GIF support, noise removal, color tuning, an advanced text editor, an audio mixer, video stabilization, scene detection, and an audio equalizer, Filmora is fairly simple to use and allows for extensive customization of pre-existing templates.
Free Download For Win 7 or later(64-bit)
Free Download For macOS 10.14 or later
Step1 Download and Install Filmora
Installing Filmora, a straightforward platform for starting to edit your audio and music files, is the first step. You must first download and install this application on your Windows PC in order to utilize it without problem. Download the most current edition of this application first. It’s now time to install it on your computer when you’ve completed that. Simply install this program on your computer by following the standard setup instructions if you want to do it fast.
Step2 Open Filmora and import audio files
In the step that follows, we’ll show you how to use this platform to fade in and out audio. To begin, open Filmora by clicking on the icon on your desktop or using the search bar.

By choosing the Video Editor option from the software’s home screen, you may now investigate the basic principles of editing. This will bring up the main interface for Filmora. To import your music and video files, just choose the Import button from the software’s main screen, as seen below:
Step3 Open the Audio Editor in Filmora
You must drag the files into Filmora’s timeline after importing your media files, as seen below. You may modify your media files using every tool in the timeline. To utilize Filmora’s audio editor, just right-click on the specific audio file and choose “Edit Audio” from the list:
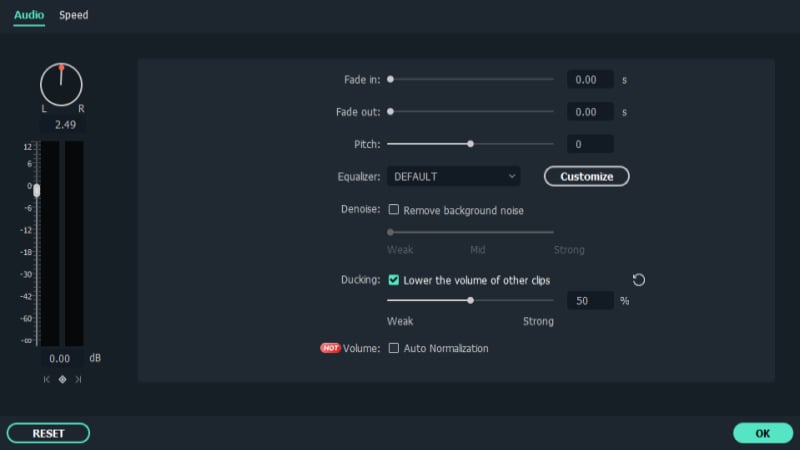
Step4 Fade-in/fade-out audio
The first step in this process is to learn how to use Filmora to start fading in and out your audio recordings. The best aspect of Filmora is how simple it is to employ these techniques from the timeline. To achieve this, focus on the audio file that you want to change in the timeline; after you’ve picked it, the two icons will show up above the audio file. Drag the first one to the desired duration for the audio fade-in option, as demonstrated:

To finish the fade-out, click and drag the other icon in Filmora to the necessary duration. You may hear the music by playing the file within the timeline of the Filmora preview layout.
Step5 Export the Modified File
The last step consists of downloading your modified file to your PC and storing it there in the appropriate place and format. To simply do so, use the Export button in the top right corner of your software’s main interface. You may also quickly submit the modified audio clip to your YouTube channel. To post and share your audio-altered file right away, go to the YouTube menu bar at the top of your Export window as follows, select Sign in, and then input your YouTube channel in Filmora:

 vMix Pro - Software based live production. vMix Pro includes everything in vMix 4K plus 8 channels of Replay and 8 vMix Call
Conclusion
You may access a variety of tools and services on the platform known as Audacity. You may have all of your recording requirements met here. Additionally, Audacity offers a variety of effects that may be used to improve your recordings and audio files. The fades’ function is used to provide your audio, or any specific area of your audio, various transitions. All of the tools we covered are really good choices. It basically comes down to choosing the one that works best for you; however, we do suggest Filmora over Audacity since it is a lot more straightforward yet powerful tool.
Free Download For macOS 10.14 or later
Step1 Download and Install Filmora
Installing Filmora, a straightforward platform for starting to edit your audio and music files, is the first step. You must first download and install this application on your Windows PC in order to utilize it without problem. Download the most current edition of this application first. It’s now time to install it on your computer when you’ve completed that. Simply install this program on your computer by following the standard setup instructions if you want to do it fast.
Step2 Open Filmora and import audio files
In the step that follows, we’ll show you how to use this platform to fade in and out audio. To begin, open Filmora by clicking on the icon on your desktop or using the search bar.
By choosing the Video Editor option from the software’s home screen, you may now investigate the basic principles of editing. This will bring up the main interface for Filmora. To import your music and video files, just choose the Import button from the software’s main screen, as seen below:
Step3 Open the Audio Editor in Filmora
You must drag the files into Filmora’s timeline after importing your media files, as seen below. You may modify your media files using every tool in the timeline. To utilize Filmora’s audio editor, just right-click on the specific audio file and choose “Edit Audio” from the list:
Step4 Fade-in/fade-out audio
The first step in this process is to learn how to use Filmora to start fading in and out your audio recordings. The best aspect of Filmora is how simple it is to employ these techniques from the timeline. To achieve this, focus on the audio file that you want to change in the timeline; after you’ve picked it, the two icons will show up above the audio file. Drag the first one to the desired duration for the audio fade-in option, as demonstrated:
To finish the fade-out, click and drag the other icon in Filmora to the necessary duration. You may hear the music by playing the file within the timeline of the Filmora preview layout.
Step5 Export the Modified File
The last step consists of downloading your modified file to your PC and storing it there in the appropriate place and format. To simply do so, use the Export button in the top right corner of your software’s main interface. You may also quickly submit the modified audio clip to your YouTube channel. To post and share your audio-altered file right away, go to the YouTube menu bar at the top of your Export window as follows, select Sign in, and then input your YouTube channel in Filmora:
Conclusion
You may access a variety of tools and services on the platform known as Audacity. You may have all of your recording requirements met here. Additionally, Audacity offers a variety of effects that may be used to improve your recordings and audio files. The fades’ function is used to provide your audio, or any specific area of your audio, various transitions. All of the tools we covered are really good choices. It basically comes down to choosing the one that works best for you; however, we do suggest Filmora over Audacity since it is a lot more straightforward yet powerful tool.
- Title: In 2024, Implementing Incremental Noise Reduction Using Audacity
- Author: Jeffrey
- Created at : 2024-08-21 07:43:43
- Updated at : 2024-08-22 07:43:43
- Link: https://some-knowledge.techidaily.com/in-2024-implementing-incremental-noise-reduction-using-audacity/
- License: This work is licensed under CC BY-NC-SA 4.0.