![[New] Flipping Photo Hues A Step-by-Step Guide](https://thmb.techidaily.com/f1294d51d8e0560c6776b360116bd819890055c0bb65c23b15603692f6dffac9.jpg)
"[New] Flipping Photo Hues A Step-by-Step Guide"
Flipping Photo Hues: A Step-by-Step Guide
How to Invert Colors in Digital Photos?

Ollie Mattison
Mar 27, 2024• Proven solutions
During the age of analog photography, the image negative was one of the most important artifacts for photographers, because it enabled them to reproduce a picture as many times as they wanted. Years later photographers invert colors in photos for mostly aesthetical reasons since only a small number of photographers still take photos with analog cameras. Regardless of the type of camera you’re using, inverting colors in a photo is a straightforward process that doesn’t require too much effort. In this article, we are going to take you through some of the best options on Mac and PC computers, as well as Android phones and iPhones that let you invert colors in just a few easy steps. So, let’s dive in.

How to Make Image Negative of a Digital Photo?
The Invert option is commonly used to invert a scanned film negative to color, but this doesn’t’ mean that you can’t use this effect in very different contexts. However, the extensive and unselective use of this effect can ruin a perfect photo. Here’s how you can invert colors in your photos.
1. Inverting Colors with MS Paint
Price: Fee
Compatibility: Windows


Open the photo you’d like to invert with MS Paint, and then choose the Select All option from the Select Menu. Right-click on the picture and click on the Invert Color option. The colors in the image will be automatically inverted, so you can then head over to the Save As submenu in the File menu to select the file format of the new photo.
If you are using Windows XP or an earlier version of the Windows OS, you can invert colors in a photo by clicking on the Invert Colors option in the Image menu. Even though MS Paint lets you invert image colors easily, it is still better to use a more powerful image editor to edit your photos.
2. Using the Preview App
Price: Free
Compatibility: macOS
Besides creating image negatives, the Preview app lets you convert image files as well. Once you open a photo you’d like to invert with the Preview app, you should click on the Tools menu.
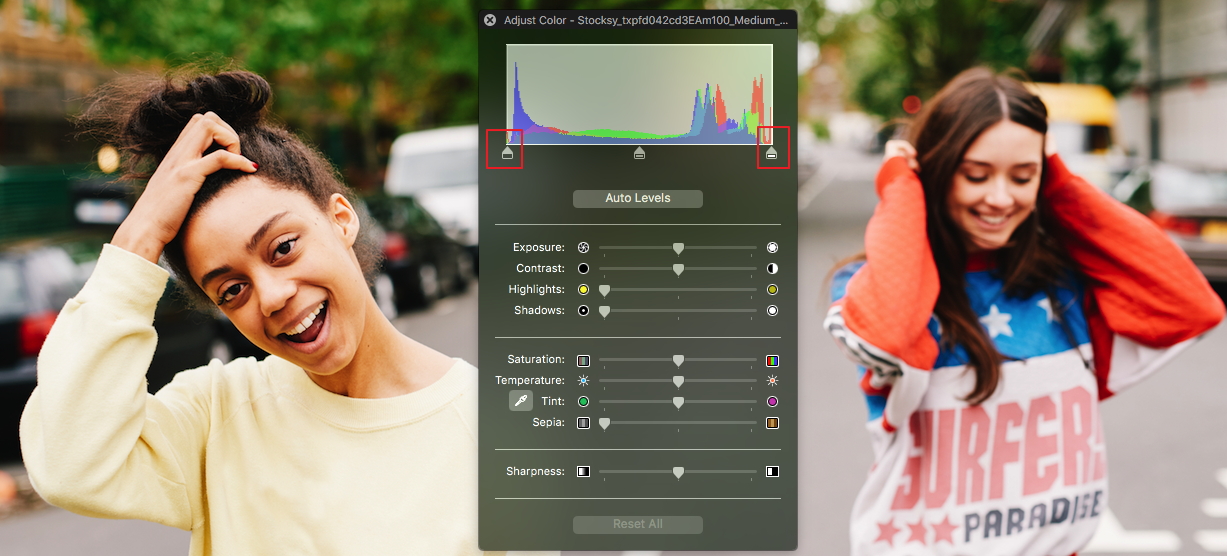
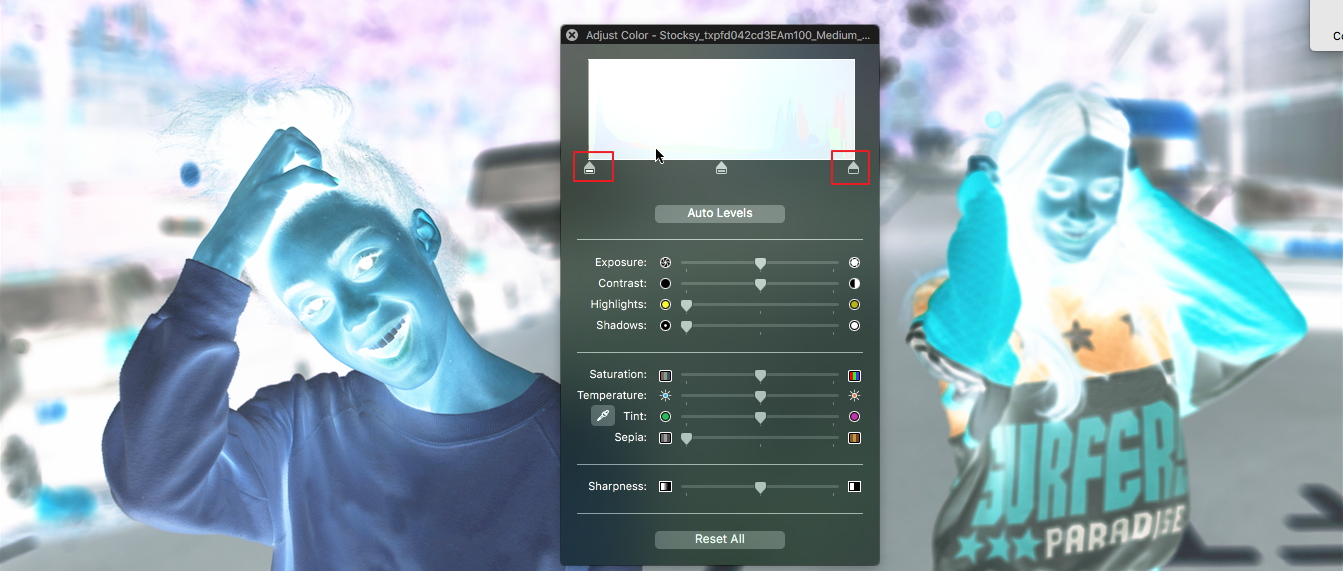
Clicking on the Adjust Color feature will bring up the color adjustment panel that contains Black Level and White Level sliders. To invert the colors in the photo you have to drag the Black Level slider to the right and the White Level Slider to the left.
 Project Manager - Asset Browser for 3Ds Max
You can experiment with the values you assign to each of these sliders in order to get a more visually pleasing result.
3. Making Image Negatives Online with PineTools
Price: Free
Compatibility: Online platform
 Forex Robotron Gold Package
The platform’s homepage contains a number of categories of tools such as Colors, Numbers, Text and Lists or Images. Clicking on the Images category will grant you the access to all photo editing tools PineTools offers, so you just have to click on the Invert Colors options to start the process of inverting a photo online. Once the Invert Colors window loads, you can click on the Choose File button to select a photo you’d like to invert. When the upload is completed, simply click on the Invert button located near the bottom of the screen and the platform will automatically invert the colors in your photo. To save the watermark-free image with inverted colors you just have to click on PNG, JPEG or WEBP file formats that are displayed above the preview of the picture.
4. Inverting colors in tjshome
Price: Free
Compatibility : Online platform

In addition to a rich selection of effects you can apply to images, tjshome also lets you browse through Funny Dumb Laws, Famous Quotes or Funny Status Messages categories. Click on the Image Filter category in order to view all effects the platform offers. Make sure that the Reverse Colors/Negate effect is selected, and then scroll further down the page to upload the photo you’d like to invert. When the upload process is completed, you can check the Make Public checkbox if you want to add your photo to the tjshome’s gallery. Click on the Submit button, and then proceed to save the picture to your computer. This platform lets you invert images in three easy steps, but if you want to have more control over the process, it is better to use a more powerful photo editor.
5. Using Adobe Photoshop
Price: $20.99 as a single app
Compatibility: macOS, Windows
 Forex Robotron Basic Package
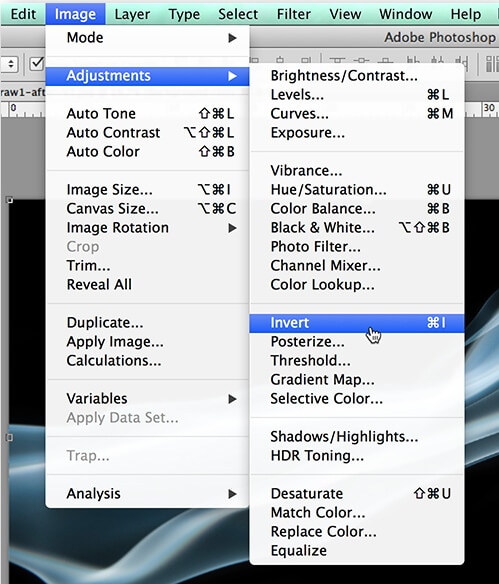
After you open a photo in Adobe Photoshop, you can invert it in just a few clicks. Expand the Image menu and the go-to Adjustments submenu where you can find the Invert option. Alternatively, you can use the CTRL+I shortcut if you are a PC user or a Command+I if you are using a Mac computer. Moreover, Photoshop lets you mask parts of a photo which enables you to precisely define an area of an image you’d like to invert. Other photo editing tools like Curves, Brightness/Contrast or Photo Filter can make an image with inverted colors look more convincing. Keep in mind that working with multiple layers requires a lot of patience because failing to mask an object properly can produce some unwanted side issues.
6. Creating Image Negatives With Gimp
Price: Free
Compatibility: macOS, Windows, Linux
Like Adobe Photoshop, Gimp lets invert the colors in a photo partially. Click on the Color menu, once you open a photo with Gimp, and select the Invert option. Optionally, you can choose the Value Invert option that only inverts the Luminosity of a selected layer while keeping the Hue and Saturation unaltered. In case the image negative is not sharp enough, you can head over to the Filters menu and apply the Unsharp Mask effect to the active layers. Gimp offers a wide range of photo editing tools that enable you to control how bright or vibrant the colors are.
7. Inverting Colors with the Picture Invert
Price: Free, but contains ads
Compatibility: Android
Creating a negative of photos you take with your phone can be fun, so why not use an app that lets you produce an image with inverted colors with a single tap. Picture Invert uses the phone’s camera to capture photos, and the app also lets you select the area of the picture you’d like to invert. You can select a source image from the phone’s gallery and invert pictures you took with other apps or any other type of camera. When you’re done experimenting with the app’s features you can quickly save the photo you created to your phone or share it with your friends on social media.
8. Using the Negative Photo Effect HD
Price: Free, but offers in-app purchases
Compatibility: iOS

Inverting the colors in a photo with Negative Photo Effect HD is easy since you just have to select a photo from the gallery or use the iPhone’s camera to snap a new one and apply the negative photo effect. You can highlight the area of the photo you’d like to invert with your finger or use some of the app’s photo editing tools to enhance the colors in the negative photo. You can save or share the photos you created, but if you use the free version of the app your photos will be watermarked unless you purchase the Free Ads and Watermark package for $2.99.
Conclusion
Inverting colors in a photo is not a complicated process, but finding creative ways to use the negative image effect is since images with inverted colors are best used within a pre-defined context. Do you often create images with inverted colors? Leave a comment below and let us know your favorite method of creating image negatives.

Ollie Mattison
Ollie Mattison is a writer and a lover of all things video.
Follow @Ollie Mattison
Ollie Mattison
Mar 27, 2024• Proven solutions
During the age of analog photography, the image negative was one of the most important artifacts for photographers, because it enabled them to reproduce a picture as many times as they wanted. Years later photographers invert colors in photos for mostly aesthetical reasons since only a small number of photographers still take photos with analog cameras. Regardless of the type of camera you’re using, inverting colors in a photo is a straightforward process that doesn’t require too much effort. In this article, we are going to take you through some of the best options on Mac and PC computers, as well as Android phones and iPhones that let you invert colors in just a few easy steps. So, let’s dive in.
How to Make Image Negative of a Digital Photo?
The Invert option is commonly used to invert a scanned film negative to color, but this doesn’t’ mean that you can’t use this effect in very different contexts. However, the extensive and unselective use of this effect can ruin a perfect photo. Here’s how you can invert colors in your photos.
1. Inverting Colors with MS Paint
Price: Fee
Compatibility: Windows
Open the photo you’d like to invert with MS Paint, and then choose the Select All option from the Select Menu. Right-click on the picture and click on the Invert Color option. The colors in the image will be automatically inverted, so you can then head over to the Save As submenu in the File menu to select the file format of the new photo.
If you are using Windows XP or an earlier version of the Windows OS, you can invert colors in a photo by clicking on the Invert Colors option in the Image menu. Even though MS Paint lets you invert image colors easily, it is still better to use a more powerful image editor to edit your photos.
2. Using the Preview App
Price: Free
Compatibility: macOS
Besides creating image negatives, the Preview app lets you convert image files as well. Once you open a photo you’d like to invert with the Preview app, you should click on the Tools menu.
Clicking on the Adjust Color feature will bring up the color adjustment panel that contains Black Level and White Level sliders. To invert the colors in the photo you have to drag the Black Level slider to the right and the White Level Slider to the left.
You can experiment with the values you assign to each of these sliders in order to get a more visually pleasing result.
3. Making Image Negatives Online with PineTools
Price: Free
Compatibility: Online platform

The platform’s homepage contains a number of categories of tools such as Colors, Numbers, Text and Lists or Images. Clicking on the Images category will grant you the access to all photo editing tools PineTools offers, so you just have to click on the Invert Colors options to start the process of inverting a photo online. Once the Invert Colors window loads, you can click on the Choose File button to select a photo you’d like to invert. When the upload is completed, simply click on the Invert button located near the bottom of the screen and the platform will automatically invert the colors in your photo. To save the watermark-free image with inverted colors you just have to click on PNG, JPEG or WEBP file formats that are displayed above the preview of the picture.
4. Inverting colors in tjshome
Price: Free
Compatibility : Online platform
In addition to a rich selection of effects you can apply to images, tjshome also lets you browse through Funny Dumb Laws, Famous Quotes or Funny Status Messages categories. Click on the Image Filter category in order to view all effects the platform offers. Make sure that the Reverse Colors/Negate effect is selected, and then scroll further down the page to upload the photo you’d like to invert. When the upload process is completed, you can check the Make Public checkbox if you want to add your photo to the tjshome’s gallery. Click on the Submit button, and then proceed to save the picture to your computer. This platform lets you invert images in three easy steps, but if you want to have more control over the process, it is better to use a more powerful photo editor.
5. Using Adobe Photoshop
Price: $20.99 as a single app
Compatibility: macOS, Windows
After you open a photo in Adobe Photoshop, you can invert it in just a few clicks. Expand the Image menu and the go-to Adjustments submenu where you can find the Invert option. Alternatively, you can use the CTRL+I shortcut if you are a PC user or a Command+I if you are using a Mac computer. Moreover, Photoshop lets you mask parts of a photo which enables you to precisely define an area of an image you’d like to invert. Other photo editing tools like Curves, Brightness/Contrast or Photo Filter can make an image with inverted colors look more convincing. Keep in mind that working with multiple layers requires a lot of patience because failing to mask an object properly can produce some unwanted side issues.
6. Creating Image Negatives With Gimp
Price: Free
Compatibility: macOS, Windows, Linux
Like Adobe Photoshop, Gimp lets invert the colors in a photo partially. Click on the Color menu, once you open a photo with Gimp, and select the Invert option. Optionally, you can choose the Value Invert option that only inverts the Luminosity of a selected layer while keeping the Hue and Saturation unaltered. In case the image negative is not sharp enough, you can head over to the Filters menu and apply the Unsharp Mask effect to the active layers. Gimp offers a wide range of photo editing tools that enable you to control how bright or vibrant the colors are.
7. Inverting Colors with the Picture Invert
Price: Free, but contains ads
Compatibility: Android
Creating a negative of photos you take with your phone can be fun, so why not use an app that lets you produce an image with inverted colors with a single tap. Picture Invert uses the phone’s camera to capture photos, and the app also lets you select the area of the picture you’d like to invert. You can select a source image from the phone’s gallery and invert pictures you took with other apps or any other type of camera. When you’re done experimenting with the app’s features you can quickly save the photo you created to your phone or share it with your friends on social media.
8. Using the Negative Photo Effect HD
Price: Free, but offers in-app purchases
Compatibility: iOS
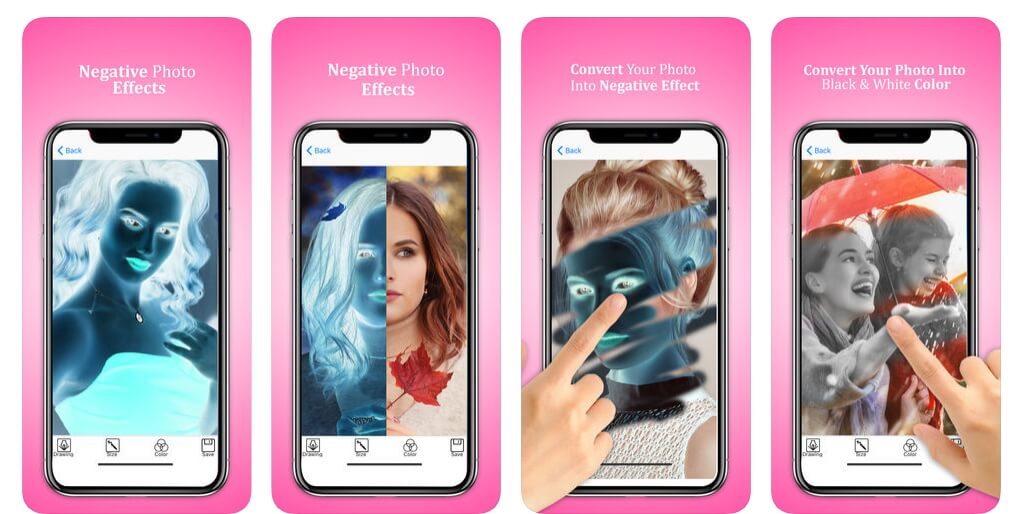
Inverting the colors in a photo with Negative Photo Effect HD is easy since you just have to select a photo from the gallery or use the iPhone’s camera to snap a new one and apply the negative photo effect. You can highlight the area of the photo you’d like to invert with your finger or use some of the app’s photo editing tools to enhance the colors in the negative photo. You can save or share the photos you created, but if you use the free version of the app your photos will be watermarked unless you purchase the Free Ads and Watermark package for $2.99.
Conclusion
Inverting colors in a photo is not a complicated process, but finding creative ways to use the negative image effect is since images with inverted colors are best used within a pre-defined context. Do you often create images with inverted colors? Leave a comment below and let us know your favorite method of creating image negatives.
Ollie Mattison
Ollie Mattison is a writer and a lover of all things video.
Follow @Ollie Mattison
Ollie Mattison
Mar 27, 2024• Proven solutions
During the age of analog photography, the image negative was one of the most important artifacts for photographers, because it enabled them to reproduce a picture as many times as they wanted. Years later photographers invert colors in photos for mostly aesthetical reasons since only a small number of photographers still take photos with analog cameras. Regardless of the type of camera you’re using, inverting colors in a photo is a straightforward process that doesn’t require too much effort. In this article, we are going to take you through some of the best options on Mac and PC computers, as well as Android phones and iPhones that let you invert colors in just a few easy steps. So, let’s dive in.
 SwifDoo PDF 2-Year Plan
How to Make Image Negative of a Digital Photo?
The Invert option is commonly used to invert a scanned film negative to color, but this doesn’t’ mean that you can’t use this effect in very different contexts. However, the extensive and unselective use of this effect can ruin a perfect photo. Here’s how you can invert colors in your photos.
1. Inverting Colors with MS Paint
Price: Fee
Compatibility: Windows
Open the photo you’d like to invert with MS Paint, and then choose the Select All option from the Select Menu. Right-click on the picture and click on the Invert Color option. The colors in the image will be automatically inverted, so you can then head over to the Save As submenu in the File menu to select the file format of the new photo.
If you are using Windows XP or an earlier version of the Windows OS, you can invert colors in a photo by clicking on the Invert Colors option in the Image menu. Even though MS Paint lets you invert image colors easily, it is still better to use a more powerful image editor to edit your photos.
2. Using the Preview App
Price: Free
Compatibility: macOS
Besides creating image negatives, the Preview app lets you convert image files as well. Once you open a photo you’d like to invert with the Preview app, you should click on the Tools menu.
Clicking on the Adjust Color feature will bring up the color adjustment panel that contains Black Level and White Level sliders. To invert the colors in the photo you have to drag the Black Level slider to the right and the White Level Slider to the left.
You can experiment with the values you assign to each of these sliders in order to get a more visually pleasing result.
3. Making Image Negatives Online with PineTools
Price: Free
Compatibility: Online platform
The platform’s homepage contains a number of categories of tools such as Colors, Numbers, Text and Lists or Images. Clicking on the Images category will grant you the access to all photo editing tools PineTools offers, so you just have to click on the Invert Colors options to start the process of inverting a photo online. Once the Invert Colors window loads, you can click on the Choose File button to select a photo you’d like to invert. When the upload is completed, simply click on the Invert button located near the bottom of the screen and the platform will automatically invert the colors in your photo. To save the watermark-free image with inverted colors you just have to click on PNG, JPEG or WEBP file formats that are displayed above the preview of the picture.
4. Inverting colors in tjshome
Price: Free
Compatibility : Online platform
In addition to a rich selection of effects you can apply to images, tjshome also lets you browse through Funny Dumb Laws, Famous Quotes or Funny Status Messages categories. Click on the Image Filter category in order to view all effects the platform offers. Make sure that the Reverse Colors/Negate effect is selected, and then scroll further down the page to upload the photo you’d like to invert. When the upload process is completed, you can check the Make Public checkbox if you want to add your photo to the tjshome’s gallery. Click on the Submit button, and then proceed to save the picture to your computer. This platform lets you invert images in three easy steps, but if you want to have more control over the process, it is better to use a more powerful photo editor.
5. Using Adobe Photoshop
Price: $20.99 as a single app
Compatibility: macOS, Windows
 vMix Basic HD - Software based live production. vMix Basic HD includes 4 inputs, 3 cameras, streaming, recording, playlist.
After you open a photo in Adobe Photoshop, you can invert it in just a few clicks. Expand the Image menu and the go-to Adjustments submenu where you can find the Invert option. Alternatively, you can use the CTRL+I shortcut if you are a PC user or a Command+I if you are using a Mac computer. Moreover, Photoshop lets you mask parts of a photo which enables you to precisely define an area of an image you’d like to invert. Other photo editing tools like Curves, Brightness/Contrast or Photo Filter can make an image with inverted colors look more convincing. Keep in mind that working with multiple layers requires a lot of patience because failing to mask an object properly can produce some unwanted side issues.
6. Creating Image Negatives With Gimp
Price: Free
Compatibility: macOS, Windows, Linux
Like Adobe Photoshop, Gimp lets invert the colors in a photo partially. Click on the Color menu, once you open a photo with Gimp, and select the Invert option. Optionally, you can choose the Value Invert option that only inverts the Luminosity of a selected layer while keeping the Hue and Saturation unaltered. In case the image negative is not sharp enough, you can head over to the Filters menu and apply the Unsharp Mask effect to the active layers. Gimp offers a wide range of photo editing tools that enable you to control how bright or vibrant the colors are.
7. Inverting Colors with the Picture Invert
Price: Free, but contains ads
Compatibility: Android
Creating a negative of photos you take with your phone can be fun, so why not use an app that lets you produce an image with inverted colors with a single tap. Picture Invert uses the phone’s camera to capture photos, and the app also lets you select the area of the picture you’d like to invert. You can select a source image from the phone’s gallery and invert pictures you took with other apps or any other type of camera. When you’re done experimenting with the app’s features you can quickly save the photo you created to your phone or share it with your friends on social media.
8. Using the Negative Photo Effect HD
Price: Free, but offers in-app purchases
Compatibility: iOS
Inverting the colors in a photo with Negative Photo Effect HD is easy since you just have to select a photo from the gallery or use the iPhone’s camera to snap a new one and apply the negative photo effect. You can highlight the area of the photo you’d like to invert with your finger or use some of the app’s photo editing tools to enhance the colors in the negative photo. You can save or share the photos you created, but if you use the free version of the app your photos will be watermarked unless you purchase the Free Ads and Watermark package for $2.99.
Conclusion
Inverting colors in a photo is not a complicated process, but finding creative ways to use the negative image effect is since images with inverted colors are best used within a pre-defined context. Do you often create images with inverted colors? Leave a comment below and let us know your favorite method of creating image negatives.
Ollie Mattison
Ollie Mattison is a writer and a lover of all things video.
Follow @Ollie Mattison
Ollie Mattison
Mar 27, 2024• Proven solutions
During the age of analog photography, the image negative was one of the most important artifacts for photographers, because it enabled them to reproduce a picture as many times as they wanted. Years later photographers invert colors in photos for mostly aesthetical reasons since only a small number of photographers still take photos with analog cameras. Regardless of the type of camera you’re using, inverting colors in a photo is a straightforward process that doesn’t require too much effort. In this article, we are going to take you through some of the best options on Mac and PC computers, as well as Android phones and iPhones that let you invert colors in just a few easy steps. So, let’s dive in.
How to Make Image Negative of a Digital Photo?
The Invert option is commonly used to invert a scanned film negative to color, but this doesn’t’ mean that you can’t use this effect in very different contexts. However, the extensive and unselective use of this effect can ruin a perfect photo. Here’s how you can invert colors in your photos.
1. Inverting Colors with MS Paint
Price: Fee
Compatibility: Windows
Open the photo you’d like to invert with MS Paint, and then choose the Select All option from the Select Menu. Right-click on the picture and click on the Invert Color option. The colors in the image will be automatically inverted, so you can then head over to the Save As submenu in the File menu to select the file format of the new photo.
If you are using Windows XP or an earlier version of the Windows OS, you can invert colors in a photo by clicking on the Invert Colors option in the Image menu. Even though MS Paint lets you invert image colors easily, it is still better to use a more powerful image editor to edit your photos.
2. Using the Preview App
Price: Free
Compatibility: macOS
Besides creating image negatives, the Preview app lets you convert image files as well. Once you open a photo you’d like to invert with the Preview app, you should click on the Tools menu.
 DLNow Video Downloader
Clicking on the Adjust Color feature will bring up the color adjustment panel that contains Black Level and White Level sliders. To invert the colors in the photo you have to drag the Black Level slider to the right and the White Level Slider to the left.
You can experiment with the values you assign to each of these sliders in order to get a more visually pleasing result.
3. Making Image Negatives Online with PineTools
Price: Free
Compatibility: Online platform
The platform’s homepage contains a number of categories of tools such as Colors, Numbers, Text and Lists or Images. Clicking on the Images category will grant you the access to all photo editing tools PineTools offers, so you just have to click on the Invert Colors options to start the process of inverting a photo online. Once the Invert Colors window loads, you can click on the Choose File button to select a photo you’d like to invert. When the upload is completed, simply click on the Invert button located near the bottom of the screen and the platform will automatically invert the colors in your photo. To save the watermark-free image with inverted colors you just have to click on PNG, JPEG or WEBP file formats that are displayed above the preview of the picture.
4. Inverting colors in tjshome
Price: Free
Compatibility : Online platform
 PDF application, powered by AI-based OCR, for unified workflows with both digital and scanned documents.
In addition to a rich selection of effects you can apply to images, tjshome also lets you browse through Funny Dumb Laws, Famous Quotes or Funny Status Messages categories. Click on the Image Filter category in order to view all effects the platform offers. Make sure that the Reverse Colors/Negate effect is selected, and then scroll further down the page to upload the photo you’d like to invert. When the upload process is completed, you can check the Make Public checkbox if you want to add your photo to the tjshome’s gallery. Click on the Submit button, and then proceed to save the picture to your computer. This platform lets you invert images in three easy steps, but if you want to have more control over the process, it is better to use a more powerful photo editor.
5. Using Adobe Photoshop
Price: $20.99 as a single app
Compatibility: macOS, Windows
After you open a photo in Adobe Photoshop, you can invert it in just a few clicks. Expand the Image menu and the go-to Adjustments submenu where you can find the Invert option. Alternatively, you can use the CTRL+I shortcut if you are a PC user or a Command+I if you are using a Mac computer. Moreover, Photoshop lets you mask parts of a photo which enables you to precisely define an area of an image you’d like to invert. Other photo editing tools like Curves, Brightness/Contrast or Photo Filter can make an image with inverted colors look more convincing. Keep in mind that working with multiple layers requires a lot of patience because failing to mask an object properly can produce some unwanted side issues.
6. Creating Image Negatives With Gimp
Price: Free
Compatibility: macOS, Windows, Linux
Like Adobe Photoshop, Gimp lets invert the colors in a photo partially. Click on the Color menu, once you open a photo with Gimp, and select the Invert option. Optionally, you can choose the Value Invert option that only inverts the Luminosity of a selected layer while keeping the Hue and Saturation unaltered. In case the image negative is not sharp enough, you can head over to the Filters menu and apply the Unsharp Mask effect to the active layers. Gimp offers a wide range of photo editing tools that enable you to control how bright or vibrant the colors are.
7. Inverting Colors with the Picture Invert
Price: Free, but contains ads
Compatibility: Android
Creating a negative of photos you take with your phone can be fun, so why not use an app that lets you produce an image with inverted colors with a single tap. Picture Invert uses the phone’s camera to capture photos, and the app also lets you select the area of the picture you’d like to invert. You can select a source image from the phone’s gallery and invert pictures you took with other apps or any other type of camera. When you’re done experimenting with the app’s features you can quickly save the photo you created to your phone or share it with your friends on social media.
8. Using the Negative Photo Effect HD
Price: Free, but offers in-app purchases
Compatibility: iOS
Inverting the colors in a photo with Negative Photo Effect HD is easy since you just have to select a photo from the gallery or use the iPhone’s camera to snap a new one and apply the negative photo effect. You can highlight the area of the photo you’d like to invert with your finger or use some of the app’s photo editing tools to enhance the colors in the negative photo. You can save or share the photos you created, but if you use the free version of the app your photos will be watermarked unless you purchase the Free Ads and Watermark package for $2.99.
Conclusion
Inverting colors in a photo is not a complicated process, but finding creative ways to use the negative image effect is since images with inverted colors are best used within a pre-defined context. Do you often create images with inverted colors? Leave a comment below and let us know your favorite method of creating image negatives.
Ollie Mattison
Ollie Mattison is a writer and a lover of all things video.
Follow @Ollie Mattison
- Title: [New] Flipping Photo Hues A Step-by-Step Guide
- Author: Jeffrey
- Created at : 2024-08-21 09:33:18
- Updated at : 2024-08-22 09:33:18
- Link: https://some-knowledge.techidaily.com/new-flipping-photo-hues-a-step-by-step-guide/
- License: This work is licensed under CC BY-NC-SA 4.0.