![[Updated] Fade To Black In Premiere Pro](https://thmb.techidaily.com/bff355a17bbebb56de3c041755295c5c8bf9f4acf5be59b973b9764a7f77ac05.jpg)
[Updated] Fade To Black In Premiere Pro
Fade To Black In Premiere Pro
Versatile Video Editor - Wondershare Filmora
An easy yet powerful editor
Numerous effects to choose from
Detailed tutorials provided by the official channel
Video editing plays a big role in different types of tasks and projects. Many individuals are spending hours in creating impressive, entertaining, and useful content to engage with audience perfectly. It is the main reason why some people are looking for the best video editors as well. Premiere pro is one of the best editors that can help you edit a video in several ways with the addition of multiple effects and animations. In case you want to make things easier and better, you can focus on its guides and tutorials as well.
When it comes to adding some effects to the videos, fade effects are ruling the choices. Due to it, most of the video editor users are trying to figure out how to fade to black premiere pro. In case you are also interested in gathering information about this particular factor, you should be focused on the upcoming paragraphs. It will help you in several ways.
In this article
01 [What Is Fade To Black?](#Part 1)
02 [How To Fade To Black Premiere Pro?](#Part 2)
03 [Tip: Add Fade To Black In Premiere Pro [Alternative]](#Part 3)

Part 1 What Is Fade To Black?
People who are new to video editing and related activities may not understand or known to the fade to black factor. Mainly, it is a kind of specific fading effect that can be used for keep the video fading until the screen becomes completely black. Most commonly, these types of effects are added to the video ending.
Part 2 How To Fade To Black Premiere Pro?
If you are interested in figure out the complete procedure to add fade to black transition premiere pro with a step-by-step guide, you should check out the following details.
Step1 Firstly, you should add videos to the Premiere pro timeline that you want to feature with fade to black effects
Step2 Now, you should go to the effects tab. You can find out this particular tab in the setting panel available in the left side
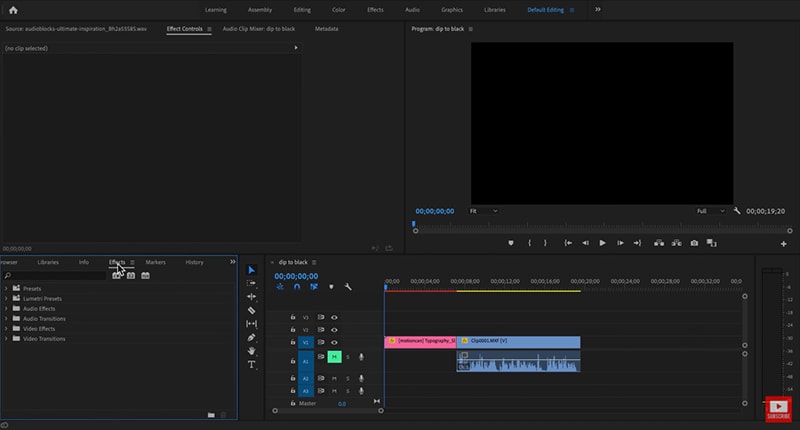
Step3 You can spot a search box in the setting panel; you can use this panel for searching the effect that can create fade to black in video. Here, you need to use the term ‘DIP TO BLACK’
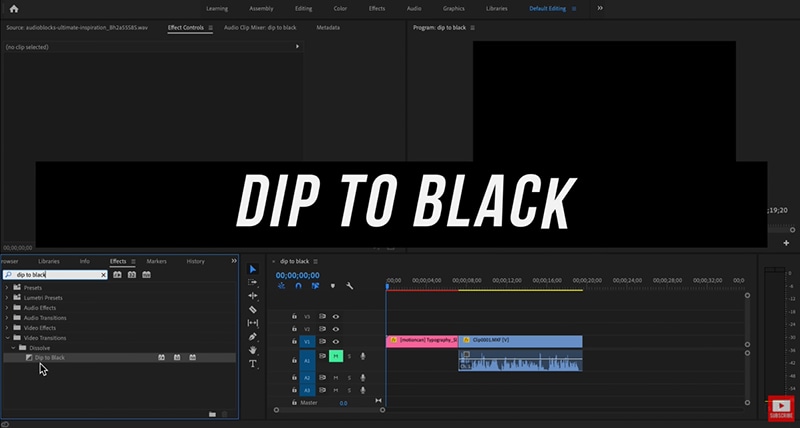
Step4 Searching for the effect will help you get lots of options as well. You should look for the exact match. It will be the effect that can be useful in getting desired results. You can drag that effect directly from the search results to the timeline and position where you want to add it and create a fade to black effect
Step5 In case you are interested in making some changes in the effect or fade out transition, you should click the effect on the timeline. It will open a different panel in the top-left side of the interface
Step6 Sometimes, you may find the transition time too fast in the beginning. Due to it, video may get changed quickly. If you want to improve things, you can drag the ends or effect clip. It will increase black fade time and make smoother
It is the complete procedure that can help you add fade to black effects to the video. Some people are using these types of effects for different positions and places. The most important thing for the premier pro users is that they can put such an effect where they want. There’s nothing can be occurred as a big problem that can make everything difficult for the users. You can put such effects at the beginning of the video, in the ending or to join two different videos. It will work fine in all three situations. By using premiere pro, you can make things good in all conditions.
Part 3 Tip: Add Fade To Black In Premiere Pro [Alternative]
Filmora is the best video editor that can be useful in editing videos in several ways. It has a big library of built-in video effects. According to some records, it contains more than 500 effects. You can pick any of these effects to feature your videos and make things better.
Step-By-Step Procedure
Step1 You should begin by adding some videos to the timeline first
Step2 After adding the videos, you should the menu and options available in the top section. Here, you can see the ‘TRANSITION’ option. You need to click on it
 vMix 4K - Software based live production. vMix 4K includes everything in vMix HD plus 4K support, PTZ control, External/Fullscreen output, 4 Virtual Outputs, 1 Replay, 4 vMix Call, and 2 Recorders.
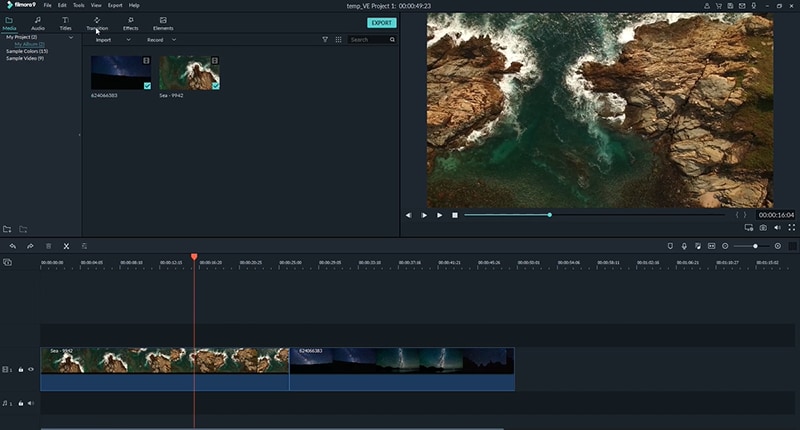
Step3 When you click the transition tab, you can see multiple options in the form of several effects. With these effects, you can see the search bar in the top-right corner of that particular section as well
Step4 You should search for FADE by using that search bar
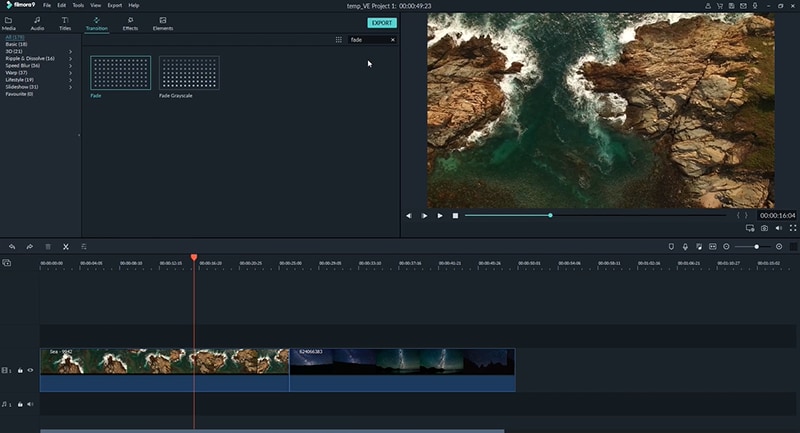
Step5 Searching for fade will lead to some options in front of you. Here, you need to go for fade option and drag it to the timeline. On the timeline, you should place it carefully and wise. You need to be careful with position of effect placement
Step6 In case you want to increase the duration of effect, you can make it possible by extending the dragging or pulling the effect clip
Filmora can be used for adding fade to black effect in multiple places of video. You can use it for adding fade to black effects in the beginning, ending, and in-between of two videos. Using it with two videos will provide a better transition effect. In case you are facing issues while using the Filmora, you can get help from guides or get tutorials online. It will help you understand more clearly that how to use Filmora for video editing and adding effects of fading to black.
Wondershare Filmora
Get started easily with Filmora’s powerful performance, intuitive interface, and countless effects!
Try It Free Try It Free Try It Free Learn More about Filmora>

Final Words
All these details will help you get some clarity to understand the best way to fade to black in premiere pro. In case you have any problem in understanding the procedure or figuring out how to use the video editor, you can check out online tutorials or guides. It will help you get introduced to the required data and easily understand everything. If you are looking for a video editor that can be useful in getting desired editing results in not time, you can consider the option of Filmora. It is used by different types of individuals for serving multiple requirements. It can help you to create any kind of video and edit that as per the requirements.
Video editing plays a big role in different types of tasks and projects. Many individuals are spending hours in creating impressive, entertaining, and useful content to engage with audience perfectly. It is the main reason why some people are looking for the best video editors as well. Premiere pro is one of the best editors that can help you edit a video in several ways with the addition of multiple effects and animations. In case you want to make things easier and better, you can focus on its guides and tutorials as well.
When it comes to adding some effects to the videos, fade effects are ruling the choices. Due to it, most of the video editor users are trying to figure out how to fade to black premiere pro. In case you are also interested in gathering information about this particular factor, you should be focused on the upcoming paragraphs. It will help you in several ways.
In this article
01 [What Is Fade To Black?](#Part 1)
02 [How To Fade To Black Premiere Pro?](#Part 2)
03 [Tip: Add Fade To Black In Premiere Pro [Alternative]](#Part 3)
Part 1 What Is Fade To Black?
People who are new to video editing and related activities may not understand or known to the fade to black factor. Mainly, it is a kind of specific fading effect that can be used for keep the video fading until the screen becomes completely black. Most commonly, these types of effects are added to the video ending.
 PearlMountain Image Converter
Part 2 How To Fade To Black Premiere Pro?
If you are interested in figure out the complete procedure to add fade to black transition premiere pro with a step-by-step guide, you should check out the following details.
Step1 Firstly, you should add videos to the Premiere pro timeline that you want to feature with fade to black effects
Step2 Now, you should go to the effects tab. You can find out this particular tab in the setting panel available in the left side
Step3 You can spot a search box in the setting panel; you can use this panel for searching the effect that can create fade to black in video. Here, you need to use the term ‘DIP TO BLACK’
Step4 Searching for the effect will help you get lots of options as well. You should look for the exact match. It will be the effect that can be useful in getting desired results. You can drag that effect directly from the search results to the timeline and position where you want to add it and create a fade to black effect
Step5 In case you are interested in making some changes in the effect or fade out transition, you should click the effect on the timeline. It will open a different panel in the top-left side of the interface
Step6 Sometimes, you may find the transition time too fast in the beginning. Due to it, video may get changed quickly. If you want to improve things, you can drag the ends or effect clip. It will increase black fade time and make smoother
It is the complete procedure that can help you add fade to black effects to the video. Some people are using these types of effects for different positions and places. The most important thing for the premier pro users is that they can put such an effect where they want. There’s nothing can be occurred as a big problem that can make everything difficult for the users. You can put such effects at the beginning of the video, in the ending or to join two different videos. It will work fine in all three situations. By using premiere pro, you can make things good in all conditions.
Part 3 Tip: Add Fade To Black In Premiere Pro [Alternative]
Filmora is the best video editor that can be useful in editing videos in several ways. It has a big library of built-in video effects. According to some records, it contains more than 500 effects. You can pick any of these effects to feature your videos and make things better.

Step-By-Step Procedure
Step1 You should begin by adding some videos to the timeline first
Step2 After adding the videos, you should the menu and options available in the top section. Here, you can see the ‘TRANSITION’ option. You need to click on it
Step3 When you click the transition tab, you can see multiple options in the form of several effects. With these effects, you can see the search bar in the top-right corner of that particular section as well
Step4 You should search for FADE by using that search bar
 Simple and intuitive video editing
Step5 Searching for fade will lead to some options in front of you. Here, you need to go for fade option and drag it to the timeline. On the timeline, you should place it carefully and wise. You need to be careful with position of effect placement
Step6 In case you want to increase the duration of effect, you can make it possible by extending the dragging or pulling the effect clip
Filmora can be used for adding fade to black effect in multiple places of video. You can use it for adding fade to black effects in the beginning, ending, and in-between of two videos. Using it with two videos will provide a better transition effect. In case you are facing issues while using the Filmora, you can get help from guides or get tutorials online. It will help you understand more clearly that how to use Filmora for video editing and adding effects of fading to black.
Wondershare Filmora
Get started easily with Filmora’s powerful performance, intuitive interface, and countless effects!
Try It Free Try It Free Try It Free Learn More about Filmora>
 With Screensaver Wonder you can easily make a screensaver from your own pictures and video files. Create screensavers for your own computer or create standalone, self-installing screensavers for easy sharing with your friends. Together with its sister product Screensaver Factory, Screensaver Wonder is one of the most popular screensaver software products in the world, helping thousands of users decorate their computer screens quickly and easily.
Final Words
All these details will help you get some clarity to understand the best way to fade to black in premiere pro. In case you have any problem in understanding the procedure or figuring out how to use the video editor, you can check out online tutorials or guides. It will help you get introduced to the required data and easily understand everything. If you are looking for a video editor that can be useful in getting desired editing results in not time, you can consider the option of Filmora. It is used by different types of individuals for serving multiple requirements. It can help you to create any kind of video and edit that as per the requirements.
Video editing plays a big role in different types of tasks and projects. Many individuals are spending hours in creating impressive, entertaining, and useful content to engage with audience perfectly. It is the main reason why some people are looking for the best video editors as well. Premiere pro is one of the best editors that can help you edit a video in several ways with the addition of multiple effects and animations. In case you want to make things easier and better, you can focus on its guides and tutorials as well.
When it comes to adding some effects to the videos, fade effects are ruling the choices. Due to it, most of the video editor users are trying to figure out how to fade to black premiere pro. In case you are also interested in gathering information about this particular factor, you should be focused on the upcoming paragraphs. It will help you in several ways.
In this article
01 [What Is Fade To Black?](#Part 1)
02 [How To Fade To Black Premiere Pro?](#Part 2)
03 [Tip: Add Fade To Black In Premiere Pro [Alternative]](#Part 3)
Part 1 What Is Fade To Black?
People who are new to video editing and related activities may not understand or known to the fade to black factor. Mainly, it is a kind of specific fading effect that can be used for keep the video fading until the screen becomes completely black. Most commonly, these types of effects are added to the video ending.
 The BootIt Collection covers multi-booting, partitioning, and disk imaging on traditional PC’s using the standard BIOS and newer PC’s using UEFI. The collection includes BootIt Bare Metal (BIBM) for standard BIOS systems and BootIt UEFI (BIU) for UEFI system.
Part 2 How To Fade To Black Premiere Pro?
If you are interested in figure out the complete procedure to add fade to black transition premiere pro with a step-by-step guide, you should check out the following details.
Step1 Firstly, you should add videos to the Premiere pro timeline that you want to feature with fade to black effects
Step2 Now, you should go to the effects tab. You can find out this particular tab in the setting panel available in the left side
Step3 You can spot a search box in the setting panel; you can use this panel for searching the effect that can create fade to black in video. Here, you need to use the term ‘DIP TO BLACK’
Step4 Searching for the effect will help you get lots of options as well. You should look for the exact match. It will be the effect that can be useful in getting desired results. You can drag that effect directly from the search results to the timeline and position where you want to add it and create a fade to black effect
Step5 In case you are interested in making some changes in the effect or fade out transition, you should click the effect on the timeline. It will open a different panel in the top-left side of the interface
Step6 Sometimes, you may find the transition time too fast in the beginning. Due to it, video may get changed quickly. If you want to improve things, you can drag the ends or effect clip. It will increase black fade time and make smoother
It is the complete procedure that can help you add fade to black effects to the video. Some people are using these types of effects for different positions and places. The most important thing for the premier pro users is that they can put such an effect where they want. There’s nothing can be occurred as a big problem that can make everything difficult for the users. You can put such effects at the beginning of the video, in the ending or to join two different videos. It will work fine in all three situations. By using premiere pro, you can make things good in all conditions.
Part 3 Tip: Add Fade To Black In Premiere Pro [Alternative]
Filmora is the best video editor that can be useful in editing videos in several ways. It has a big library of built-in video effects. According to some records, it contains more than 500 effects. You can pick any of these effects to feature your videos and make things better.
Step-By-Step Procedure
Step1 You should begin by adding some videos to the timeline first
Step2 After adding the videos, you should the menu and options available in the top section. Here, you can see the ‘TRANSITION’ option. You need to click on it
Step3 When you click the transition tab, you can see multiple options in the form of several effects. With these effects, you can see the search bar in the top-right corner of that particular section as well
Step4 You should search for FADE by using that search bar
Step5 Searching for fade will lead to some options in front of you. Here, you need to go for fade option and drag it to the timeline. On the timeline, you should place it carefully and wise. You need to be careful with position of effect placement
Step6 In case you want to increase the duration of effect, you can make it possible by extending the dragging or pulling the effect clip
Filmora can be used for adding fade to black effect in multiple places of video. You can use it for adding fade to black effects in the beginning, ending, and in-between of two videos. Using it with two videos will provide a better transition effect. In case you are facing issues while using the Filmora, you can get help from guides or get tutorials online. It will help you understand more clearly that how to use Filmora for video editing and adding effects of fading to black.
Wondershare Filmora
Get started easily with Filmora’s powerful performance, intuitive interface, and countless effects!
Try It Free Try It Free Try It Free Learn More about Filmora>

Final Words
All these details will help you get some clarity to understand the best way to fade to black in premiere pro. In case you have any problem in understanding the procedure or figuring out how to use the video editor, you can check out online tutorials or guides. It will help you get introduced to the required data and easily understand everything. If you are looking for a video editor that can be useful in getting desired editing results in not time, you can consider the option of Filmora. It is used by different types of individuals for serving multiple requirements. It can help you to create any kind of video and edit that as per the requirements.
Video editing plays a big role in different types of tasks and projects. Many individuals are spending hours in creating impressive, entertaining, and useful content to engage with audience perfectly. It is the main reason why some people are looking for the best video editors as well. Premiere pro is one of the best editors that can help you edit a video in several ways with the addition of multiple effects and animations. In case you want to make things easier and better, you can focus on its guides and tutorials as well.
When it comes to adding some effects to the videos, fade effects are ruling the choices. Due to it, most of the video editor users are trying to figure out how to fade to black premiere pro. In case you are also interested in gathering information about this particular factor, you should be focused on the upcoming paragraphs. It will help you in several ways.
In this article
01 [What Is Fade To Black?](#Part 1)
02 [How To Fade To Black Premiere Pro?](#Part 2)
03 [Tip: Add Fade To Black In Premiere Pro [Alternative]](#Part 3)
Part 1 What Is Fade To Black?
People who are new to video editing and related activities may not understand or known to the fade to black factor. Mainly, it is a kind of specific fading effect that can be used for keep the video fading until the screen becomes completely black. Most commonly, these types of effects are added to the video ending.
Part 2 How To Fade To Black Premiere Pro?
If you are interested in figure out the complete procedure to add fade to black transition premiere pro with a step-by-step guide, you should check out the following details.
Step1 Firstly, you should add videos to the Premiere pro timeline that you want to feature with fade to black effects
Step2 Now, you should go to the effects tab. You can find out this particular tab in the setting panel available in the left side
 Power Tools add-on for Google Sheets, Lifetime subscription
Step3 You can spot a search box in the setting panel; you can use this panel for searching the effect that can create fade to black in video. Here, you need to use the term ‘DIP TO BLACK’
Step4 Searching for the effect will help you get lots of options as well. You should look for the exact match. It will be the effect that can be useful in getting desired results. You can drag that effect directly from the search results to the timeline and position where you want to add it and create a fade to black effect
Step5 In case you are interested in making some changes in the effect or fade out transition, you should click the effect on the timeline. It will open a different panel in the top-left side of the interface
Step6 Sometimes, you may find the transition time too fast in the beginning. Due to it, video may get changed quickly. If you want to improve things, you can drag the ends or effect clip. It will increase black fade time and make smoother
It is the complete procedure that can help you add fade to black effects to the video. Some people are using these types of effects for different positions and places. The most important thing for the premier pro users is that they can put such an effect where they want. There’s nothing can be occurred as a big problem that can make everything difficult for the users. You can put such effects at the beginning of the video, in the ending or to join two different videos. It will work fine in all three situations. By using premiere pro, you can make things good in all conditions.
Part 3 Tip: Add Fade To Black In Premiere Pro [Alternative]
Filmora is the best video editor that can be useful in editing videos in several ways. It has a big library of built-in video effects. According to some records, it contains more than 500 effects. You can pick any of these effects to feature your videos and make things better.
Step-By-Step Procedure
Step1 You should begin by adding some videos to the timeline first
Step2 After adding the videos, you should the menu and options available in the top section. Here, you can see the ‘TRANSITION’ option. You need to click on it
Step3 When you click the transition tab, you can see multiple options in the form of several effects. With these effects, you can see the search bar in the top-right corner of that particular section as well
Step4 You should search for FADE by using that search bar

Step5 Searching for fade will lead to some options in front of you. Here, you need to go for fade option and drag it to the timeline. On the timeline, you should place it carefully and wise. You need to be careful with position of effect placement
Step6 In case you want to increase the duration of effect, you can make it possible by extending the dragging or pulling the effect clip
Filmora can be used for adding fade to black effect in multiple places of video. You can use it for adding fade to black effects in the beginning, ending, and in-between of two videos. Using it with two videos will provide a better transition effect. In case you are facing issues while using the Filmora, you can get help from guides or get tutorials online. It will help you understand more clearly that how to use Filmora for video editing and adding effects of fading to black.
Wondershare Filmora
Get started easily with Filmora’s powerful performance, intuitive interface, and countless effects!
Try It Free Try It Free Try It Free Learn More about Filmora>
Final Words
All these details will help you get some clarity to understand the best way to fade to black in premiere pro. In case you have any problem in understanding the procedure or figuring out how to use the video editor, you can check out online tutorials or guides. It will help you get introduced to the required data and easily understand everything. If you are looking for a video editor that can be useful in getting desired editing results in not time, you can consider the option of Filmora. It is used by different types of individuals for serving multiple requirements. It can help you to create any kind of video and edit that as per the requirements.
- Title: [Updated] Fade To Black In Premiere Pro
- Author: Jeffrey
- Created at : 2024-08-21 11:37:16
- Updated at : 2024-08-22 11:37:16
- Link: https://some-knowledge.techidaily.com/updated-fade-to-black-in-premiere-pro/
- License: This work is licensed under CC BY-NC-SA 4.0.